


Your vehicle deserves only genuine OEM Honda parts and accessories. To ensure reliability, purchase Honda part # 79310-SR3-A01 Motor Assembly, Fan (W/Fan). It is sometimes referred to as Honda Blower Motor. Our Honda parts and accessories are expedited directly from authorized Honda dealers strategically located all across the U.S. and are backed by the manufacturer's 12 month, 12,000 mile warranty. OEM Honda parts are the best for restoring your vehicle to factory condition performance. This part fits 1994-1997 Honda Accord, 1992-2000 Honda Civic, 1993-1997 Honda Del Sol, 1992-1996 Honda Prelude.
Affordable, reliable and built to last, Honda part # 79310SR3A01 Motor Assembly, Fan (W/Fan) stands out as the smart option. HondaPartsNow.com is your prime online source with the biggest and best selection of genuine Honda parts and accessories at giant discounted prices. We have the OEM Honda parts and accessories you need at the wholesale prices. HondaPartsNow.com has you covered no matter what type of Honda vehicle you drive.
×
My Garage
My Account
My Cart
Make sure this part fits your vehicle
Honda 79310-SR3-A01 Motor Assembly, Fan (W/Fan)
1992-2006 Honda 79310SR3A01
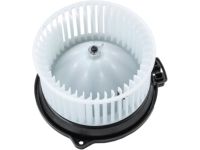


- Part DescriptionBlower Motor
- Replaces79310-SR3-A00
- ManufacturerHonda
$164.07 MSRP: $233.72 1
You Save: $69.65 (30%)
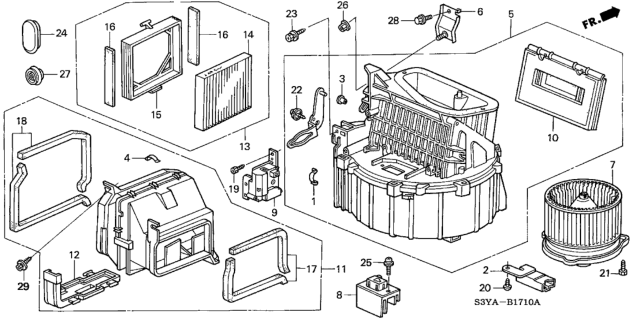
79310-SR3-A01 Motor Assembly, Fan (W/Fan) is Ref No. 7 in the diagram below
Product Specifications
Brand Genuine Honda Manufacturer Part Number 79310-SR3-A01 Part Description Blower Motor Other Names Fan & Motor Item Dimensions 14.3 x 9.8 x 8.9 inches Item Weight 3.70 Pounds Condition New Fitment Type Direct Replacement Replaces 79310-SR3-A00 Manufacturer Honda SKU 79310-SR3-A01 Warranty This genuine Honda part is guaranteed by Honda's factory warranty. Shipping & Return Shipping Policy Return Policy Warning: California’s Proposition 65Vehicle Fitment
View MoreYear Make Model Body & Trim Emission & Transmission 1997 Honda Accord 2 Door EX, 2 Door LX, 2 Door Special, 4 Door DX, 4 Door DX-VP, 4 Door EX, 4 Door EX (V6), 4 Door LX, 4 Door LX (V6), 4 Door Special, 5 Door EX, 5 Door LX KA 4AT, KA 5MT, KL 4AT, KL 5MT 1996 Honda Accord 2 Door EX, 2 Door LX, 4 Door DX, 4 Door EX, 4 Door EX (V6), 4 Door LX, 4 Door LX (V6), 5 Door EX, 5 Door LX KA 4AT, KA 5MT, KL 4AT, KL 5MT 1995 Honda Accord 2 Door EX, 2 Door LX, 4 Door DX, 4 Door EX, 4 Door EX (V6), 4 Door LX, 4 Door LX (V6), 5 Door EX, 5 Door LX KA 4AT, KA 5MT, KL 4AT, KL 5MT 1994 Honda Accord 2 Door DX, 2 Door EX, 2 Door LX, 4 Door DX, 4 Door EX, 4 Door LX, 5 Door EX, 5 Door LX KA 4AT, KA 5MT, KL 4AT, KL 5MT 2000 Honda Civic 2 Door DX, 2 Door EX, 2 Door HX, 2 Door SI, 3 Door CX, 3 Door DX, 4 Door DX, 4 Door DX-VP, 4 Door EX, 4 Door GX, 4 Door LX KA 4AT, KA 5MT, KA CVT, KL 5MT, KL CVT 1999 Honda Civic 2 Door DX, 2 Door EX, 2 Door HX, 2 Door SI, 3 Door CX, 3 Door DX, 4 Door DX, 4 Door DX-VP, 4 Door EX, 4 Door GX, 4 Door LX KA 4AT, KA 5MT, KA CVT, KL 5MT, KL CVT 1998 Honda Civic 2 Door DX, 2 Door EX, 2 Door HX, 3 Door CX, 3 Door DX, 4 Door DX, 4 Door EX, 4 Door GX, 4 Door LX KA 4AT, KA 5MT, KA CVT, KL 4AT, KL 5MT, KL CVT, KW 5MT 1997 Honda Civic 2 Door DX, 2 Door EX, 2 Door HX, 3 Door CX, 3 Door DX, 4 Door DX, 4 Door EX, 4 Door LX KA 4AT, KA 5MT, KA CVT, KL 4AT, KL 5MT, KL CVT, KR 5MT, KW 5MT 1996 Honda Civic 2 Door DX, 2 Door EX, 2 Door HX, 3 Door CX, 3 Door DX, 4 Door DX, 4 Door EX, 4 Door LX KA 4AT, KA 5MT, KA CVT, KL 4AT, KL 5MT, KL CVT, KR 5MT 1995 Honda Civic 2 Door DX, 2 Door EX, 3 Door CX, 3 Door DX, 3 Door SI, 3 Door VX, 4 Door DX, 4 Door EX, 4 Door LX KA 4AT, KA 5MT, KL 5MT
Customer Questions & Answers
- Q:Does this fit my car? Posted by HondaPartsNow Specialist
- A:You can Select Your Vehicle to check if 79310-SR3-A01 fits your vehicle.Posted by HondaPartsNow Specialist
- Q:How Do I Replace or Service the Heater, A/C Switch,Blower Motor and Control Components on a Honda Prelude? Posted by Customer
- A:The SRS system should always be disarmed before performing dash related repairs, otherwise physical injury or component damage could occur. On some models of the Accord and Prelude, removing the blower motor might necessitate taking out the air conditioning evaporator. To access the blower motor, discharging the A/C system might be required. Legal implications associated with discharging A/C systems without the proper EPA certification and equipment suggest that only a Motor Vehicle Air Conditioning (MVAC) trained, and EPA certified technician using approved equipment should service your vehicle's A/C components. If you aren't certified or lack the necessary equipment, have your vehicle's A/C system discharged at an approved repair facility before beginning any repair procedure. For the Accord 1996-97 models, the front blower motor is in the front passenger's right side foot well area. To replace it, if more room is needed, remove the front passenger's right side lower kick panel. Detach the negative battery cable, remove the glove box door and frame. On models without A/C, remove the self-tapping screws from the heater duct. On those with A/C, take out the evaporator. Detach electrical connectors from the blower motor, remove fasteners on its mounting flange, and take the motor out downwards from the blower unit. Installation follows the reverse of the removal process. Check for air leaks afterwards. For the Prelude 1996 models, detach the negative battery cable, take out the glove box and frame, remove the heater duct screws on models without A/C, and for those with A/C, remove the evaporator. Disconnect all electrical connections from the blower motor, remove the blower resistor, recirculation motor, two nuts from the bolts, then pull out the blower unit. Installation follows the removal's reverse process. Again, check for air leaks. Removing the heater core may necessitate taking out the dashboard and the air conditioner evaporator. Only MVAC trained and EPA certified technicians using approved equipment should service the A/C components due to the legal implications. If you choose to service the heater core without the necessary certifications, have the A/C system discharged at an approved facility first. For the heater core procedure: Take your vehicle to an approved facility and discharge the A/C system. Record your vehicle's radio anti-theft code, disconnect the negative battery cable, and let the engine cool if coolant temperature is above 100F. From under the hood, locate the heater control valve on the lower passenger's side firewall area, turn it to the open position, and ensure it's in the full hot position. Drain the engine coolant, remove the heater control valve, place a drain pan below the heater hoses at the firewall, and remove them. Take off the nut attached to the stud through the firewall, then remove the dashboard assembly, heater duct, and heater unit from the firewall. Remove screws and bracket, then take the heater core out of the housing. Installation is the reverse of removal. For the heater water control valve: Turn the ignition switch to ON, set the heater temperature to full hot, then switch OFF. Drain the coolant, or clamp the two heater hoses. Squeeze the hose clamp ends, slide the clamps off the heater valve, place a drain pan below, remove the control valve cable clamp and cable, take out the heater hoses and the control valve. Installation is the reverse of removal. Air Conditioning Components: Repair or service is not covered due to risks of personal injury or death, environmental damage, and legal considerations. Only MVAC trained and EPA certified technicians should service these components. If your vehicle's A/C system uses R-12 refrigerant and needs recharging, it can be converted to R-134a. For control cables: Locate the heater control valve under the hood and disconnect the temperature control cable. Set the climate control temperature to MAXCOOL with the ignition switched ON. Reconnect the cable to the air mix control arm assembly under the dash, ensuring it's flush against the stop. Access the heater control valve under the hood, move the valve arm away from the firewall, attach the cable end, hold the valve arm in the fully closed position, clamp the cable into the heater control valve, and test for operation. For adjustment, open the clamp and disconnect the heater control valve cable from the arm under the hood. Position the temperature control at MAXCOOL, turn the air mix control arm counterclockwise, attach the air mix control cable, snap it into the cable clamp, turn the control valve to the fully closed position, gently pull on the cable housing to remove any slack, and insert the cable into the clamp. For the control panel: Remove the center trim panel, detach the air mix control cable from the heater unit, remove panel retaining screws, pull the heater control panel from the dash, detach the wiring connectors, and then remove the heater control panel. Installation is the reverse of removal.Posted by HondaPartsNow Specialist
If you have any questions about this product, please don't hesitate to ask us. We will be happy to help you!
Genuine Honda Part 79310-SR3-A01, the Right Choice
Why choose Honda Parts Now
- Dedicated Service
Your complete satisfaction is our #1 goal
- Lowest Prices
Best deals on genuine OE parts from dealerships
- Fast Delivery
Orders are processed and delivered promptly