×
My Garage
My Account
My Cart
This part fits the vehicle you selected:
My Vehicle: 5FNRL18614B121947 2004 Honda Odyssey 5 Door EX; KA 5AT
Change VehicleThe vehicle options this part fits:
- Mfg.Origin: USA
Honda 17045-S0X-A32 Module Assembly, Fuel Pump
2002-2004 Honda Odyssey 17045S0XA32
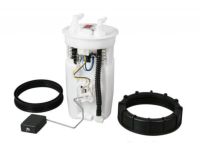


- Part DescriptionModule Assembly, Fuel Pump
- Replaces17045-S0X-A31, 17045-S0X-A30
- ManufacturerHonda
- Manufacturer's NotesThis part is discontinued.
This part fits the vehicle you selected:
5FNRL18614B121947 2004 Honda Odyssey 5 Door EX; KA 5AT
The vehicle options this part fits:
- Mfg.Origin: USA
$373.53 MSRP: $532.11
You Save: $158.58 (30%)
Currently UnavailableDue to manufacturer supply shortage, this item isn’t currently available for ordering.
Product Specifications
| Brand | Genuine Honda |
| Manufacturer Part Number | 17045-S0X-A32 |
| Part Description | Module Assembly, Fuel Pump |
| Item Dimensions | 17.4 x 10.4 x 8.1 inches |
| Item Weight | 3.70 Pounds |
| Condition | New |
| Fitment Type | Direct Replacement |
| Replaces | 17045-S0X-A31, 17045-S0X-A30 |
| Manufacturer | Honda |
| SKU | 17045-S0X-A32 |
| Warranty | This genuine Honda part is guaranteed by Honda's factory warranty. |
| Shipping & Return | Shipping Policy Return Policy |
Warning: California’s Proposition 65
Customer Questions & Answers
- Q:Does this fit my car? Posted by HondaPartsNow Specialist
- A:You can Select Your Vehicle to check if 17045-S0X-A32 fits your vehicle.Posted by HondaPartsNow Specialist
- Q:How Do I Remove and Replace the Fuel Pump/Fuel Level Sending Unit Module on a Honda Odyssey? Posted by Customer
- A:Detach the cable from the negative battery terminal. Relieve the fuel system pressure. Remove the second-row seats, then remove the carpet from the area underneath. Remove the fuel pump access cover screws and remove the fuel pump access cover. Disconnect the fuel pump/fuel level sending unit electrical connector. Disconnect the quick-connect fittings for the fuel supply and return lines and set the fuel lines aside. Remove the fuel pump/fuel level sending unit locknut. This is the special Honda tool for loosening and tightening the fuel pump/fuel level sending unit locknut; if you can obtain one, this is the way to go because it won't damage the plastic locknut. If you're unable to obtain the special Honda tool, you can use a large pair of water pump pliers. Remove the fuel pump/fuel level sending unit module from the tank. Carefully inspect the condition of the seal around the top of the module; if the seal is cracked, torn or deteriorated, replace it. When installing the fuel pump/fuel level sending unit module, install the seal in the hole first. Don't try to install it with the module, which might cause it to become pinched or distorted. Installation is otherwise the reverse of removal. Be sure to tighten the module locknut securely. You can use a torque wrench and tighten the locknut. Reconnect the cable to the negative terminal of the battery.Posted by HondaPartsNow Specialist
- Q:How to replace the Fuel Pump and Fuel Filter on a Honda Odyssey? Posted by Customer
- A:On 2005 and later models, the fuel pump module also contains the fuel pressure regulator. Relieve the system fuel pressure, then disconnect the cable from the negative battery terminal. Remove the fuel pump/fuel level sending unit from the fuel tank. Place the fuel pump/fuel level sending unit module on a clean workbench. Disconnect the return hose from the case. Disconnect the electrical connectors for the fuel pump and for the fuel level sending unit. Separate the bracket and the case. Disconnect the ground wire from its terminal on the side of the fuel filter housing. Disconnect the fuel filter outlet tube from the fuel filter housing. Remove the pump retainer. Remove the rubber isolator. Separate the fuel pump from the fuel filter housing. If you're simply replacing the fuel filter, no further disassembly is necessary. However, we strongly recommend cleaning the fuel inlet strainer and replacing the fuel filter inlet and outlet 0-rings. Remove the fuel inlet sock (strainer) from the fuel pump. Remove the fuel level sending unit from the case. On 2005 and later models, remove the fuel pressure regulator by pulling the retaining clip from the regulator housing. Remove the pressure regulator, its support ring and 0-rings. Replace the O-rings with new ones upon assembly. Before reassembling the fuel pump, fuel filter and fuel level sending unit, wash the fuel strainer thoroughly in clean solvent. If it's impossible to clean, replace it. When installing the strainer on the fuel pump, use a new retainer and make sure that it's firmly seated. Before installing the fuel pump in the fuel filter housing, inspect the condition of the fuel filter inlet and outlet 0-rings. If either 0-ring is cracked, torn or deteriorated, replace it. Also make sure that the spacer at the top of the pump is in place. This spacer insures a tight fit between the pump outlet pipe and the fuel filter inlet 0-ring. If the spacer is damaged or missing, replace it. Installation is otherwise the reverse of removal, but stop when you're done installing the pump. Before installing the fuel pump access cover, reconnect the cable to the negative battery terminal, start the engine and check for fuel leaks at the pump fuel line connections. If there are no leaks, install the access cover, the carpet and the second-row seat.Posted by HondaPartsNow Specialist
- Q:How Can I check the Fuel Pressure and Fuel Pump in My Honda Odyssey? Posted by Customer
- A:Verify that there is fuel in the fuel tank and that the fuel pump actually runs by turning the ignition switch to ON and hearing a brief whirring noise for about two seconds. To measure the fuel pressure, you'll need a fuel pressure gauge capable of reading at least 63 psi (430 kPa), some fuel hose and a suitable double flare fitting and adapter nut. Before disconnecting any fuel line fittings, relieve system fuel pressure, then disconnect the cable from the negative battery terminal. On 2004 and earlier models, disconnect the fuel supply line from the fuel rail hose at the connection at the firewall. On 2005 and later models, the connection point should be at the fuel rail. Connect the fuel pressure gauge to the fuel system, reconnect the battery, turn the ignition switch to ON and start the engine. For 2001 models, disconnect the vacuum hose from the fuel pressure regulator, note the indicated fuel pressure reading on the gauge and compare it with the operating range. Reconnect the vacuum hose to the fuel pressure regulator, note the indicated fuel pressure. If both fuel pressure readings are within the specified range, the system is operating correctly. If the indicated fuel pressure doesn't go up when you disconnect the vacuum line from the regulator, apply vacuum to the pressure regulator with a hand-held vacuum pump and note what happens. If the fuel pressure drops, the regulator is okay, but there's probably a crack or tear in the vacuum hose. Replace the vacuum hose and retest. For 2002 and later models, note the indicated fuel pressure reading on the gauge. If the indicated pressure is within the specified range, the system is operating correctly. If the indicated pressure is higher than the specified range, look for a kinked, pinched or clogged fuel return hose or line. If the indicated pressure is lower than the specified range, the fuel filter might be clogged or the fuel pump might be defective. After the test is complete, relieve the system fuel pressure, then disconnect the cable from the negative battery terminal, remove your fuel pressure testing rig, then reconnect the fuel supply line to the connection at the firewall and reconnect the cable to the negative battery terminal.Posted by HondaPartsNow Specialist
If you have any questions about this product, please don't hesitate to ask us. We will be happy to help you!
Why choose Honda Parts Now
- Dedicated Service
Your complete satisfaction is our #1 goal
- Lowest Prices
Best deals on genuine OE parts from dealerships
- Fast Delivery
Orders are processed and delivered promptly