Honda CRX Parts
- Select Vehicle by VIN
- Select Vehicle by Model
For the most accurate results, search by your VIN (Vehicle Identification Number).
Why choose HondaPartsNow
- Unbeatable Prices
HondaPartsNow.com is your prime online source for discounted prices. We offer high-quality options for your vehicle that can't be found anywhere else. HondaPartsNow.com offers genuine parts at discounted prices, allowing you to keep your vehicle running at its peak without straining your budget.
- Dedicated Service
HondaPartsNow.com ranks second to none in devoted customer service. We strive to exceed the customer's expectations and build relationships with the customers. We are always ready to assist you with any inquiry or detail about your vehicle's parts and accessories.
- Rapid Delivery
HondaPartsNow.com is devoted to combining genuine Honda CRX parts and accessories with fast and affordable shipping. Most items listed in our catalog are in stock and are shipped out promptly after the order has been successfully processed. This guarantees you receive the parts your vehicle needs without needing to leave your home in just a matter of days.
Popular Genuine Honda CRX Parts
- Electrical / Exhaust / Heater / Fuel Parts View More >
- Chassis Parts View More >
- Engine Parts View More >
- Interior / Bumper Parts View More >
- Body / Air Conditioning Parts View More >
- Accessories View More >


Shop Genuine Honda CRX Parts with HondaPartsNow.com
The Honda CRX, also known as the Honda Civic CRX, is a front-wheel-drive sport compact car introduced by the Japanese auto manufacturer Honda in 1983. Often referred to as the "Civic Renaissance Experimental," the CRX was celebrated for its unique sporty design, catering to two passengers with an optional 2+2 seating arrangement. At its inception, the CRX was available in two distinct models: an economy version with a 1.3-liter CVCC engine, and a sports variant featuring an aluminum 1.5-liter four-cylinder engine. Buyers could choose between a 5-speed manual or a 3-speed automatic transmission. Measuring 3675 mm in length, 1625 mm in width, and 1290 mm in height, the CRX was compact yet potent. The model saw changes in 1985, as the economy version was replaced with a High Fuel model featuring an enhanced 1.5-liter engine. The same year, a new Si variant was introduced, boasting a more powerful SOHC PGM-FI engine, 13-inch alloy wheels, and a powered roof. In 1988, the CRX underwent a complete redesign, featuring a longer wheelbase and wider body. Enhancements included a unique black glass panel to improve rear visibility and a new 4-wheel double-wishbone suspension, improving handling and cargo space. By the time the Honda CRX del Sol replaced the original CRX in 1992, the model had offered an array of advanced engines for drivers seeking high performance. Despite the introduction of the del Sol, the CRX's enduring popularity led many to consider the del Sol as the CRX's third generation.
While the sporty and compact Honda CRX is a favorite among drivers, its performance can diminish over time and with exposure to various road conditions, leading to common issues like engine problems and braking and suspension system failures. Owners have reported that around the 110,000-mile mark, the engine may exhibit hard starting or fail to start, accompanied by hesitant acceleration, decreased fuel economy, visible white or grey oil smoke, and unusual engine sounds. Should these symptoms occur, it's wise to check the oil filter, timing cover, rod bearing, and piston ring set. In terms of braking and suspension, drivers have noted issues such as an unusual brake pedal feel, strange braking sounds, loose parking brakes, often traced back to a faulty brake drum. Suspension-related complaints include vibrations, poor handling, loose steering wheel, uneven tire wear, and grinding noises while turning, usually associated with the steering knuckle, ball joint, and coil spring insulator. Beyond regular maintenance, keeping aesthetic elements like emblems intact also contributes to the vehicle's overall appeal. Lastly, maintaining functioning headlights and wiper blades is crucial for safety, ensuring clear vision in different light conditions and weather, making these components integral to your maintenance routine.
Original equipment manufacturer parts deliver the superb performance and provide top-class durability. That's because they use Honda's official manufacturing techniques, use high-grade materials, and meet the rigorous standards of quality. Feel free to browse our extensive catalog of genuine Honda CRX parts, like Transmission - Automatic, Transmission - Manual, available at the highly economical prices on HondaPartsNow.com. All of our OEM Honda CRX parts come with a manufacturer's warranty, ensuring your peace of mind. Moreover, we offer a no-hassle return policy and speedy delivery service. Shop confidently with us today!
Honda CRX Parts Questions & Answers
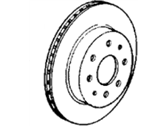
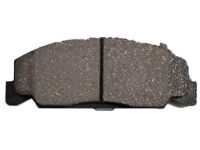
- Q: How is the Brake Caliper,Brake Disc and Brake Pad removed, inspected, and installed?A: The disc brake system includes components like brake pads, a caliper, and a rotor. The caliper forces the brake pads to squeeze the rotor, stopping the vehicle. To remove and install the components, lift and support the vehicle on a jack stand, the wheel assembly removed, and the brake hose disconnected.
- Q: What are the steps involved in their removal, inspection, and installation Brake Caliper,Brake Disc and Brake Pad?A: The disc brake system consists of brake pads, the caliper, and the rotor. To replace brake pads, remove the lower caliper retaining bolt and pad components. If the caliper needs overhauling, remove it from the vehicle and its components disassembled. To remove the brake disc, support and raise it, remove the caliper assembly and the retaining screw. To install, reverse the removal process and inspect the disc for scores, run out, and parallelism.
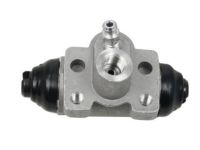
- Q: How Do You Remove and Assemble a Brake Drum,Brake Shoe and Wheel Cylinder?A: To remove the drum, lift the vehicle, remove the rear wheel and tire, and then the drum. Check the drum for cracks and the shoe for wear. To remove the shoes, lift the vehicle, remove the wheel, tire, and brake drums, remove the pins, lower the brake shoe assembly, disconnect the parking brake cable, remove the upper return spring, self-adjuster lever, and spring, and separate the shoes. To remove the wheel cylinder, lift the vehicle, remove the tire, wheel, brake drum, and shoes, disconnect the parking brake cable and brake lines, and remove the wheel cylinder. When reassembling, grease the wheel cylinder piston grooves and backing plate surfaces, and apply brake fluid to the pistons, piston cup, and cylinder walls.