Your vehicle deserves only genuine OEM Honda parts and accessories. To ensure reliability, purchase Honda part # 44306-TR0-A02 Driveshaft Assembly, Driver Side. It is sometimes referred to as Honda Axle Shaft. Our Honda parts and accessories are expedited directly from authorized Honda dealers strategically located all across the U.S. and are backed by the manufacturer's 12 month, 12,000 mile warranty. OEM Honda parts are the best for restoring your vehicle to factory condition performance. This part fits 2012-2015 Honda Civic.
Affordable, reliable and built to last, Honda part # 44306TR0A02 Driveshaft Assembly, Driver Side stands out as the smart option. HondaPartsNow.com is your prime online source with the biggest and best selection of genuine Honda parts and accessories at giant discounted prices. We have the OEM Honda parts and accessories you need at the wholesale prices. HondaPartsNow.com has you covered no matter what type of Honda vehicle you drive.
×
My Garage
My Account
My Cart
Make sure this part fits your vehicle
Honda 44306-TR0-A02 Driveshaft Assembly, Driver Side
2012-2015 Honda Civic 44306TR0A02
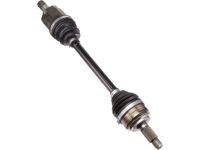


- Part DescriptionAxle Assembly
- PositionDriver Side
- Replaces44306-TR0-A02RM
- ManufacturerHonda
$255.89 MSRP: $364.52 1
You Save: $108.63 (30%)
44306-TR0-A02 Driveshaft Assembly, Driver Side is Ref No. 2 in the diagram below
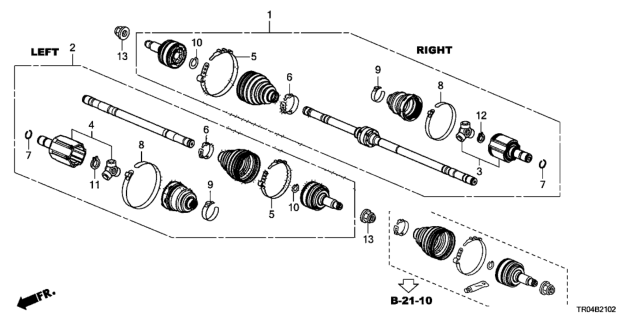
 Band, Joint Boot (Double Rolled Band)44327-SV4-305
 Band, Outboard Boot44317-S6D-E01
 Band, Outboard Boot (Gkn)44318-S6D-E21
 Band, Shaft Boot (Double Rolled Band)44329-SV4-305
 Circlip44338-SNE-A01
 Joint, Inboard44310-TR0-A11
 Nut, Spindle (22MM)90305-692-010
 Ring B, Stopper44337-S6D-E01
 Set-Ring (26X1.8) (Gkn)44319-SR1-003
Product Specifications
Brand Genuine Honda Manufacturer Part Number 44306-TR0-A02 Part Description Axle Assembly Item Dimensions 29.9 x 5.6 x 5.4 inches Item Weight 12.10 Pounds Position Driver Side Condition New Fitment Type Direct Replacement Replaces 44306-TR0-A02RM Manufacturer Honda SKU 44306-TR0-A02 Warranty This genuine Honda part is guaranteed by Honda's factory warranty. Shipping & Return Shipping Policy Return Policy Warning: California’s Proposition 65Vehicle Fitment
Year Make Model Body & Trim Emission & Transmission 2015 Honda Civic 4 Door GX KA 5AT 2014 Honda Civic 4 Door GX KA 5AT 2013 Honda Civic 2 Door EX, 2 Door EX-L, 2 Door LX, 4 Door EX, 4 Door EX-L, 4 Door GX, 4 Door HF, 4 Door LX KA 5AT, KL 5AT 2012 Honda Civic 2 Door DX, 2 Door EX, 2 Door EX-L, 2 Door LX, 4 Door DX, 4 Door EX, 4 Door EX-L, 4 Door GX, 4 Door HF, 4 Door LX, 4 Door LX (AT) KA 5AT, KL 5AT
Customer Questions & Answers
- Q:Is this part a direct fit for my VIN#? Posted by HondaPartsNow Specialist
- A:You can Select Your Vehicle to check if 44306-TR0-A02 fits your vehicle.Posted by HondaPartsNow Specialist
- Q:How Do I Remove and Install the Front and Rear Driveaxles on a Honda CR-V or Civic? Posted by Customer
- A:Loosen the front wheel lug nuts, raise the vehicle and support it securely on jackstands. Remove the wheel. Unstake the axle shaft/hub nut with a punch or chisel. Loosen the axle shaft/hub nut with a large socket and breaker bar, then remove the axle shaft/hub nut from the axle and discard it. Separate the balljoint from the control arm. Swing the knuckle/hub assembly out until the end of the axle shaft is free of the hub. Support the outer end of the axle shaft with a piece of wire to avoid unnecessary strain on the inner CV joint. If the axle shaft splines stick in the hub, tap on the end with a plastic hammer. Remove the engine lower splash shield. Place a drain pan under the transaxle to catch any oil that may run out. Pry the inner CV joint out of the transaxle using a large screwdriver or prybar. Avoid pulling on the axle shaft to remove it or the inner CV joint could come apart. Pry the inner CV joint straight out to prevent damage to the seal. Support the CV joints and carefully remove the axle shaft from the vehicle. Installation: Pry the old spring clip from the inner end of the axle shaft and install a new one. Installation is the reverse of removal, noting: apply a film of multi-purpose grease around the splines of the joints; when installing the axle shaft, hold it straight out, then push it in sharply to seat the spring clip; clean all foreign matter from the CV joint threads and coat the splines with grease. Guide the axle shaft into the hub splines and install the new axle shaft/hub nut. Reconnect the balljoint to the control arm, tighten the fasteners, and add transaxle lubricant if needed. Intermediate shaft Removal: Loosen the right front wheel lug nuts, raise the vehicle and support it securely on jackstands. Remove the wheel. Remove the engine lower splash shield. Separate the lower control arm from the steering knuckle. Pry the axle shaft inner CV joint from the intermediate shaft and remove the set-ring from the end. Use a jack to support the engine, then remove the lower torque rod bolts and bracket. Remove the cover from the crankshaft position sensor. Remove the bearing support mounting bolts and slide the intermediate shaft out of the transaxle. Check the support bearing for smooth operation by turning the shaft. Installation: Install a new spring clip on the end of the intermediate shaft. Lubricate the lips of the transaxle seal with grease. Carefully guide the intermediate shaft into the transaxle side gear and install the mounting bolts for the bearing supportRear(4WD CR-V models) Removal: Remove the wheel cover or hub cap. Loosen the wheel lug nuts. Unstake the Axle Shaft/hub nut, then break it loose with a socket and large breaker bar. Raise the rear of the vehicle and support it on jackstands. Remove the wheel and the Axle Shaft/hub nut. Make reference marks where the rear driveshaft connects to the pinion flange. Remove the four bolts and separate the driveshaft from the pinion flange. Disconnect the electrical connectors and breather hoses from the differential housing. Support the rear differential housing with a jack. Remove and discard the fasteners from the differential mounting brackets. Remove the bolts and circular plates that fasten the upper bracket to the floorpan. Lower the jack ensuring all connections are disconnected. Pry the inner CV joints from the differential housing. Pull on the outer CV joint to remove it from the rear hub.Installation: Pry the old set-ring from the inner end of the Axle Shaft and install a new one. Apply grease to the outer CV joint splines and insert into the hub. Raise the differential and insert the splined end of both inner CV joints into the differential. The remainder of installation is the reverse of removal. When installing the upper bracket to the floorpan, rotate the circular plates to align with the tabs on the rubber bushings. Use all new fasteners when installing the mounting brackets. Install the brackets on the differential housing first and tighten. Install a new Axle Shaft/hub nut and tighten after lowering the vehicle. Check the differential lubricant, adding as necessary. Use a new sealing washer on the fill plug.Posted by HondaPartsNow Specialist
If you have any questions about this product, please don't hesitate to ask us. We will be happy to help you!
Genuine Honda Part 44306-TR0-A02, the Right Choice
Why choose Honda Parts Now
- Dedicated Service
Your complete satisfaction is our #1 goal
- Lowest Prices
Best deals on genuine OE parts from dealerships
- Fast Delivery
Orders are processed and delivered promptly