My Garage
Cart
Make sure this part fits

Honda 53040-SB2-737 Box, Steering Gear (Yamada)

1985-1986 Honda CRX 53040SB2737

Customer Questions & Expert Answers (3)
53040-SB2-737 Honda Box, Steering Gear (Yamada) Illustration 1 of 1
  • Part Description
    Box, Steering Gear (Yamada)
  • Replaced By
    53040-SB2-738
  • Manufacturer
    Honda
Make sure this part fits
$576.16 MSRP: $831.41
You Save: $255.25 (31%)
1
ADD TO CART
  • Related Parts
  • Product Specifications
  • Vehicle Fitment
  • Customer Questions & Expert Answers
  • Product Specifications

    BrandGenuine Honda
    Manufacturer Part Number53040-SB2-737
    Part DescriptionBox, Steering Gear (Yamada)
    Item Dimensions28.7 x 6.6 x 5.9 inches
    Item Weight8.60 Pounds
    ConditionNew
    Fitment TypeDirect Replacement
    ManufacturerHonda
    SKU53040-SB2-737
    WarrantyThis genuine Honda part is guaranteed by Honda's factory warranty.
    Shipping & ReturnShipping Policy Return Policy
    Warning: California's Proposition 65
  • Vehicle Fitment

    Year Make Model Body & Trim Emission & Transmission
    1986 Honda CRX2 Door DX, 2 Door SIKA 4AT, KA 5MT, KL 4AT, KL 5MT
    1985 Honda CRX2 Door DX, 2 Door SIKA 3AT, KA 5MT, KL 3AT, KL 5MT
  • Customer Questions & Expert Answers

    Q:
    Will this part fit my vehicle? Posted by HondaPartsNow Specialist
    A:
    You can Select Your Vehicle to check if 53040-SB2-737 fits your vehicle.
    Posted by HondaPartsNow Specialist
    Q:
    How to remove and overhaul a Rack and Pinion assembly on a Honda CRX? Posted by Customer
    A:
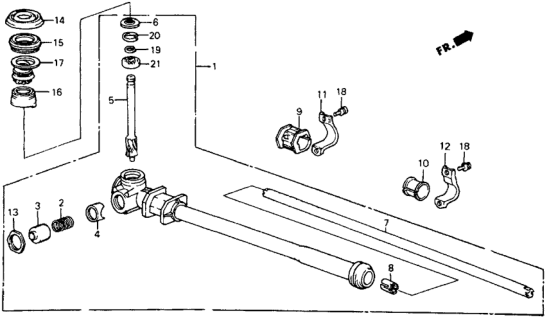
    Remove the steering rack splash shield if equipped, then loosen the rack guide adjusting locknut. Tighten the adjusting screw until it compresses the spring and seats against the guide, then loosen it. Torque it to 35 inch lbs., then back it off 20°. Hold it in that position while adjusting the locknut to 18 ft. lbs. (25 Nm). Recheck the play and move the wheels lock-to-lock to ensure the rack moves freely. Disconnect the negative battery cable, raise the vehicle, and support it safely. Remove the cover panel and steering joint cover, unbolt and separate the steering shaft at the coupling. Drain the power steering fluid by disconnecting the return hose at the box and running the engine while turning the steering wheel lock to lock until fluid stops draining. Remove the gearbox shield if equipped and the front wheels. Remove the cotter pins and unscrew the castle nuts on the tie rod ends, then use a ball joint tool to disconnect the tie rod ends and lift them out of the steering knuckles. If equipped with a manual transaxle, disconnect the shift lever torque rod from the clutch housing, slide the pin retainer out of the way, drive out the spring pin, and disconnect the shift rod. For automatic transaxle, remove the shift cable guide from the floor and pull the shift cable down by hand. Remove the two nuts connecting the exhaust header pipe to the exhaust pipe and remove the exhaust header pipe. Disconnect the three hydraulic lines from the control unit. Slide the tie rod ends all the way to the right and remove the steering rack mounting bolts. Drop the gearbox far enough to permit the end of the pinion shaft to come out of the hole in the frame channel, then rotate it forward until the shaft is pointing rearward. Slide the gearbox to the right until the left tie rod clears the beam, then drop it down and out of the vehicle. Installation is the reverse of removal, torquing the mounting bracket bolts to 29 ft. lbs. (40 Nm). If equipped with a manual transaxle, reinstall the pin retainer after driving in the pin and ensure the projection on the pin retainer is in the hole. Reconnect the fluid lines, tightening the line from the pump to 28 ft. lbs. (38 Nm), the line to the reservoir to 9 ft. lbs. (13 Nm), and the line to the oil cooler to 20 ft. lbs. (29 Nm). Fill the system with fluid and bleed the air from the system. For overhaul, remove the steering rack assembly from the vehicle and support it in a bench vise. Remove the valve body assembly from the gearbox housing, ensuring to take out the O-rings and port orifices. Remove the tie rods from the rack by unbending the lock washers and unscrewing the tie rods. Push the right end of the rack into the housing to avoid scratching the sliding surface, loosen the rack screw locknut, and remove the rack guide from the housing. Remove the 28mm snap ring from the bottom of the housing, then tap the pinion lightly with a plastic mallet to remove it. The pinion bearing can be removed if it shows signs of wear using a bearing puller. Remove the four bolts from the end of the rack cylinder housing and slide the cylinder housing off of the rack. Remove the O-ring, back-up ring, steering rack bushing A, and cylinder spring from the cylinder housing, and carefully remove the end seal. Remove the cylinder, cylinder seal retainer, cylinder cap, and steering rack from the housing, along with the retainer washer from the gear housing. Check the upper pinion bearing for free play and replace it if excess free play is evident. Remove the cylinder and seal retainer from the rack, then take out the O-rings and circlip from the seal retainer before removing the cylinder cap. Remove the bushing stopper and cylinder end seal from the seal retainer, and carefully pry the piston seal ring from the rack. Inspect all sliding surfaces for signs of wear, the rack for broken teeth, the pinion assembly for broken teeth, and the main housing, cylinder, and seal retainer for any signs of wear. Replace all O-rings and any damaged snap rings, checking all bearings for excessive free play and replacing any that are damaged. Lubricate all sliding pieces with power steering fluid before assembly unless otherwise noted. Install a new O-ring on the rack with its narrow edge facing out, then install a piston seal guide tool onto the rack big end first. Position the new piston seal ring on the tool and slide it onto the big end of the tool and onto the O-ring on the rack before removing the tool. Coat new O-rings with grease and install them on the cylinder cap, then slide the cylinder cap onto the seal retainer and install the circlip. Grease the sliding surface of the steering rack bushing and install it on the steering rack with the groove facing the steering rack piston. Grease the sliding surface of the cylinder end seal and slide it onto the rack with the grooves facing opposite the seal slider, then attach the seal retainer to the rack. Push the rack bushing to the seal retainer until the cylinder end seal is seated in the retainer, then install the stopper ring in the groove of the seal retainer. Install the retainer washer on the gear housing, place the gear housing on a workbench, and insert the rack and seal retainer assembly into the housing. Coat the inside of the cylinder with power steering fluid and slide it over the rack assembly, pressing it into the housing until it seats. Install the cylinder spring over the rack, then coat the rack bushing with power steering fluid and install it on the spring. Coat the inside surface of the cylinder with power steering fluid and install the cylinder end seal with the groove facing out. Install the O-ring and back-up ring on the gear housing, carefully position the cylinder on the gear housing, and loosely install the four bolts. Install the steering rack into the cylinder housing, being careful not to damage the rack, then tighten the cylinder housing bolts to 16 ft. lbs. (22 Nm). Press the lower bearing onto the pinion with its shielded side facing down, apply a light coating of grease, and install the 28mm snap ring. Grease the pinion seal and install it on the gear housing using a seal driver. Apply grease to the O-ring and install it in the groove in the housing cap, then install the gear housing cap over the pinion and tighten the flange bolts to 8 ft. lbs. (11 Nm). Install the valve body on the assembly, coat the rack guide with grease, and install the rack guide assembly into the housing. Screw in each of the tie rods to the rack while holding the lock washer so that its tabs are aligned with the slots in the rack, then install the stopper washer with the chamfered side facing out. Tighten the tie rod securely, bend the lock washer back onto the flange, install the bellows over the end of the rack housing, and install the retaining clamp. Finally, install the tie rod ends on the tie rods and fill the tie rod boots with grease before installing the rack into the vehicle and connecting the power steering lines, adjusting the rack as needed.
    Posted by HondaPartsNow Specialist
    Q:
    How to Raise, Support, and Adjust the Rack and Pinion on a Honda CRX? Posted by Customer
    A:
    Support the vehicle and raise it, then turn the steering wheel using a suitable spring gauge and check the reading and if it's greater than 3.3lbs. adjust the steering gear as outlined. Put front wheels in straight ahead position, loosen rack screw locknut, check for tight or loose steering throughout the complete turning travel and recheck steering effort. Ensure that toe play is less than 0.4 in. (10mm) and lower the vehicle and measure the distance the steering wheel can be turned without moving the front wheels. If that distance exceeds 0.4 in. (10mm), check all steering components. Raise the vehicle and support it, remove the cover panel and steering joint cover, unbolt and separate the steering shaft at the coupling; remove the front wheels. Using a ball joint tool disconnect the tie rod ends and remove the cotter pins, loosen the castle nuts and lift out of the steering knuckles. For manual transaxle, remove the shift lever torque rod by disconnecting the shift lever from the clutch housing, slide the pin retainer out of the way, drive out the spring pin; remove shift rod if equipped with automatic transaxles, remove the shift cable guide from the floor and pull the shift cable down manually. Remove the two nuts from the exhaust header pipe and exhaust pipe and move the exhaust pipe out of the way. Pull the rack over to far right and remove the brackets or mounting bolts, then push the tie rod ends to the right until they sit as far away from the shock as possible. Lower the rack far enough so that you can pull the end of the pinion shaft out of the hole in the frame channel and rotate it forward, so that it's coming out rearward. Using it to slide the axle rack to the right so the left tie rod passes over the exhaust pipe; then drop it down and out of the vehicle to the left. To install, position rack into vehicle, torque mounting bolts to 29 lbs (40 Nm), connect exhaust pipe with new gasket, reconnect shift linkage and tension as required, install tie rod ends into steering knuckle, torque nuts to 32 ft. lbs (44 Nm), then tighten as required to install new cotter pin and connect steering shaft coupling, torquing bolt to 22 ft. lbs (30 Nm). To overhaul, pull the bellows (at each end of the rack), loosen band that retains bellows on rack, remove rack (rack and pinion) from vehicle, and support rack (rack and pinion) in bench vise. To remove the tie rods on the end of the rack use a 17mm wrench to remove the tie rods, and a 22mm wrench to hold the rack. Carefully remove the lock nut securing the rack guide components and remove the pieces from the rack body, but not the spring. Remove the pinion assemby dust seal and remove the snapring that holds the pinion assembly and withdraw the pinion through the gearbox body sliding the rack out of the the gearbox body, remove the snapring that holds the pinion assembly. Inspect the pinion assembly for wear, scoring or damaged teeth, replacing if needed. Freedom to move the pinion bearing, and any indication of balls damaged should be inspected; if there is a damaged ball in the pinion bearing, the pinion assembly must be replaced. The rack is inspected to determine if it has excessive wear or damaged teeth (if so it is replaced) and the rack guide is checked for scoring and the steering gear housing for cracking or damage to the pinion bore. Apply a thin coat of grease to the rack end bushing and install as shown in Figure 6. Carefully slick the rack with grease and slide into the housing so as not to damage the housing surface. Install the pinion assembly into the housing and the 35mm snapring to hold the pinion, and then the pinion dust seal. Install rack guide components into housing; if required, adjust rack guide screw after rack installation, and grease rack guide. Place each of the tie rods into the rack and screw in while holding the lock washer to get the tabs of the lock washer aligned in the slots of the rack, set in the stopper washer with with the chamfered side facing out, tighten the tie rod well and bend the lock washer back on to the flange. Install the bellows over the end of the rack housing and the retaining clamp, install the tie rod ends on the tie rods filling the tie rod boots with grease, then install the rack into the vehicle and adjust.
    Posted by HondaPartsNow Specialist
    If you have any questions about this product, please don't hesitate to ask us. We will be happy to help you!

Genuine Honda Part 53040-SB2-737, the Right Choice

To ensure reliability, purchase Honda part # 53040-SB2-737 Box, Steering Gear (Yamada). It is sometimes referred to as Honda Rack And Pinion, Honda Steering Gear Box. In terms of quality, OEM parts are the wise choice for Honda owners who want to keep their vehicles at peak performance. They are manufactured to follow official strict factory specifications and are made in world-class facilities. They undergo rigorous tests to ensure that they are durable and safe to use. This part fits 1985-1986 Honda CRX.

HondaPartsNow.com is a leading supplier of genuine Honda parts and accessories such as Honda 53040SB2737 Box, Steering Gear (Yamada). When it comes to choosing the right parts for your vehicle, the solution is simple: shop from our wide selection of genuine Honda parts at competitive prices available on HondaPartsNow.com. We prioritize your convenience, 100% satisfaction, and peace of mind by offering a user-friendly catalog, manufacturer-warranted OEM Honda parts, a hassle-free return policy, and swift delivery service.

Why choose Honda Parts Now

  • Dedicated Service

    Your complete satisfaction is our #1 goal

  • Lowest Prices

    Best deals on genuine OE parts from dealerships

  • Fast Delivery

    Orders are processed and delivered promptly