×
- Hello
- Login or Register
- Quick Links
- Live Chat
- Track Order
- Parts Availability
- RMA
- Help Center
- Contact Us
- Shop for
- Honda Parts
- Honda Accessories
My Garage
My Account
Cart
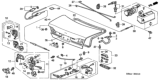
Genuine Honda Accord Trunk Lids
Deck Lids- Select Vehicle by Model
- Select Vehicle by VIN
Select Vehicle by Model
orMake
Model
Year
Select Vehicle by VIN
For the most accurate results, select vehicle by your VIN (Vehicle Identification Number).
43 Trunk Lids found


Honda Accord Lid Comp,Trunk (DOT)
Part Number: 68500-T2A-A80ZZ$745.77 MSRP: $1076.15You Save: $330.38 (31%)


Honda Accord Trunk Lid (DOT)
Part Number: 68500-T3V-A90ZZ$577.73 MSRP: $833.67You Save: $255.94 (31%)

Honda Accord Lid Comp,Trunk (DOT)
Part Number: 68500-T2A-A90ZZ$745.77 MSRP: $1076.15You Save: $330.38 (31%)
Honda Accord Lid Comp Trunk
Part Number: 68500-T2F-A30ZZ$707.82 MSRP: $1021.38You Save: $313.56 (31%)

Honda Accord Lid Comp, Trunk (Dot)
Part Number: 68500-TA5-A90ZZ$928.67 MSRP: $1340.07You Save: $411.40 (31%)


Honda Accord Trunk Lid (DOT)
Part Number: 68500-TA0-A90ZZ$967.82 MSRP: $1396.57You Save: $428.75 (31%)

Honda Accord Trunk Lid (DOT)
Part Number: 68500-T3L-A90ZZ$617.75 MSRP: $891.42You Save: $273.67 (31%)
Honda Accord Trunk Lid (DOT)
Part Number: 68500-SDA-A61ZZ$736.92 MSRP: $1063.38You Save: $326.46 (31%)
Honda Accord Trunk Lid (DOT)
Part Number: 68500-SDN-A91ZZ$607.44 MSRP: $879.52You Save: $272.08 (31%)
Honda Accord Trunk Lid (DOT)
Part Number: 68500-SDA-A91ZZ$693.82 MSRP: $1001.18You Save: $307.36 (31%)

Honda Accord Trunk Lid (DOT)
Part Number: 68500-SV4-A80ZZ$107.65 MSRP: $723.20You Save: $615.55 (86%)Honda Accord Trunk Lid (DOT)
Part Number: 68500-TA5-A80ZZ$552.40 MSRP: $797.12You Save: $244.72 (31%)

Honda Accord Trunk Lid (DOT)
Part Number: 68500-TE0-A80ZZ$1270.44 MSRP: $1833.25You Save: $562.81 (31%)Honda Accord Trunk Lid (DOT)
Part Number: 68500-SDC-A80ZZ$568.37 MSRP: $822.92You Save: $254.55 (31%)
Honda Accord Trunk Lid (DOT)
Part Number: 68500-SDN-A70ZZ$585.43 MSRP: $811.85You Save: $226.42 (28%)
| Page 1 of 3 |Next >
1-20 of 43 Results
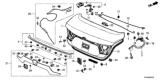
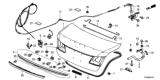
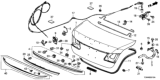
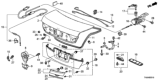
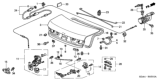
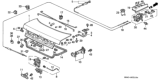
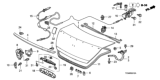
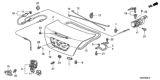
Honda Accord Trunk Lids
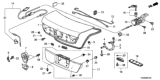
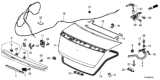
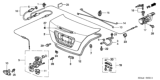
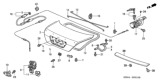
Honda Accord Trunk Lids provide drivers with a secure barrier to protect cargo from weather, dirt and thieves without making it difficult to reach the rear storage space. On all generations of Honda sedans, the lid covers the entire opening, incorporates stiff panels of metal and seals against a rubber gasket, so the rain or road debris remains outside as you pack up spare tires or school gear. A dependable internal latch connects to the cabin release and key cylinder, allowing owners to lock valuables comfortably knowing their belongings are safe and the trusted Honda latch springs open quickly when you tug the lever inside. Over the long timeline of the Accord, the shape of Trunk Lids changed, with the square cut designs on earlier models focused on the simple coverage, while the sculpted profiles of later designs dip deeper into the bumper, widening the loading mouth so that large suitcases go in without tilting. Modern Trunk Lids on this Accord incorporate the hidden hinges that go higher and bump the head less, thereby creating more vertical space. These Trunk Lids are painted to match surrounding panels for a unified appearance, and when closed, the Trunk Lids are flush with the tail lamps to facilitate streamlined airflow. Despite styling changes, each Honda unit maintains the basic purpose of protection and accessibility and will, if damaged and left out of alignment, still ensure prompt replacement, keeping the Accord cargo bay fully usable.
In search of affordable OEM Honda Accord Trunk Lids? Consider browsing through our extensive inventory of genuine Honda Accord Trunk Lids. Not only do we provide market-leading prices and a manufacturer's warranty, but we also pride ourselves on exceptional customer service and swift delivery.
Honda Accord Trunk Lids Parts Questions & Experts Answers
- Q: How should Trunk Lids be removed and installed properly on a Honda Accord?A:The trunk lid is rather massive and it is rather cumbersome to pry and to place it back; therefore it is highly recommended to have at least two persons in order to accomplish this task. To start with, lift the trunk lid and place caps or padding materials over the edges of the trunk compartment since it will be hurt by the removal process. Disconnect the multi connectoirs from the license plate, brake light, and the trunk lock actuator then remove the wire harness and the actuator cable through the hole in the trunk lid and tie the string or wire to the cable so as to ease its fixing again. Label or mark along the trunk hinges using a pen or pencil while removing the lid or before closing it, so as to align the marks while replacing the lid. On both sides unscrew the hinge to trunk lid bolts and with some help lift off the trunk lid. Reinstallation is the process, the opposite of removal, with the hinge flanges having to be placed right on the marks made earlier. After installation is complete, shut the lid, and ensure it is properly aligned with neighboring body surfaces; mechanical alterations are possible by loosening hinge bolts, manually realigning the lid, and then tightening the bolts again. The rear of the lid may be height adjustable by loosening the lock striker bolts and moving the striker up or down as required, a reference mark around the striker must be made before alteration. Last but not the least; adjust the positioning of the trailing edge of the trunk lid; this can be done by either pushing or pulling on the edge cushions until it gets to the proper setting.
")
Related Honda Accord Parts
 Honda Accord Trunk Latch
 Honda Accord Fuel Door Release Cable
 Honda Accord Lift Support
 Honda Accord Spoiler
 Honda Accord License Plate
 Honda Accord Door Hinge
 Honda Accord Tailgate Lock
 Honda Accord Tailgate Latch
 Honda Accord Brake Light
Browse by Year
2025 Trunk Lids 2024 Trunk Lids 2023 Trunk Lids 2022 Trunk Lids 2021 Trunk Lids 2020 Trunk Lids 2019 Trunk Lids 2018 Trunk Lids 2017 Trunk Lids 2016 Trunk Lids 2015 Trunk Lids 2014 Trunk Lids 2013 Trunk Lids 2012 Trunk Lids 2011 Trunk Lids 2010 Trunk Lids 2009 Trunk Lids 2008 Trunk Lids 2007 Trunk Lids 2006 Trunk Lids 2005 Trunk Lids 2004 Trunk Lids 2003 Trunk Lids 2002 Trunk Lids 2001 Trunk Lids 2000 Trunk Lids 1999 Trunk Lids 1998 Trunk Lids 1997 Trunk Lids 1996 Trunk Lids 1995 Trunk Lids 1994 Trunk Lids 1993 Trunk Lids 1992 Trunk Lids 1991 Trunk Lids 1990 Trunk Lids 1989 Trunk Lids 1988 Trunk Lids 1987 Trunk Lids 1986 Trunk Lids 1985 Trunk Lids 1984 Trunk Lids 1983 Trunk Lids 1982 Trunk Lids 1981 Trunk Lids 1980 Trunk Lids 1979 Trunk Lids