×
- Hello
- Login or Register
- Quick Links
- Live Chat
- Track Order
- Parts Availability
- RMA
- Help Center
- Contact Us
- Shop for
- Honda Parts
- Honda Accessories
My Garage
My Account
Cart
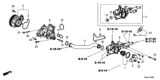
Genuine Honda Civic Thermostat
Engine Coolant Thermostat- Select Vehicle by Model
- Select Vehicle by VIN
Select Vehicle by Model
orMake
Model
Year
Select Vehicle by VIN
For the most accurate results, select vehicle by your VIN (Vehicle Identification Number).
29 Thermostats found


Honda Civic Thermostat Assembly (Fuji Seiko)
Part Number: 19301-RNA-315$57.63 MSRP: $83.52You Save: $25.89 (31%)


Honda Civic Thermostat Assembly (Nippon Thermostat)
Part Number: 19301-PAA-306$42.32 MSRP: $60.28You Save: $17.96 (30%)


Honda Civic Thermostat Assembly (Nippon Thermostat)
Part Number: 19301-RAF-004$94.42 MSRP: $136.83You Save: $42.41 (31%)


Honda Civic Thermostat Assembly
Part Number: 19301-PNA-003$98.78 MSRP: $139.52You Save: $40.74 (30%)


Honda Civic Thermostat Assembly (Nippon Thermostat)
Part Number: 19301-P08-316$42.32 MSRP: $60.28You Save: $17.96 (30%)

Honda Civic Cover Assembly, Thermostat
Part Number: 19310-6A0-A01$61.69 MSRP: $89.40You Save: $27.71 (31%)


Honda Civic Thermostat Assembly (Fuji Thompson)
Part Number: 19301-PLC-315$47.60 MSRP: $67.23You Save: $19.63 (30%)


Honda Civic Thermostat Assembly (Nippon Thermostat)
Part Number: 19301-REA-305$60.07 MSRP: $84.85You Save: $24.78 (30%)


Honda Civic Thermostat Assembly (Nippon Thermostat)
Part Number: 19301-PZA-305$29.96 MSRP: $60.30You Save: $30.34 (51%)


Honda Civic Thermostat Assembly (Nippon Thermostat)
Part Number: 19301-RP3-305$58.46 MSRP: $82.57You Save: $24.11 (30%)

Honda Civic Cover Assembly, Thermo
Part Number: 19310-5BF-G01$61.29 MSRP: $86.55You Save: $25.26 (30%)


| Page 1 of 2 |Next >
1-20 of 29 Results
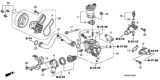
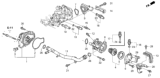
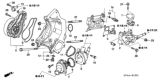
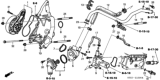
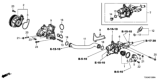
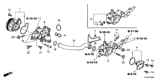
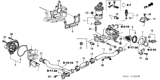
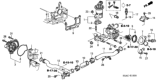
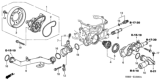
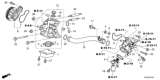
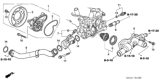
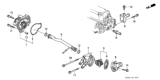
Honda Civic Thermostat
The Civic's thermostat primarily belongs to the car's cooling system where it mainly functions to control temperature on the engine. This is normally situated close to the radiator as can be seen to be a mechanical component that regulates the circulation of the coolant and thereby regulates the temperature of the engine. In the previous years, thermostats used in Honda Civic cars have been of the bimetallic and even wax pellet type. These types of thermostats work on the principle of expanding or collapsing by will and reduce/ increase the temperature in the process of cooling the engine. A thermostat also acts as a controller of the flow of the liquid to the cooling part of the car's cooling system, therefore, when the thermostat is faulty, it becomes extremely crucial to replace it in order to restore efficiency and reliability of the car model, such as Honda Civic.
In search of affordable OEM Honda Civic Thermostat? Consider browsing through our extensive inventory of genuine Honda Civic Thermostat. Not only do we provide market-leading prices and a manufacturer's warranty, but we also pride ourselves on exceptional customer service and swift delivery.
Honda Civic Thermostat Parts Questions & Experts Answers
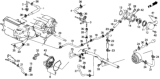
- Q: How to disconnect the cable from the negative battery terminal and drain the cooling system while replacing the thermostat in Honda Civic?A:Disconnect the cable from the negative battery terminal and drain the cooling system, saving the coolant if it is in good condition. For a Civic with a 2.4L engine or a 2014 and earlier CR-V, access the thermostat from the underside of the engine compartment by raising the front of the vehicle and removing the under-vehicle splash shield. For a 1.8L Civic or a 2015 and later CR-V, access the thermostat from the top of the engine compartment, removing the PCM and bracket on CR-V models. On 1.8L models, use pliers to squeeze the upper radiator hose clamp, slide it up, and remove the hose, twisting if necessary. Locate the thermostat housing cover by following the lower radiator hose to the engine, then loosen the hose clamp and detach the hose. If the fitting is deteriorated, it may need replacement. On 1.8L models, move the harness bracket out of the way, then remove the thermostat cover bolts and detach the housing cover, tapping it if stuck. Note the jiggle pin's position when removing the thermostat, as it should be at the top. For 2.4L engines, replace the thermostat cover and thermostat as one assembly. Clean all old gasket material from the housing and cover, then install a new rubber seal over the thermostat on 1.8L engines, ensuring proper alignment. For 2.4L engines, install a new O-ring into the housing. Install the thermostat in the housing without sealant, ensuring the jiggle pin is at the top. Install the housing cover or thermostat assembly and tighten the bolts to the specified torque. Reattach the hose and tighten the clamp securely, then reinstall all components removed for access. Refill the cooling system and reconnect the battery. Start the engine, allowing it to reach normal operating temperature, then check for leaks and proper thermostat operation.
")
Related Honda Civic Parts
 Honda Civic Water Pump
 Honda Civic Radiator
 Honda Civic Thermostat Housing
 Honda Civic Radiator Support
 Honda Civic Radiator Hose
 Honda Civic Cooling Hose
 Honda Civic Coolant Reservoir
 Honda Civic Thermostat Gasket
 Honda Civic Fan Motor
 Honda Civic Water Pump Gasket
 Honda Civic Fan Shroud
 Honda Civic Fan Blade
Browse by Year
2026 Thermostat 2025 Thermostat 2024 Thermostat 2023 Thermostat 2022 Thermostat 2021 Thermostat 2020 Thermostat 2019 Thermostat 2018 Thermostat 2017 Thermostat 2016 Thermostat 2015 Thermostat 2014 Thermostat 2013 Thermostat 2012 Thermostat 2011 Thermostat 2010 Thermostat 2009 Thermostat 2008 Thermostat 2007 Thermostat 2006 Thermostat 2005 Thermostat 2004 Thermostat 2003 Thermostat 2002 Thermostat 2001 Thermostat 2000 Thermostat 1999 Thermostat 1998 Thermostat 1997 Thermostat 1996 Thermostat 1995 Thermostat 1994 Thermostat 1993 Thermostat 1992 Thermostat 1991 Thermostat 1990 Thermostat 1989 Thermostat 1988 Thermostat 1987 Thermostat 1986 Thermostat 1985 Thermostat 1984 Thermostat 1983 Thermostat 1982 Thermostat 1981 Thermostat 1980 Thermostat 1979 Thermostat 1978 Thermostat 1977 Thermostat 1976 Thermostat 1975 Thermostat 1974 Thermostat 1973 Thermostat