×
- Hello
- Login or Register
- Quick Links
- Live Chat
- Track Order
- Parts Availability
- RMA
- Help Center
- Contact Us
- Shop for
- Honda Parts
- Honda Accessories
My Garage
My Account
Cart
Genuine Honda Crosstour Brake Master Cylinder
- Select Vehicle by Model
- Select Vehicle by VIN
Select Vehicle by Model
orMake
Model
Year
Select Vehicle by VIN
For the most accurate results, select vehicle by your VIN (Vehicle Identification Number).
2 Brake Master Cylinders found


Honda Crosstour Master Cylinder Assembly
Part Number: 46100-TP6-A12$428.12 MSRP: $617.78You Save: $189.66 (31%)


Honda Crosstour Master Cylinder A
Part Number: 46100-TK4-A01$452.04 MSRP: $652.30You Save: $200.26 (31%)
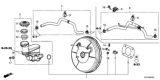
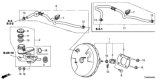
Honda Crosstour Brake Master Cylinder
Brake Master Cylinder is one of the significant parts of Honda Crosstour braking system which apply the foot force to hydraulic pressure to the slave cylinders. Force and displacement are improved in this system by using hydraulic fluid to deliver force produced by the master cylinder's piston to slave cylinders. The master cylinder is use involved in operating caliper or drum brakes for the braking and also to actuate slave cylinder for the purpose of releasing the clutch. Honda Crosstour vehicles often have a diagonally split hydraulic system whereby each of the master cylinder piston controls one of the circuits to warrant braking even if one of them fails to work. In total, Brake Master Cylinder used in Honda Crosstour vehicles disposes hydraulic force and pressure in the braking and the clutch systems to guarantee the safe and proper car use.
In search of affordable OEM Honda Crosstour Brake Master Cylinder? Consider browsing through our extensive inventory of genuine Honda Crosstour Brake Master Cylinder. Not only do we provide market-leading prices and a manufacturer's warranty, but we also pride ourselves on exceptional customer service and swift delivery.
Honda Crosstour Brake Master Cylinder Parts Questions & Experts Answers
- Q: How to Remove and Install the Brake Master Cylinder on a Honda Crosstour?A:The Brake Master Cylinder on 2008 and newer cars is in the engine area, fastened to the power Brake Booster location. First, take off the mounting bolt on the underhood fuse/relay block. To do this, push the clips aside, then gently lift the whole block assembly out of the way. Empty the brake fluid in the master cylinder by using a large syringe, drain it into a safe container, and protect all painted parts when you work. Before disconnecting the fluid level warning switch electrical connector, place rags under the fluid components and collect caps or plastic bags to cover the ends of the separated lines. Turn the Brake Line connections at each end of the master cylinder's input with a flare-nut wrench to loosen them, rather than rounding off the edges. Before starting work, pinch the brake lines away from the master cylinder and plug them with caps to protect from dirt entering the system. Separate the cylinder-brake power booster fasteners, then carefully pull out the master cylinder from its mounts while being watchful not to drain any fluid. When you're putting in a new master cylinder, move the fluid reservoir from the old one over to the new one, and see that fresh seals are set in place. Set up the master cylinder on a workbench while in a vice grip, and use tubing to collect expelled fluid from the ports. Replace the old brake fluid with the recommended type. With slow, controlled movements, put both master cylinder pistons into the fluid reservoir one at a time. Keep filling and pushing until the reservoir has no more air bubbles. Fit a plug into each open bleed tube ending connection, after removing each tube one by one. Then attach the reservoir's top cap and finish the job. Place the master cylinder over the studs on the power brake booster, and hold the connecting nuts tight with your fingers. Also replace the rod seal during installation. Push the brake line threads into the master cylinder and adjust them a little for easier passage, then firmly clamp down the mounting nuts and fittings. Squeeze the brake pedal to start bleeding air out of the master cylinder while your helper unscrews a pipe fitting. Once you see clear fluid, repeat the pumping and release until the fluid stops blowing bubbles. Then you and your assistant reconnect everything. Wash the area under the master cylinder if bleeding is complete. Return to your original step sequence for reinstalling, making sure to carefully test how well the brakes work before you let your car go back on the road.
