×
- Hello
- Login or Register
- Quick Links
- Live Chat
- Track Order
- Parts Availability
- RMA
- Help Center
- Contact Us
- Shop for
- Honda Parts
- Honda Accessories
My Garage
My Account
Cart
Genuine Honda CRX Camshaft
Cam- Select Vehicle by Model
- Select Vehicle by VIN
Select Vehicle by Model
orMake
Model
Year
Select Vehicle by VIN
For the most accurate results, select vehicle by your VIN (Vehicle Identification Number).
10 Camshafts found


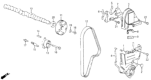
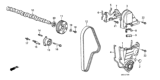

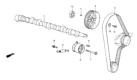
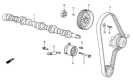
Honda CRX Camshaft
The camshaft in Honda CRX vehicles helps in the control of the intake and exhaust valves of the engine ensuring that the required air/fuel mixture enters the engine and the exhaust gases leave the engine. Usually the Honda CRX camshaft is made of iron or steel and it works through Over Head Valve (OHV), Single Over Head Cam(SOHC), and Double Over Head Cam (DOHC). Each type affects the performance of the engines uniquely, DOHC provides independent control of intake and exhaust valves thus optimizing airflow and power a car can produce. Camshafts for Honda CRX are factory or performance part, and they are customized for certain horsepower requirement for the car. The performance camshafts enjoy higher lift and longer duration, which makes the air flow at the state of high RPMs, but it also impacts torque and idle character depending upon the lobe separation angle.
In search of affordable OEM Honda CRX Camshaft? Consider browsing through our extensive inventory of genuine Honda CRX Camshaft. Not only do we provide market-leading prices and a manufacturer's warranty, but we also pride ourselves on exceptional customer service and swift delivery.
Honda CRX Camshaft Parts Questions & Experts Answers
- Q: How to remove and install the Camshaft on Honda CRX?A:To facilitate installation, ensure that the No. 1 piston is at Top Dead Center before removing the camshaft. Begin by disconnecting the negative battery cable and bringing the piston in the No. 1 cylinder to TDC on the compression stroke. Proceed to remove the valve cover, Timing Belt front covers, and the timing belt, followed by the camshaft sprocket and Rocker Arm assembly. Next, remove the camshaft and camshaft seal. For installation, reverse the removal steps, lubricating the lobes and journals of the camshaft beforehand, and install it with the keyway facing up. Install the rocker arm assembly by loosening the locknuts and backing off the adjust screws, then set it in place and loosely install the bolts. Tighten each bolt two turns at a time in the proper sequence to prevent binding on the valves, and finally, tighten the rocker arm bolts to 16 ft. lbs. (22 Nm). Lubricate a new camshaft seal and install it using a suitable tool, ensuring to properly set the tension of the timing belt afterward. Tighten the crankshaft pulley bolt to specification and adjust the valvelash. For inspection, degrease the camshaft with a safe solvent and clean all oil grooves, then visually inspect the cam lobes and bearing journals for excessive wear. If any lobe appears questionable, measure all lobes and journals with a micrometer, checking the lift by subtracting the measurement at 90° from the measurement at the nose. If the lobes are not identical, the camshaft must be reground or replaced. Measure the bearing journals and compare them to specifications; if a journal is worn, the cam bearings likely require replacement as well. If the lobes and journals appear intact, place the front and rear cam journals in V-blocks and rest a dial indicator on the center journal, rotating the camshaft to check for straightness; if deviation exceeds 0.025mm, the camshaft should be replaced.


