×
- Hello
- Login or Register
- Quick Links
- Live Chat
- Track Order
- Parts Availability
- RMA
- Help Center
- Contact Us
- Shop for
- Honda Parts
- Honda Accessories
My Garage
My Account
Cart
Genuine Honda CRX Oil Pan
Oil Drain Pan- Select Vehicle by Model
- Select Vehicle by VIN
Select Vehicle by Model
orMake
Model
Year
Select Vehicle by VIN
For the most accurate results, select vehicle by your VIN (Vehicle Identification Number).
4 Oil Pans found


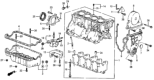

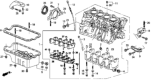

Honda CRX Oil Pan
The Oil Pan in the Honda CRX automobiles is one of the major assemblies of the wet sump lubrication system, which is fitted in most automobiles. The Oil Pan is located below the engine and serves as a tank that stores the engine oil that is used for the lubrication and cooling of the parts in the engine. Through this, the oil pump sucks oil from the oil pan using a pick up tube so that during operation of the engine the various parts are well lubricated. In earlier models of Honda CRX Oil Pans, the core material used the stamped steel but with the newer models, cast aluminum was adopted resulting to increased strength and performance. The design of Oil Pan depends upon the models of Honda CRX it has been found that though there are varied models of Honda CRX but the basic structure has not changed much in this aspect while the process has improved from using steel to using aluminum. In a nut shell, the Oil Pan plays the role of ensuring the efficiency of the Honda CRX car engines.
In search of affordable OEM Honda CRX Oil Pan? Consider browsing through our extensive inventory of genuine Honda CRX Oil Pan. Not only do we provide market-leading prices and a manufacturer's warranty, but we also pride ourselves on exceptional customer service and swift delivery.
Honda CRX Oil Pan Parts Questions & Experts Answers
- Q: How to remove and install Oil Pan on Honda CRX?A:To perform operations involving the removal and installation of the component, first leads should be disconnected and the vehicle should be securely placed on a jack stand. For the non-4WD Civic Wagon, if equipped, the engine splash shield must be removed, engine oil must be drained and disposed appropriately. Next, if needed, take off the exhaust header pipe, then the bolts accompanied by the oil pan, finally-the oil pan as well. Before installing the new oil pan gasket, the gasket mating surfaces must be cleaned and, on both sides of the new oil pan gasket, an application of sealant must be made and the bolts tightened in a crisscross manner with a total torque of 9 ft. lbs. (12 Nm) and, later, to 33 ft. lbs. (45 Nm). For the 4WD Civic Wagon with manual transaxle proceed as follows: remove the air box as before, drain both the engine oil and transaxle oil also, remove the exhaust header pipe and locate the position of the drive shaft flange by placing a mark on it before it is removed. Be gentle during the removal of the left side cover and the driven gear from the transfer case in order not to damage the thrust shims. If the transfer case and clutch case cover have been removed, all the mating surfaces must be cleaned before putting a new gasket for the oil pan with sealant applied on it and must be fastened firmly in the same way as done before. For the automatic transaxle it is also the same as for the manual transaxle but without received components: the driven gear assembly and the left side cover. Use a clean rag and clean the oil pan surface, apply sealant, fit the oil pan gasket and tighten it. Last, reattach the drive shaft, exhaust header pipe as well as the splash shields back on, add both crankcase and transaxle oil, reconnect the negative terminal on the battery, turn the engine on and run it for a few minutes; take it for a short drive to check for any signs of leakage.


