×
- Hello
- Login or Register
- Quick Links
- Live Chat
- Track Order
- Parts Availability
- RMA
- Help Center
- Contact Us
- Shop for
- Honda Parts
- Honda Accessories
My Garage
My Account
Cart
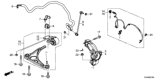
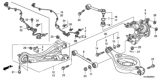
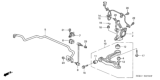
Genuine Honda Odyssey Control Arm
Suspension Arm- Select Vehicle by Model
- Select Vehicle by VIN
Select Vehicle by Model
orMake
Model
Year
Select Vehicle by VIN
For the most accurate results, select vehicle by your VIN (Vehicle Identification Number).
45 Control Arms found


Honda Odyssey Left Front Arm (Lower)
Part Number: 51360-THR-A10$256.66 MSRP: $365.61You Save: $108.95 (30%)


Honda Odyssey Right Front Arm (Lower)
Part Number: 51350-TK8-A10$745.46 MSRP: $1075.70You Save: $330.24 (31%)

Honda Odyssey Right Rear Arm (Lower)
Part Number: 52350-THR-A00$148.71 MSRP: $211.84You Save: $63.13 (30%)

Honda Odyssey Left Front Arm (Lower)
Part Number: 51360-THR-A00$256.66 MSRP: $365.61You Save: $108.95 (30%)


Honda Odyssey Left Front Arm (Lower)
Part Number: 51360-SHJ-A03$462.00 MSRP: $666.67You Save: $204.67 (31%)


Honda Odyssey Upper Arm Complete, Rear
Part Number: 52510-THR-A02$193.42 MSRP: $275.54You Save: $82.12 (30%)

Honda Odyssey Arm Assembly, Left Rear (Upper)
Part Number: 52400-SHJ-A01$378.57 MSRP: $563.35You Save: $184.78 (33%)

Honda Odyssey Left Rear Trailing Arm
Part Number: 52365-THR-A00$192.65 MSRP: $274.43You Save: $81.78 (30%)
Honda Odyssey Right Rear Trailing Arm
Part Number: 52360-THR-A00$192.65 MSRP: $274.43You Save: $81.78 (30%)

Honda Odyssey Arm Assembly, Right Rear (Upper)
Part Number: 52390-SHJ-A01$390.40 MSRP: $563.35You Save: $172.95 (31%)


Honda Odyssey Left Front Arm (Lower)
Part Number: 51360-S0X-A02$404.25 MSRP: $583.33You Save: $179.08 (31%)


Honda Odyssey Right Front Arm (Lower)
Part Number: 51350-SHJ-A01$404.25 MSRP: $583.33You Save: $179.08 (31%)

Honda Odyssey Arm, Right Rear Control
Part Number: 52340-THR-A00$43.53 MSRP: $61.49You Save: $17.96 (30%)


Honda Odyssey Upper Arm Complete, Rear
Part Number: 52520-THR-A02$193.42 MSRP: $275.54You Save: $82.12 (30%)

Honda Odyssey Arm B, Right Rear (Lower)
Part Number: 52350-SHJ-A00$195.83 MSRP: $278.97You Save: $83.14 (30%)
Honda Odyssey Arm, Left Rear Control
Part Number: 52345-THR-A00$43.53 MSRP: $61.49You Save: $17.96 (30%)Honda Odyssey Left Rear Arm (Lower)
Part Number: 52355-THR-A00$148.71 MSRP: $211.84You Save: $63.13 (30%)Honda Odyssey Right Front Arm (Lower)
Part Number: 51350-SHJ-A03$462.00 MSRP: $666.67You Save: $204.67 (31%)


Honda Odyssey Arm, Right Front-(Lower)
Part Number: 51350-THR-A10$256.66 MSRP: $365.61You Save: $108.95 (30%)
Honda Odyssey Right Front Arm (Lower)
Part Number: 51350-THR-A00$256.66 MSRP: $365.61You Save: $108.95 (30%)
| Page 1 of 3 |Next >
1-20 of 45 Results
Honda Odyssey Control Arm
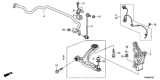
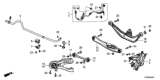
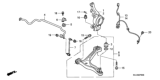
The Control Arm in Honda Odyssey cars connects the vehicle framework with the wheels and helps in the operation of the suspension system. This aspect enables the wheels to rotate upon contact with irregularities on the ground, and this is very vital in that it helps in correction of wheel positions and increase vehicle stability. Different automobile models of Honda Odyssey have incorporated different types of Control Arms ranging from stamped plate steel, the advanced cast iron or aluminum Control Arms, which allow high strength with light weight. Stamped steel Control Arms are not easily damaged, but they easily rust, thus making their strength questionable. On the other hand, newer designs incorporate higher performance characteristics of the racing applications, utilizing more robust fabrication and components of DOM tubular steel or billet aluminum. These performance oriented Control Arms are designed for proposing aggressive looks, modifications and for enhancing the handling and stability of the Honda Odyssey under all conditions.
In search of affordable OEM Honda Odyssey Control Arm? Consider browsing through our extensive inventory of genuine Honda Odyssey Control Arm. Not only do we provide market-leading prices and a manufacturer's warranty, but we also pride ourselves on exceptional customer service and swift delivery.
Honda Odyssey Control Arm Parts Questions & Experts Answers
- Q: How to remove and install a control arm on Honda Odyssey?A:When removing control arm-turn the lug nuts on the side of the car you are removing the arm from loose and apply the parking brake-lift the front of the vehicle, and place it securely on jack stands-then remove the wheel. On those built after December 2004 the nut and bolt that link the stabiliser bar to the strut should be removed so that the latter can be rotated to reveal the control arm bolts. After that, unlock a lock pin of a castle nut between the lower control arm and the Steering Knuckle, loosen the nut but do not take it off, and using a hammer, define the boss on the steering knuckle from the lower ball joint stud. Do not hit the lower control arm bushing or the balljoint grease plug location; also do not exert force to split the inner CV joint or try to pry loose the lower balljoint from the steering knuckle. Pull the balljoint stud and set the instrument back, then detach the castle nut and split the balljoint from the steering knuckle. Then unbolt the two bolts which hold the control arm to the subframe and pull out the control arm. In inspection, the control arm should be as straight as possible and if not, it should not be bent into the right position but replaces immediately. Inspect the bushings for signs of cracks, tears or wears, If there is, replace the control arm with new one. For installation, reverse the removal steps, the balljoint stud castle nut requires tightening to the lower torque figure and in case it is loosened for alignment of the slots in the nut to the hole in the stud use new fasteners as recommended. Insert a new lock pin, lift the outer end of the control arm using a floor jack and then tighten the control arm to subframe bolts to the recommended torque. Last but not the least, fix the wheel back and the lug nuts, then lower the vehicle, finally, using a torque wrench tighten the lug nuts to the factory recommended set torque and even align the front wheel if needed.
")
Related Honda Odyssey Parts
 Honda Odyssey Control Arm Bushing
 Honda Odyssey Lift Support
 Honda Odyssey Ball Joint
 Honda Odyssey Shift Cable
 Honda Odyssey Coil Springs
 Honda Odyssey Steering Knuckle
 Honda Odyssey Trailing Arm
 Honda Odyssey Radius Arm Bushing
 Honda Odyssey Radius Arm
 Honda Odyssey Torsion Bar
Browse by Year
2026 Control Arm 2025 Control Arm 2024 Control Arm 2023 Control Arm 2022 Control Arm 2021 Control Arm 2020 Control Arm 2019 Control Arm 2018 Control Arm 2017 Control Arm 2016 Control Arm 2015 Control Arm 2014 Control Arm 2013 Control Arm 2012 Control Arm 2011 Control Arm 2010 Control Arm 2009 Control Arm 2008 Control Arm 2007 Control Arm 2006 Control Arm 2005 Control Arm 2004 Control Arm 2003 Control Arm 2002 Control Arm 2001 Control Arm 2000 Control Arm 1999 Control Arm 1998 Control Arm 1997 Control Arm 1996 Control Arm 1995 Control Arm