×
- Hello
- Login or Register
- Quick Links
- Live Chat
- Track Order
- Parts Availability
- RMA
- Help Center
- Contact Us
- Shop for
- Honda Parts
- Honda Accessories
My Garage
My Account
Cart
Genuine Honda Pilot Brake Booster
Brake Power Booster- Select Vehicle by Model
- Select Vehicle by VIN
Select Vehicle by Model
orMake
Model
Year
Select Vehicle by VIN
For the most accurate results, select vehicle by your VIN (Vehicle Identification Number).
12 Brake Boosters found


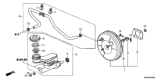
Honda Pilot Power Set, Master (10.5")
Part Number: 01469-SZA-A00$148.45 MSRP: $211.47You Save: $63.02 (30%)


Honda Pilot Power Set, Master (10.5")
Part Number: 01469-SZA-A10$148.40 MSRP: $211.40You Save: $63.00 (30%)


Honda Pilot Power Set, Master (10.5")
Part Number: 01469-TG7-A00$104.73 MSRP: $147.92You Save: $43.19 (30%)


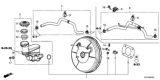
Honda Pilot Power Assembly, Master (9"+9")
Part Number: 46400-S9V-A11$587.19 MSRP: $847.32You Save: $260.13 (31%)


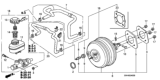
Honda Pilot Power Assembly, Master (9"+9")
Part Number: 46400-S3V-A11$503.29 MSRP: $726.25You Save: $222.96 (31%)Honda Pilot POWER SET, MASTER (10.5")
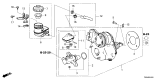
Part Number: 01469-TG7-A50$114.41 MSRP: $167.27You Save: $52.86 (32%)


Honda Pilot Brake Booster
That is why the Brake Booster in Honda Pilot automobiles is the component that helps in reducing the pressure needed for brake engagement. By using a vacuum chamber, the booster increases the hydraulic pressure from the master cylinder that in turn enables the driver apply the brake using less force. There are two main types of boosters used in Pilot vehicles: emergency vacuum-operated boosters and hydraulic boosters. As for vacuum sort of boosters, their operative principle lies in the difference in the pressure between the engine vacuum and positive pressure of the air surrounding the vehicle; hydraulic boosters, however, utilize force of fluid to help with the application of brakes. Honda has many brake boosters ranging from master cylinder complete replacement kits, performance boosters, and converters for classic and muscle cars. These are available in various sizes and surface finishes, with the larger diameter supplying more power assistance; there are also types that are double diaphragm boosters which can provide extra help in circumstances where there is not much room in the engine compartment.
In search of affordable OEM Honda Pilot Brake Booster? Consider browsing through our extensive inventory of genuine Honda Pilot Brake Booster. Not only do we provide market-leading prices and a manufacturer's warranty, but we also pride ourselves on exceptional customer service and swift delivery.
Honda Pilot Brake Booster Parts Questions & Experts Answers
- Q: How to replace a power brake booster on Honda Pilot?A:Within their HB Automatic Maintenance Program, Honda and all 2006 and before Acura vehicles need multiple brake check routines. Squeeze the brake pedal several times when the engine is turned off. If there's no difference in the reserve space left before the pedal returns to the floor, start the engine and do it again. Regular functioning means the pedal gets lower each time. To check for airtightness in the booster, cycle through these tasks: start the engine, let it run for a minute or two, then stop it. Press down slowly on the brake pedal three times in a row - if the pedal drops when you first press, then comes back up after pressing two more times, your booster is tight. When the engine is running, keep your foot on the brake pedal and turn off the engine; the booster passes this test if your brake pedal reserve distance stays the same for 30 seconds while not changing. Because removing the power unit needs complex tools most homeowners don't have, it's safer to let professionals install new or rebuilt power units if you run into problems. Take off the master cylinder, cut connections for cruise control and the accelerator when needed, and disconnect the large hose from the power brake booster. When inside the passenger area, remove the pin that holds the joint and disconnect the pushrod connector from the brake pedal connection. Disconnect the nuts holding the booster in place by the firewall. Lift the booster unit slowly and steady from its spot on the engine compartment, taking care to not flex the brake hydraulic pipe. First, put the booster unit in place and fasten the holding nuts. Next, join the pushrod to the brake pedal and use a new lock pin for the pushrod's joint pin, as suggested. Last, put the master cylinder back in place, attach the vacuum tube, clean any air from the brakes, and verify brake performance before getting back to regular car driving.
")
Related Honda Pilot Parts
 Honda Pilot Brake Disc
 Honda Pilot Brake Light Switch
 Honda Pilot Brake Caliper
 Honda Pilot Brake Backing Plate
 Honda Pilot Brake Master Cylinder
 Honda Pilot Brake Line
Browse by Year
2025 Brake Booster 2024 Brake Booster 2023 Brake Booster 2022 Brake Booster 2021 Brake Booster 2020 Brake Booster 2019 Brake Booster 2018 Brake Booster 2017 Brake Booster 2016 Brake Booster 2015 Brake Booster 2014 Brake Booster 2013 Brake Booster 2012 Brake Booster 2011 Brake Booster 2010 Brake Booster 2009 Brake Booster 2008 Brake Booster 2007 Brake Booster 2006 Brake Booster 2005 Brake Booster 2004 Brake Booster 2003 Brake Booster