×
- Hello
- Login or Register
- Quick Links
- Live Chat
- Track Order
- Parts Availability
- RMA
- Help Center
- Contact Us
- Shop for
- Honda Parts
- Honda Accessories
My Garage
My Account
Cart
Genuine Honda Pilot Drive Shaft
Axle Shaft- Select Vehicle by Model
- Select Vehicle by VIN
Select Vehicle by Model
orMake
Model
Year
Select Vehicle by VIN
For the most accurate results, select vehicle by your VIN (Vehicle Identification Number).
6 Drive Shafts found


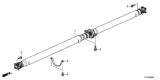
Honda Pilot Shaft, Propeller
Part Number: 40100-TZ6-A22$709.03 MSRP: $1023.13You Save: $314.10 (31%)

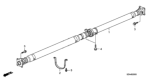
Honda Pilot Propeller Shaft Assembly
Part Number: 40100-TZ6-A23$709.03 MSRP: $1023.13You Save: $314.10 (31%)

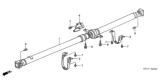
Honda Pilot Propeller Shaft Assembly
Part Number: 40100-SZA-A02$965.57 MSRP: $1393.32You Save: $427.75 (31%)
Honda Pilot Propeller Shaft Assembly
Part Number: 40100-S3V-A22$1351.88 MSRP: $1950.76You Save: $598.88 (31%)Honda Pilot Propeller Shaft Assembly
Part Number: 40100-S3V-A03$1392.62 MSRP: $2009.55You Save: $616.93 (31%)

Honda Pilot SHAFT, PROPELLER
Part Number: 40100-TYA-A02$1192.66 MSRP: $1721.03You Save: $528.37 (31%)
Honda Pilot Drive Shaft
A drive shaft in a Honda pilot car is an essential part of the car that transmits power and torque from the car's engine or transmission to the car's drive wheels. It has the responsibility of conveying mechanical power, torque and rotation in the drivetrain; there are techniques to provide for alignment and distance; these include using universal joints, jaw couplings or splined joints. Depending on the kind of suspension they used, there could be one-piece, two-piece or slip-in-tube Drive Shaft that could be changed on the Honda Pilot and some of these options have been developed to increase crash safety. More so, four-wheel and all-wheel drive systems in Honda Pilot cars may apply multiple drive shafts where transfer cases distribute the power between the front and rear wheels in the efficiency of the system.
In search of affordable OEM Honda Pilot Drive Shaft? Consider browsing through our extensive inventory of genuine Honda Pilot Drive Shaft. Not only do we provide market-leading prices and a manufacturer's warranty, but we also pride ourselves on exceptional customer service and swift delivery.
Honda Pilot Drive Shaft Parts Questions & Experts Answers
- Q: How to remove and replace the intermediate shaft and Drive Shaft in a Honda Pilot?A:Raise the front of the vehicle and securely support it on jack stands. Drain the transaxle lubricant. Remove the right drive axle. Remove the exhaust pipe bracket and bearing support-to-engine block bolts, and slide the intermediate shaft out of the transaxle. Be careful not to damage the Differential Seal when pulling out the shaft. Check the support bearing for smooth operation by turning the shaft while holding the bearing. If it feels rough or sticky, it should be replaced. Take it to a dealer service department or other repair shop, as special tools are needed for this job. Lubricate the lips of the transaxle seal with multi-purpose grease. Carefully guide the intermediate shaft into the transaxle side gear, then install the mounting bolts through the bearing support. Tighten the bolts. Reinstall the drive axle. Refill the transaxle with the proper type and amount of lubricant.
- Q: How to Inspect and Replace a Drive Shaft on a Honda Pilot?A:Raise the rear of the vehicle, securely support it on jackstands, and block the front wheels. With the parking brake off and the transaxle in Neutral, inspect the driveshaft for dents or cracks. If dents or cracks are present, the driveshaft needs replacement. Examine for oil leakage at the driveshaft's front and rear; leakage at the Transfer Case suggests a faulty seal, while leakage at the Differential suggests a defective pinion seal. Have an assistant rotate a rear wheel to check the driveshaft's movement. Listen for noise from the center bearing and inspect the rubber portion for cracks or separation. To check the universal joints' condition, twist them with your hands. If there's movement or noise, the driveshaft should be replaced. To measure driveshaft runout, use a dial indicator, and if the runout is beyond the allowable limit, replace the driveshaft. Ensure the driveshaft mounting bolts are tight. For removal and installation, after supporting the vehicle on jackstands and ensuring the transaxle is in Neutral, make reference marks on the driveshaft flanges, the differential pinion flange, and the transfer case pinion flange. This preserves the driveshaft balance during reinstallation. Next, remove the rear universal joint bolts, using a screwdriver to prevent shaft rotation while loosening the bolts. Detach the driveshaft safety loops and the center support bearing from the floorpan. Unbolt the driveshaft front from the transfer case flange and take out the driveshaft assembly. When reinstalling, follow the reverse procedure, aligning the marks on the flanges, and ensuring all fasteners are tightened.

Browse by Year
2025 Drive Shaft 2024 Drive Shaft 2023 Drive Shaft 2022 Drive Shaft 2021 Drive Shaft 2020 Drive Shaft 2019 Drive Shaft 2018 Drive Shaft 2017 Drive Shaft 2016 Drive Shaft 2015 Drive Shaft 2014 Drive Shaft 2013 Drive Shaft 2012 Drive Shaft 2011 Drive Shaft 2010 Drive Shaft 2009 Drive Shaft 2008 Drive Shaft 2007 Drive Shaft 2006 Drive Shaft 2005 Drive Shaft 2004 Drive Shaft 2003 Drive Shaft