×
- Hello
- Login or Register
- Quick Links
- Live Chat
- Track Order
- Parts Availability
- RMA
- Help Center
- Contact Us
- Shop for
- Honda Parts
- Honda Accessories
My Garage
My Account
Cart
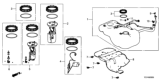
Genuine Honda Pilot Fuel Tank
Gas Tank- Select Vehicle by Model
- Select Vehicle by VIN
Select Vehicle by Model
orMake
Model
Year
Select Vehicle by VIN
For the most accurate results, select vehicle by your VIN (Vehicle Identification Number).
7 Fuel Tanks found


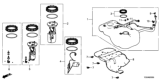


Honda Pilot Tank Assembly, Fuel
Part Number: 17044-TG7-A00$949.43 MSRP: $1370.03You Save: $420.60 (31%)
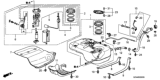

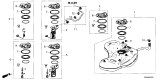


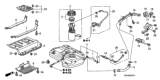

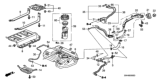
Honda Pilot Fuel Tank
The Fuel Tank in Honda Pilot cars is designed to contain fuel it also has the electric fuel pump and the fuel gauge sender. It also has an important function in the Evaporative Emission Control System (EVAP) to stop fuel vapours from escaping. These tanks commonly used are the metallic and plastic tanks where in the metallic tanks are stamped and welded while the plastic tanks are blow molded from High Density Polyethylene (HDPE). Metallic tanks are normally have corrosion issues and plastic tanks can crack at high temperature and vibration. Racing fuel tanks have advanced to fuel cells to prevent them from being easily punctured and spillage of gasoline upon an impact. High capacity fuel tanks from military-grade polymer can be availed to increase the driving range by up to 500miles,advantages being,the tanks can be designed in more flexible manner than that of steel tanks and has more durability.
In search of affordable OEM Honda Pilot Fuel Tank? Consider browsing through our extensive inventory of genuine Honda Pilot Fuel Tank. Not only do we provide market-leading prices and a manufacturer's warranty, but we also pride ourselves on exceptional customer service and swift delivery.
Honda Pilot Fuel Tank Parts Questions & Experts Answers
- Q: How to remove and install a fuel tank in a Honda Pilot?A:Remove the fuel tank filler cap to relieve the fuel tank pressure. Relieve the fuel system pressure. Disconnect the cable from the negative battery terminal. Disconnect the electrical connector from the Fuel Pump/fuel level sending unit module. If the fuel tank is empty or nearly empty, it's not necessary to siphon the remaining fuel from the tank. But if there is a lot of fuel in the tank, remove the fuel pump/fuel level sending unit and siphon out the remaining fuel through the fuel pump mounting hole in the tank. Raise the vehicle and place it securely on jackstands. Remove the rear part of the exhaust system. On 4WD models, remove the driveshaft. Remove the fuel tank rock guard mounting bolts ornuts and remove the rock guard. On 2001 and 2002 Acura and 2003 and 2004 Honda models, disconnect the quick-connect fittings for the fuel supply and return lines. Be sure to cover the ends of the fuel line fitting(s) with plastic bags to prevent dirt and moisture from contaminating the fuel system. On 2003 and later Acura and 2005 and later Honda models disconnect the fuel supply line quick-connect fitting. Disconnect the EVAP hose that connects the fuel tank to the EVAP canister. Disconnect the fuel filler neck hose. Disconnect the EVAP hose located above the filler neck hose. Support the fuel tank. Remove the fuel tank retaining strap bolts and remove the straps. Carefully lower the fuel tank. If you're cleaning the fuel tank, this would be a good time to inspect and clean the inlet strainer for the fuel pump/fuel level sending unit module. Installation is the reverse of removal. Be sure to tighten the fuel tank strap bolts securely. When you're done, reconnect the cable to the negative battery terminal, then start the engine and check for fuel leaks.
- Q: What precautions should be taken when removing and cleaning a Honda Pilot's fuel tank?A:Vehicle fuel tanks are plastic and unrepairable. Their removal and cleaning should be handled by professionals due to the risk of explosive fumes. Even after cleaning, these fumes can linger. Removed tanks should be kept away from sparks or open flames, especially in garages with gas appliances, to prevent explosions.


Related Honda Pilot Parts
 Honda Pilot Gas Cap
 Honda Pilot Fuel Door
 Honda Pilot Fuel Pump
 Honda Pilot Fuel Pressure Regulator
 Honda Pilot Fuel Door Release Cable
 Honda Pilot Fuel Filler Neck
 Honda Pilot Fuel Filter
 Honda Pilot Fuel Pressure Sensor
 Honda Pilot Fuel Tank Strap
Browse by Year
2025 Fuel Tank 2024 Fuel Tank 2023 Fuel Tank 2022 Fuel Tank 2021 Fuel Tank 2020 Fuel Tank 2019 Fuel Tank 2018 Fuel Tank 2017 Fuel Tank 2016 Fuel Tank 2015 Fuel Tank 2014 Fuel Tank 2013 Fuel Tank 2012 Fuel Tank 2011 Fuel Tank 2010 Fuel Tank 2009 Fuel Tank 2008 Fuel Tank 2007 Fuel Tank 2006 Fuel Tank 2005 Fuel Tank 2004 Fuel Tank 2003 Fuel Tank