My Garage
Cart
Make sure this part fits

Honda 31100-P12-A02 Alternator Assembly (Cjp76) (Denso)

1992-1996 Honda Prelude 31100P12A02

Customer Questions & Expert Answers (3)
31100-P12-A02 Honda Alternator Assembly (Cjp76) (Denso) Illustration 1 of 1
  • Part Description
    Alternator Assembly (Cjp76) (Denso)
  • Replaced By
    31100-P39-003
  • Manufacturer
    Honda
Make sure this part fits
$225.97 MSRP: $321.90
You Save: $95.93 (30%)
1
ADD TO CART
  • Related Parts
  • Product Specifications
  • Vehicle Fitment
  • Customer Questions & Expert Answers
  • Product Specifications

    BrandGenuine Honda
    Manufacturer Part Number31100-P12-A02
    Part DescriptionAlternator Assembly (Cjp76) (Denso)
    Item Dimensions9.3 x 7.9 x 7.4 inches
    Item Weight11.30 Pounds
    ConditionNew
    Fitment TypeDirect Replacement
    ManufacturerHonda
    SKU31100-P12-A02
    WarrantyThis genuine Honda part is guaranteed by Honda's factory warranty.
    Shipping & ReturnShipping Policy Return Policy
    Warning: California's Proposition 65
  • Vehicle Fitment

    Year Make Model Body & Trim Emission & Transmission
    1996 Honda Prelude2 Door SKA 4AT, KA 5MT, KL 4AT, KL 5MT
    1995 Honda Prelude2 Door SKA 4AT, KA 5MT, KL 4AT, KL 5MT
    1994 Honda Prelude2 Door SKA 4AT, KA 5MT, KL 4AT, KL 5MT
    1993 Honda Prelude2 Door SKA 4AT, KA 5MT, KL 4AT, KL 5MT
    1992 Honda Prelude2 Door SKA 4AT, KA 5MT, KL 4AT, KL 5MT
  • Customer Questions & Expert Answers

    Q:
    I would like to make sure that this is the correct fit for my car Posted by HondaPartsNow Specialist
    A:
    You can Select Your Vehicle to check if 31100-P12-A02 fits your vehicle.
    Posted by HondaPartsNow Specialist
    Q:
    What precautions should be observed with alternator to avoid damage on Honda Prelude? Posted by Customer
    A:
    Several precautions must be observed with alternator equipped vehicles to avoid damage to the unit. Always observe proper polarity of the battery connections and use extreme care when jump starting the car, as reversing the battery connections can cause the battery to explode or damage the one-way rectifiers. Remove the battery or, at least, disconnect the cables while charging to prevent alternator damage. Match and consider the polarity of the battery, alternator, and regulator before making any electrical connections within the system. Disconnect the battery ground terminal while repairing or replacing any electrical components. Never use a fast battery charger to jump start a vehicle with a dead battery, attempt to polarize an alternator, or use test lights of more than 12 volts when checking diode continuity. Avoid grounding or shorting out the alternator or regulator terminals, and do not separate the alternator on an open circuit; ensure all connections within the circuit are clean and tight. Refrain from using arc welding equipment on the car with the battery cable, PCM, or alternator connected, and do not operate the alternator with any of its or the battery's lead wires disconnected. Additionally, avoid subjecting the alternator to excessive heat or dampness, such as steam cleaning the engine. When utilizing a booster battery as a starting aid, always connect the positive to positive terminals and the negative terminal from the booster battery to a good engine ground on the vehicle being started.
    Posted by HondaPartsNow Specialist
    Q:
    How to remove and install Alternator on Honda Prelude? Posted by Customer
    A:
    During the test procedure the technician measures the decline in voltage between the alternator output wire that runs from the alternator terminal through the battery positive terminal and from the alternator ground terminal. A 0-18 volt DC scale voltmeter is needed for this test while test points become accessible through air cleaner housing removal or by lifting the vehicle. The testing process requires a fully charged battery with good condition while checking cables followed by engine start and warming up before engine shutdown. Start by installing the engine tachometer then activate the parking brake followed by engine start. Complete the process by activating HIGH blower speed and turning on both high beam lamps and interior illumination. To test the ground circuitry connect the negative voltmeter lead to the positive battery terminal along with the positive lead to B+ output terminal stud on the alternator while observing a voltage below 0.6 volts at 2,400 rpm engine speed. During the positive circuitry test connect the positive voltmeter lead to the negative battery terminal while the negative lead touches the ground terminal stud on the alternator. Avoid exceeding 0.3 volts. The test requires measurement of voltage between this alternator case and the engine. The output voltage test requires a well-conditioned battery as well as voltage drop verification and alternator drive belt tension inspection. Utilize the VAT-40 or equivalent tester to begin the engine at 3,000 rpm with all accessories shut off. Let the radiator cooling fan activate before allowing the engine to idle for 15 seconds. Use an engine speed of 2,000 rpm to check the voltage which needs replacement if it falls below 15.1 volts. The alternator requires replacement when the tested voltage exceeds the specified level. To start this test begin by letting the engine idle while all electrical features stay off and switch the VAT-40 to its charging mode to clear the ammeter display before securing the inductive pick-up unit on B terminal wiring of the alternator. To diagnose the alternator for failure run the engine at 2,000 rpm while measuring voltage; the replacement is necessary when the reading shows less than 13.5 volts. The charging system can be confirmed good if the alternator produces 75 amps or more when the voltage reduces between 12-13.5 volts. Probings require the radio security code before disconnecting both battery cables and removing the power steering pump and alternator's wiring and through bolt alongside the adjustment locknut and then removing the belt and finally the unit itself. The installer needs to follow torque standards for bolts and control the tension of the alternator belt throughout the installation. Specific engine types require the same alternator detaching and installing sequence yet require recording radio security codes and adjusting belt tension after completion.
    Posted by HondaPartsNow Specialist
    If you have any questions about this product, please don't hesitate to ask us. We will be happy to help you!

Genuine Honda Part 31100-P12-A02, the Right Choice

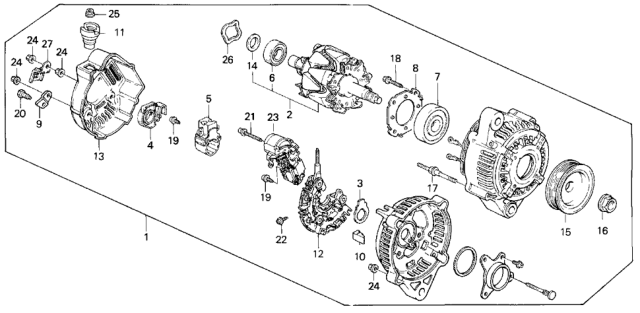
To ensure reliability, purchase Honda part # 31100-P12-A02 Alternator Assembly (Cjp76) (Denso). It is sometimes referred to as Honda Alternator. In terms of quality, OEM parts are the wise choice for Honda owners who want to keep their vehicles at peak performance. They are manufactured to follow official strict factory specifications and are made in world-class facilities. They undergo rigorous tests to ensure that they are durable and safe to use. This part fits 1992-1996 Honda Prelude.

HondaPartsNow.com is a leading supplier of genuine Honda parts and accessories such as Honda 31100P12A02 Alternator Assembly (Cjp76) (Denso). When it comes to choosing the right parts for your vehicle, the solution is simple: shop from our wide selection of genuine Honda parts at competitive prices available on HondaPartsNow.com. We prioritize your convenience, 100% satisfaction, and peace of mind by offering a user-friendly catalog, manufacturer-warranted OEM Honda parts, a hassle-free return policy, and swift delivery service.

Why choose Honda Parts Now

  • Dedicated Service

    Your complete satisfaction is our #1 goal

  • Lowest Prices

    Best deals on genuine OE parts from dealerships

  • Fast Delivery

    Orders are processed and delivered promptly