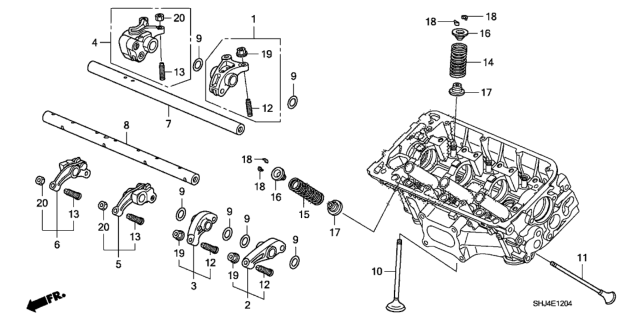
As for 3.0L models, the first steps are the removal of the valve cover, the positioning of the engine at TDC for the piston 1, the belts removal, including the timing one. In the process of removing the assembly, the bolts that are holding the rocker shaft should be loosened gradually in order to minimize spring pressure into the cylinder head; the rocker arms and the shaft assembly should then be lifted from the cylinder head, but the bolts must still remain on the cylinder head to facilitate easy access to the throttles and to reduce the pressure exerted by the tensioner.Spring pressure must be relieved before the rocker shaft mounting bolts are loos Should the rocker arm assembly require further disassembly and inspection, then it is necessary to remove the mounting bolts to free the rocker arms and springs from the shafts, at this point, the positions must be recorded with the purpose of identification in the reassembly stage. The examination of all parts for any sign of wear and or damage is done, while checking that the oil flow is not restricted and that the roller tips of needles have a smooth working surface. For assembly grease all the parts with engine oil before assembling the shafts, paint all the worn parts with camshaft installation lubricant before finally tightening the bolt with the recommended sequence. For 3.5L (J35Z3) models, if possible, take off the valve cover or covers, and then relax the adjusting screws of the rocker arms and the bolts of the rocker arm shaft bridge and holder while spiralling them. Raise the assembly away from the cylinder head, while being careful to not disturb the circlips for lost motion assemblies. Tie up intake rocker arms with rubber bands and pull out the rocker arm shaft bolts and then remove the components. Check for wear and tear and the efficiency of the VTEC pistons. clean engine oil should then be used to applied to the rocker arms and pistons before assembly and lubrication of the shafts before they can be fitted. For 3.5L (J35Z2 and J35Y1) models procedure is quite similar to the one described above, where you have to make sure that all the parts are tightened with rubber bands and fitted correctly before proceeding with reassembly. Remove old liquid gasket and apply new bead before installing the rocker arm assemblies and tighten the bolts in spiral motion. Last but not least, inspect and correct, if necessary, valve clearance, and test the leaks of oil and operation of the engine.


")

")


 (Nippon Hatsujo)")
