My Garage
Cart
Make sure this part fits

Honda 44306-SHJ-L01 Driver Side Driveshaft Assembly

2007-2010 Honda Odyssey 44306SHJL01

Customer Questions & Expert Answers (4)
44306-SHJ-L01 Honda Driver Side Driveshaft Assembly Product Photo 1 of 1
  • Part Description
    Axle Assembly
  • Position
    Driver Side
  • Replaces
    44306-SHJ-C01RM, 44306-SHJ-C01, 44306-SHJ-L01RM
  • Manufacturer
    Honda
Make sure this part fits
$279.79 MSRP: $398.57
You Save: $118.78 (30%)
1
ADD TO CART
  • Related Parts
  • Product Specifications
  • Vehicle Fitment
  • Customer Questions & Expert Answers
  • Product Specifications

    BrandGenuine Honda
    Manufacturer Part Number44306-SHJ-L01
    Part DescriptionAxle Assembly
    Item Dimensions31.2 x 6.2 x 6.2 inches
    Item Weight4.10 Pounds
    PositionDriver Side
    ConditionNew
    Fitment TypeDirect Replacement
    Replaces44306-SHJ-C01RM, 44306-SHJ-C01, 44306-SHJ-L01RM
    ManufacturerHonda
    SKU44306-SHJ-L01
    WarrantyThis genuine Honda part is guaranteed by Honda's factory warranty.
    Shipping & ReturnShipping Policy Return Policy
    Warning: California's Proposition 65
  • Vehicle Fitment

    Year Make Model Body & Trim Emission & Transmission
    2010 Honda Odyssey5 Door EX, 5 Door EX-L, 5 Door EXL-T, 5 Door LXKA 5AT
    2009 Honda Odyssey5 Door EX, 5 Door EX-L, 5 Door EXL-T, 5 Door LXKA 5AT
    2008 Honda Odyssey5 Door EX, 5 Door EX-L, 5 Door EXL-T, 5 Door LXKA 5AT
    2007 Honda Odyssey5 Door EX, 5 Door EX-L, 5 Door EXL-T, 5 Door LXKA 5AT
  • Customer Questions & Expert Answers

    Q:
    Is this part a direct fit for my VIN#? Posted by HondaPartsNow Specialist
    A:
    You can Select Your Vehicle to check if 44306-SHJ-L01 fits your vehicle.
    Posted by HondaPartsNow Specialist
    Q:
    How to Remove and Install a Front Axle Shaft on a Honda Odyssey? Posted by Customer
    A:
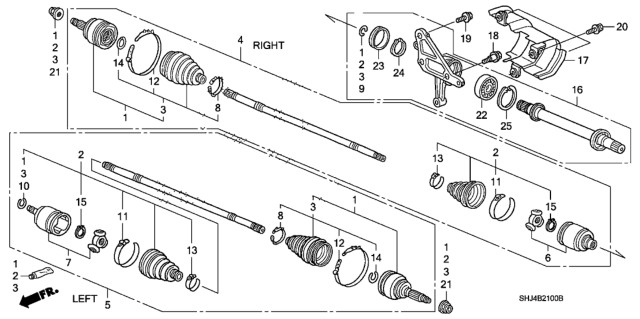
    Set the parking brake and remove the wheel cover or hubcap. If the axle shaft/hub nut is staked, unstake it with a center punch or chisel. Loosen the axle shaft/hub nut with a large socket and breaker bar, but do not remove it yet. Loosen the front wheel lug nuts, raise the vehicle, and support it securely on jackstands before removing the wheel. If removing the left axle shaft, drain the transaxle lubricant. Remove the axle shaft/hub nut, disconnect the upper end of the stabilizer bar link, and separate the control arm from the steering knuckle. To loosen the axle shaft from the hub splines, tap the end of the axle shaft with a hammer and brass punch; if it is stuck, a puller may be necessary. Pull out on the steering knuckle and detach the axle shaft from the hub, suspending the outer end on a bungee cord or wire. Before removing the axle shaft, check for lubricant leakage around the differential seal, as a leak may require seal replacement after removal. For the right axle shaft, tap the inboard joint off the intermediate shaft using a long drift; for the left axle shaft, position a prybar against the inner joint and carefully pry it off the transaxle side gear. Avoid using the axle shaft to pull on the inner joint to prevent damage. Remove the axle shaft assembly, ensuring not to over-extend the inner joint or damage the axle shaft boots. If necessary to move the vehicle while the axle shaft is out, place a large bolt with two large washers through the hub and tighten the nut securely. Installation is the reverse of removal, with additional points including removing the old set-ring from the inner CV joint or intermediate shaft and installing a new one, applying a film of multi-purpose grease around the splines of the joints, and ensuring the axle shaft is seated properly in the transaxle side gear or center support bearing. Clean all foreign matter from the axle shaft outer CV joint threads, install the new axle shaft/hub nut, and tighten it securely without reaching the specified torque at this time. Tighten the suspension fasteners to the specified torque, install the wheel and lug nuts, lower the vehicle, and then tighten the axle shaft/hub nut to the specified torque, staking it to the groove in the axle shaft. Finally, tighten the wheel lug nuts to the specified torque and add transaxle lubricant if it was drained or spilled.
    Posted by HondaPartsNow Specialist
    Q:
    What Are the Components and Maintenance Practices for Axle Shafts and CV Joints on a Honda Odyssey? Posted by Customer
    A:
    Drive is delivered from the transaxle to the wheels by means of two axle shafts, of which one end fits onto the side gears of the differential by means of splines. The axle shafts can be withdrawn for renewal of the oil seals, and the outer ends are splined to the front hubs and locked by usually a large nut. Every axle shaft assembly is made up of an inner and outer CV joint linked by an axle shaft, with the inner ends containing a tripod joint that permits angular, as well as axial movement; it is also designed to allow the inner CV joints to slide outwards, if the axle shaft adjusts with wheel movement. The outer CV joints have a ball-and-cage structure through which angular motion is possible, but not the axial type. Proper inspection of the boots to look for the damage and seeping of lubricant is key since torn boots will harm the CV joint. It is generally necessary to pull the axle shaft to replace the boot, but some automotive socket stores have 'split' type boots for those who do not wish to pull the axle shaft. However, it is recommended that the axle shaft be momentarily withdrawn and the boots of the CV joint opened to check that they are clear of offending materials that may catalyse wear. Some of these signs you will be seeing when your CV joints are worn or damaged include; you find lubricant on the CV joint, getting a clicking sound when making corners, there is a sound like a clunk when you speed up after slowing down, the car's steering vibrates at high speeds. To confirm wear, hold one axle at its end opposite the CV joint, and the other at the related CV joint housing, while rotating the axle in each direction-think of it as 'windshield wiper' like motion where you see play or loose splines, or hopelessly sloppy CV joints. The axle shafts should be also checked for cracks, dents and distortion.
    Posted by HondaPartsNow Specialist
    Q:
    What is the other side for this part#44306-SHJ-L01? Per the VIN provided. Posted by Customer: 2007 Honda Odyssey
    A:
    Right side axle is 44305-SHJ-L01
    Posted by HondaPartsNow Specialist 6/5/2019
    If you have any questions about this product, please don't hesitate to ask us. We will be happy to help you!

Genuine Honda Part 44306-SHJ-L01, the Right Choice

To ensure reliability, purchase Honda part # 44306-SHJ-L01 Driver Side Driveshaft Assembly. It is sometimes referred to as Honda Axle Shaft. In terms of quality, OEM parts are the wise choice for Honda owners who want to keep their vehicles at peak performance. They are manufactured to follow official strict factory specifications and are made in world-class facilities. They undergo rigorous tests to ensure that they are durable and safe to use. This part fits 2007-2010 Honda Odyssey.

HondaPartsNow.com is a leading supplier of genuine Honda parts and accessories such as Honda 44306SHJL01 Driver Side Driveshaft Assembly. When it comes to choosing the right parts for your vehicle, the solution is simple: shop from our wide selection of genuine Honda parts at competitive prices available on HondaPartsNow.com. We prioritize your convenience, 100% satisfaction, and peace of mind by offering a user-friendly catalog, manufacturer-warranted OEM Honda parts, a hassle-free return policy, and swift delivery service.

Why choose Honda Parts Now

  • Dedicated Service

    Your complete satisfaction is our #1 goal

  • Lowest Prices

    Best deals on genuine OE parts from dealerships

  • Fast Delivery

    Orders are processed and delivered promptly