My Garage
Cart
Make sure this part fits

Honda 13210-PM3-000 Connecting Rod

1988-1995 Honda 13210PM3000

Customer Questions & Expert Answers (4)
13210-PM3-000 Honda Connecting Rod Product Photo 1 of 5
  • Part Description
    Connecting Rod
  • Manufacturer
    Honda
  • Manufacturer's Notes
    This part is discontinued.
Make sure this part fits
  • Related Parts
  • Product Specifications
  • Vehicle Fitment
  • Customer Questions & Expert Answers
  • Product Specifications

    BrandGenuine Honda
    Manufacturer Part Number13210-PM3-000
    Part DescriptionConnecting Rod
    Item Dimensions7.0 x 3.2 x 1.0 inches
    Item Weight1.00 Pounds
    ConditionNew
    Fitment TypeDirect Replacement
    Require Quantity4
    ManufacturerHonda
    SKU13210-PM3-000
    WarrantyThis genuine Honda part is guaranteed by Honda's factory warranty.
    Shipping & ReturnShipping Policy Return Policy
    Warning: California's Proposition 65
  • Vehicle Fitment

    Year Make Model Body & Trim Emission & Transmission
    1991 Honda CRX2 Door DXKA 4AT, KA 5MT, KL 4AT, KL 5MT
    1990 Honda CRX2 Door DXKA 4AT, KA 5MT, KL 4AT, KL 5MT
    1989 Honda CRX2 Door DXKA 4AT, KA 5MT, KL 4AT, KL 5MT
    1988 Honda CRX2 Door DXKA 4AT, KA 5MT, KL 4AT, KL 5MT
    1995 Honda Civic2 Door DX, 3 Door CX, 3 Door DX, 4 Door DX, 4 Door LXKA 4AT, KA 5MT, KL 5MT
    1994 Honda Civic2 Door DX, 3 Door CX, 3 Door DX, 4 Door DX, 4 Door LXKA 4AT, KA 5MT, KL 4AT, KL 5MT
    1993 Honda Civic2 Door DX, 3 Door CX, 3 Door DX, 4 Door DX, 4 Door LXKA 4AT, KA 5MT, KL 4AT, KL 5MT
    1992 Honda Civic3 Door CX, 3 Door DX, 4 Door DX, 4 Door LXKA 4AT, KA 5MT, KL 4AT, KL 5MT
    1991 Honda Civic3 Door DX, 3 Door STD, 4 Door DX, 4 Door LX, 5 Door DXKA 4AT, KA 4MT, KA 5MT, KL 4AT, KL 4MT, KL 5MT
    1990 Honda Civic3 Door DX, 3 Door STD, 4 Door DX, 4 Door LX, 5 Door DXKA 4AT, KA 4MT, KA 5MT, KL 4AT, KL 4MT, KL 5MT
    View More
  • Customer Questions & Expert Answers

    Q:
    Does this fit my car? Posted by HondaPartsNow Specialist
    A:
    You can Select Your Vehicle to check if 13210-PM3-000 fits your vehicle.
    Posted by HondaPartsNow Specialist
    Q:
    How to remove and install the Connecting Rod and Pistons on Honda CRX? Posted by Customer
    A:
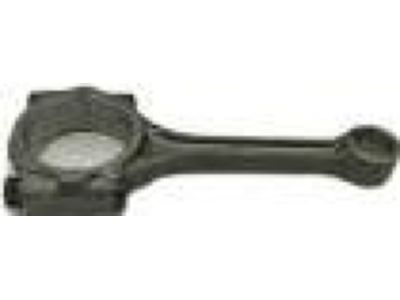
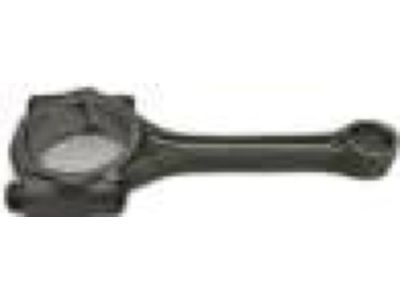
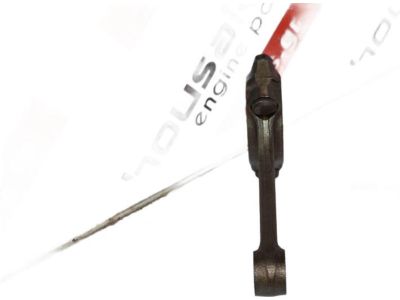
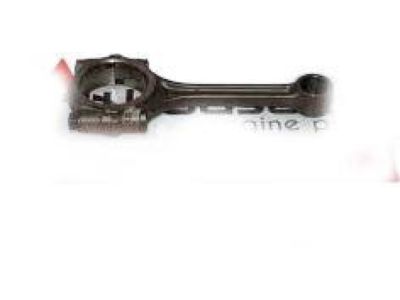
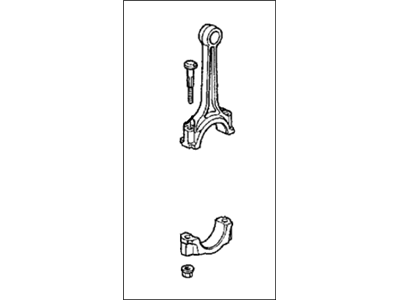
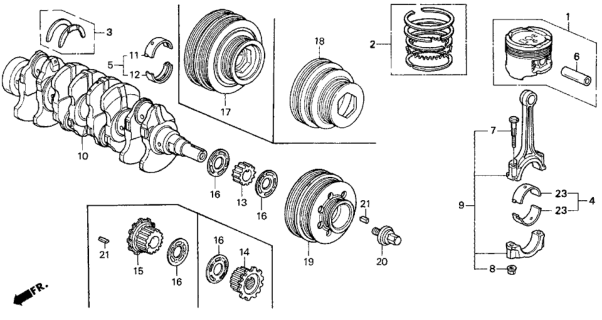
    When draining coolant, be aware that ethylene glycol antifreeze can attract pets, posing a fatal risk if ingested, so always use a sealable container and reuse coolant unless contaminated or several years old. Minimize exposure to used engine oil, which can cause skin disorders, including cancer, by wearing protective gloves and washing hands promptly after contact. To begin removal with the engine out, disconnect the negative battery cable and remove the hood, then drain the radiator and engine oil. Raise the vehicle and support it with safety stands, attaching a chain to the clutch cable bracket to relieve the center mount load without removing the left engine mount. Proceed to remove the center beam, engine lower mount, and cylinder head, then loosen and remove the oil pan and flywheel dust shield, tapping the corners lightly if necessary. Remove the oil passage block and oil pump assembly, then from underneath, take off the connecting rod bearing caps and push the pistons and connecting rods out, checking for carbon buildup or ridges before removal. When handling piston rings, avoid excessive force, and use a hydraulic press for piston pin removal. For installation, stagger the gaps of the three-piece oil ring and ensure markings on the second and top rings face upward, checking for smooth movement. Use a ring compressor to install the piston, applying oil to the rings and cylinder wall, and guide the connecting rod carefully during installation. Reassemble components in reverse order, ensuring proper alignment of bearing caps. For cleaning and inspection, remove rings with a piston ring expander, clean grooves carefully, and inspect for wear or damage, replacing pistons as necessary. Check the cylinder bore for wear using a telescope gauge and micrometer, measuring at specified points to determine clearance and whether oversized pistons are needed. When fitting new piston rings, compress them and measure the end gap, filing as necessary to avoid breakage, and inspect grooves for wear. Install rings in the correct order, ensuring proper positioning and spacing, and use a ring compressor for final assembly into the engine.
    Posted by HondaPartsNow Specialist
    Q:
    What steps should be taken before inspecting Connecting Rod and Pistons on Honda Del Sol? Posted by Customer
    A:
    The piston/connecting rod assemblies must needed to be cleansed, and the initial piston rings have to be taken off from the pistons and additionally new piston rings have to be incorporated at the time of reassembling. A piston ring expander tool is to be used to ease out the rings without scratching the pistons. Carbon deposits have to be removed manually with a wire brush or fine emery paper from the top of the piston down as far as the rings; use of electric wire brush erodes the piston's material. Dirty deposits made of carbon can be wiped out by using a piston ring groove cleaning tool or a fragment of an old piston ring paying attention to possible damaging of the grooves. After that the piston/rod assemblies need to be cleaned with solvent and if possible the piston/rod should be blow dried with compressed air. If the pistons and cylinder walls are not worn out or damaged keen and the engine block is not rebored new pistons may not be necessary as they are usually over sized but new piston rings should always be fit in a rebuild. Every piston should be for signs such as cracks, scoring, scuffing, hoop cracks, holes and burned areas as these suggest that the piston has overheated or there are abnormal combustions and thus a thorough check of the cooling and lubrication systems should be made. Electrolytic (non uniform) corrosion shows up in the form of small pits around the openings which points towards the possibility of coolant leakage and this must be rectified before rebuilding the engine as it may occur again. Side clearance of the piston rings should be done using feeler gauge at several positions on each groove and the right ring should be used for the right groove; in case the clearance is above the prescribed limit, then new pistons will be needed. Piston to bore clearance must be checked by measuring the bore diameter and piston diameter and checking whether they are correctly matched and calculating the clearance by subtracting the piston diameter from the bore diameter; if the results show too much clearance it means that the bore requires rebore and new pistons and rings must be fitted. Piston-to-rod clearance has to be checked by turning the piston and the rod in opposite directions; if there is significant end-play, often felt or seen, some or all of which may be removed at an automotive machine shop. In case pistons require removal from connecting rods they should be taken for assessment for bend and twist to a machine shop. Connecting Rods should be checked for crack and damage by removing the rod cap to clean the bearing surface, looking for nicks or scratches, old bearings should be replaced new ones installed, and caps tightened with finger tightening if rebuilding because of connecting rod knock then new rods should also be fitted.
    Posted by HondaPartsNow Specialist
    Q:
    What steps should be taken before installing the connecting rod and pistons on a Honda Del Sol? Posted by Customer
    A:
    When the piston and connecting rod assemblies are to be fitted, but before they are fitted, the cylinder walls should be free from any lubricant, the top edge of each cylinder should be chamfered, and the crankshaft should be assembled. Carefully unscrew the cap of the number one connecting rod and, applying the marks made during dismantle, be sure to clean the bearing surfaces with the piece of cotton wool. According to received information it was recommended not to pick the new bearing inserts with fingers to avoid carrying contamination on gloves. Remove the old 'O' ring and clean the new one as well as the back side of the new upper bearing insert and position it into the connecting rod correctly in such a way that the tab fits into the recess without hammering or nicking the bearing face. If the crankshaft has been machined, or has any BEAM machining, fit standard bearings, otherwise use oversize bearings to match the connecting rod bearings according to their stamped numbers. Purge the area of other bearing insert's back side as well and then put it in the rod cap so that the tab should fit correctly; there is no need to lubricate it. Space the piston ring gaps around the piston with no two gaps being opposite each other on the piston's thrust surfaces areas. Place a section of hose over each connecting rod cap bolt, apply clean engine oil to rings in cylinder bore and push piston and rings into the bore with piston ring compressor intact with about a 1/2 inch sticking out of the skirt. Turn engine for the number one connecting rod journal and place it at the bottom dead center and lubricate the cylinder walls. Place the piston/connecting rod fully into the cylinder bore with the mark on the piston pointing towards the front of the vehicle and using the hammer lightly tap on the ring compressor to make sure that it locates itself on the block. Gently hit the piston with a wooden or plastic hammer handle so as to slide the connecting rod over the crankshaft journal without applying force that will harm the piston or the rings. During the final tightening process and after installation, check the P.C. for the oil clearance of the connecting rod bearing using Plastigage, make sure the marks on the cap and the rod match. Nuts must be tightened to the required torque in a step by step manner after which the cap is removed to read the Plastigage to ascertain the clearance. In the case that the above clearance is incorrect, then what may be required is a check on dirt or oil contamination or a check on the journal diameter. Remove any Plastigage gently, use a clean cloth to wipe off the grease, spread a thin layer of moly-base grease or engine assembly lube on the bearing surfaces and replace the connecting rod and cap and tighten the nuts to the prescribed torque. That is done for the rest of the assemblies and it is critical to maintain cleanness as well as the correct direction of the piston. After that turn a crankshaft in order to check for binding and the last preparatory step is to measure the counterweight endplay with pin of connecting rod which must not be over the specified limit. When necessary, resize at an automotive machine shop.
    Posted by HondaPartsNow Specialist
    If you have any questions about this product, please don't hesitate to ask us. We will be happy to help you!

Genuine Honda Part 13210-PM3-000, the Right Choice

To ensure reliability, purchase Honda part # 13210-PM3-000 Connecting Rod. It is sometimes referred to as Honda Connecting Rod. In terms of quality, OEM parts are the wise choice for Honda owners who want to keep their vehicles at peak performance. They are manufactured to follow official strict factory specifications and are made in world-class facilities. They undergo rigorous tests to ensure that they are durable and safe to use. This part fits 1988-1991 Honda CRX, 1988-1995 Honda Civic, 1993-1995 Honda Del Sol.

HondaPartsNow.com is a leading supplier of genuine Honda parts and accessories such as Honda 13210PM3000 Connecting Rod. When it comes to choosing the right parts for your vehicle, the solution is simple: shop from our wide selection of genuine Honda parts at competitive prices available on HondaPartsNow.com. We prioritize your convenience, 100% satisfaction, and peace of mind by offering a user-friendly catalog, manufacturer-warranted OEM Honda parts, a hassle-free return policy, and swift delivery service.

Why choose Honda Parts Now

  • Dedicated Service

    Your complete satisfaction is our #1 goal

  • Lowest Prices

    Best deals on genuine OE parts from dealerships

  • Fast Delivery

    Orders are processed and delivered promptly