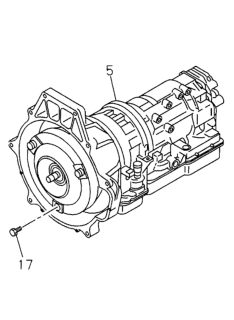
Unplug the negative battery cable first, lift the top half off the air cleaner housing, and detach it to keep the air intake system free from damage as you lift up the engine. On 4WD models, first unbutton the knob on the shift lever, drop the center console, slide out the transfer case shift lever. Securely lift the car on jackstands, remove the skid plate and anything else that might block work on the transmission or transfer case, before starting your repair. Separate all electrical connectors from the transmission and also disconnect the wires from the transfer case, in models with 4WD. Let the fluid drain out from the transmission and, on 4x4 trucks, let the transfer case oil run empty. First, you need to disconnect the oil cooler lines from the transmission. After that, take off any brackets holding those lines. Remove the ends of the lines from the oil-cooled hoses before pulling out all the lines. On Rodeo/Passport models, first take off the front crossmember, then remove the driveshaft and disconnect the shift lever from the shift linkage. Pull out the dipstick tube if present, followed by removing the engine stiffener, heat protector, unplugging electrical connections, releasing and unplugging the harness connectors, and placing the harness aside - all on Rodeo/Passport models. Pull out the starter motor, and for Rodeo/Passport cars, take off the cover over the torque converter. Paint over the bolt holes that attach the torque converter to the driveplate. When you remove these bolts, mark their relationship with white paint so you can remember how they go together later. Before removing the engine and transmission/transfer case, use jacks to lift them up plus wooden blocks under both. Put the jack head between transmission and transfer case, with a wood block as a buffer. Lift the transmission/transfer case up high enough to take out the crossmember by removing the rear bolts from both the crossmember and frame, plus the rear mount-to-rear crossmember nuts and skidplate if you have one. Take out the engine bolts that attach the transmission to the engine. Keep careful track of all bolts, their sizes, types, lengths, and position. Lower the engine end of the transmission/transfer case to unfasten and take out the upper bolt holding it to the engine base, then carefully move the entire unit to the back of the engine while making sure the torque converter detaches from its driveplate connection with the engine. Before you put it back together, be sure the torque converter is tightly held by both the pump and the input shaft. Push it in while turning it slowly until you hear it drop into place. Position the jack and transmission together, making sure the torque converter stays level to keep fluid from sliding forward to the back. Put the transmission over the driveplate so the torque converter's holes match up. Pull it forward slowly, allowing the dowel pins and torque converter to join. Place the transmission-to-engine bolts and nuts correctly on the engine block before tightening them to important torque values. Then add and tighten the torque converter-to-driveplate bolts. When working on Rodeo/Passport models, fasten the torque converter cover and tighten all bolts. Replace the transmission mount if you took it out earlier, and bolt the rear crossmember to the frame. Secure the crossmember nuts with tools. Lower the transmission/transfer case, line up the mount studs with their correct holes in the crossmember, screw on and tightly secure the nuts. Place the transmission/transfer case back on top of the support jacks. Reinstall the dipstick tube (if present), the starter motor, and the engine stiffening block while making sure all bolts are tight. Run wires for transmission and transfer case back to the lever and plug in all electrical connections. Replace all drive shafts by connecting the parts you took off earlier. Also connect any exhaust components you had to separate and install all heat shields you removed. First pour the recommended fluid into the transfer case, and add the same fluid type to the transmission models with no dipstick tube. Place all jackstands back, let the vehicle come down to the ground, put in oil your transmission needs, start the engine, and see if you have any fluid leaks. On 4WD models, put the transfer case dial back in, then press the top section of the air filter case into position.

")