×
- Hello
- Login or Register
- Quick Links
- Live Chat
- Track Order
- Parts Availability
- RMA
- Help Center
- Contact Us
- Shop for
- Honda Parts
- Honda Accessories
My Garage
My Account
Cart
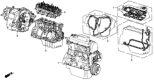
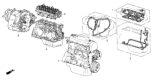
Genuine 1987 Honda CRX Transmission Assembly
Trans Assembly- Select Vehicle by Model
- Select Vehicle by VIN
Select Vehicle by Model
orMake
Model
Year
Select Vehicle by VIN
For the most accurate results, select vehicle by your VIN (Vehicle Identification Number).
6 Transmission Assemblies found

 Product Specifications
- Other Name: Transaxle
- Item Weight: 99.00 Pounds
- Item Dimensions: 22.9 x 21.0 x 19.9 inches
- Condition: New
- Fitment Type: Direct Replacement
- SKU: 20021-PH0-680
- Warranty: This genuine part is guaranteed by Honda's factory warranty.
 Product Specifications
- Other Name: Transaxle
- Item Weight: 71.00 Pounds
- Item Dimensions: 20.0 x 17.0 x 15.8 inches
- Condition: New
- Fitment Type: Direct Replacement
- SKU: 20011-PE6-J40
- Warranty: This genuine part is guaranteed by Honda's factory warranty.
- Product Specifications
- Other Name: Transaxle
- Item Weight: 63.80 Pounds
- Item Dimensions: 19.6 x 16.9 x 16.3 inches
- Condition: New
- Fitment Type: Direct Replacement
- SKU: 20011-PE6-J30
- Warranty: This genuine part is guaranteed by Honda's factory warranty.
- Product Specifications
- Other Name: Transaxle
- Item Weight: 40.90 Pounds
- Item Dimensions: 19.8 x 16.8 x 16.7 inches
- Condition: New
- Fitment Type: Direct Replacement
- SKU: 20011-PE6-771
- Warranty: This genuine part is guaranteed by Honda's factory warranty.
- Product Specifications
- Item Weight: 68.20 Pounds
- Item Dimensions: 20.4 x 17.6 x 16.3 inches
- Condition: New
- Fitment Type: Direct Replacement
- SKU: 20011-PE6-740
- Warranty: This genuine part is guaranteed by Honda's factory warranty.
- Product Specifications
- Other Name: Transaxle
- Item Weight: 59.50 Pounds
- Item Dimensions: 19.7 x 16.7 x 15.9 inches
- Condition: New
- Fitment Type: Direct Replacement
- SKU: 20011-PE6-692
- Warranty: This genuine part is guaranteed by Honda's factory warranty.
1987 Honda CRX Transmission Assembly
Our website is the optimal online store for when you need any genuine 1987 Honda CRX Transmission Assembly. We offer a wide range of 1987 Honda CRX Transmission Assembly at unbeatable prices. We will help provide you with a worry-free shopping experience at highly competitive prices. In addition, all OEM parts are backed by the manufacturer's warranty.
1987 Honda CRX Transmission Assembly Parts Questions & Experts Answers
- Q: How to remove and install manual Transmission Assembly on 1987 Honda CRX?A: Switch off the battery ground, unlock your steering wheel, and engage the gearchange into neutral. Take out these wires from their connections: battery positive cable, solenoid black/white wire, temperature gauge sending unit wire, ignition timing thermo-sensor wire, back-up light switch, and distributor wiring, plus the transaxle ground cable in the engine compartment. Take off the speedometer wire from the transaxle, but don't take the whole cable assembly apart. Take off either the clutch slave cylinder and hydraulic line, or disconnect the clutch cable from the release arm. Loosen the bolts that hold the starter to each side and top of the engine. After enabling the parking brake, block the rear tires, put jack stands under the front, and take off both front wheels. Using a chain hoist, lift the engine slightly from the back to take the mounting pressure off, and then drain the transaxle, replacing the drain plug and washer. Uninstall the splash shields on top and bottom and remove the stabilizer bar beneath. Separate each lower joint and tie rod end with the help of a ball joint tool. Push the right CV-joint out until it won't go any farther, press a pry-bar against the inner joint, and force the right axle partially out of the transaxle opening by ¼ inch so that the spring clip escapes its groove inside the differential spline. After that, pull it free completely. Repeat this procedure on the other side. Disconnect the shift lever torque rod from the clutch housing. Move the pin retainer back, drive the spring pin out with a pin punch, detach the shift rod, and remove the bolt fastening the shift rod's clevis if the car has one. Strap a jack meant for transaxles underneath it, then lift the transaxle and set it on the jack to relieve its weight. Loosen and take out these seven parts: engine torque rods and brackets, bolts from the front transaxle mount, transaxle housing bolts from the engine torque bracket, remaining starter mounting bolts, and the starter itself. Unbolt all remaining engine and transaxle mounting bolts while also removing the three other bolts: one on the engine damper bracket, one at the clutch housing, and the final bolt from the engine. Take off the transmission from the engine by removing two lower bolts at the engine damper, then pull the transmission away while lowering the jack. When assembling, create two 14mm dowel pins and insert them in the clutch housing to simplify putting everything together. Put the raise the transaxle and carefully place it into position onto the two wooden supports, lining the gear shaft with the groove on the clutch. Install lower bolts for the damper while you can, and tighten both bolts until the clutch housing fits perfectly against the engine block. Screw in two bottom mounting bolts, apply 33 foot-pounds of force (45 Newton meter) to each one. Put on the front and rear torque rod brackets and tighten down the front torque rod bolts at 74 ft. lbs., the front bracket bolts at 45 ft. lbs., the rear torque rod bolts at 74 ft. lbs., and the rear bracket bolts at 65 ft. lbs. Without the transaxle jack, place the starter in position, then tighten the starter's bolts to 33 ft. lbs. (45 Nm). Put the end of the right steering knuckle far out enough to push it into the transaxle, attaching new 26mm spring clips on both sides before doing the other steering knuckle the same way. Reattach the lower ball joints and tighten their nuts to 32 ft. lbs., attach the tie rods and tighten their nuts to 32 ft. lbs. Fix the shift linkage and the shift lever rod onto the clutch housing and tighten the bolt to 7 ft. lbs. (84 inch lbs.). Put on the stablizer bar, lower shields, front tires, and tighten the lug nuts following guidelines. Put in the starter bolts, and tighten them to 45 Nm. Then fasten the clutch slave cylinder or cable to the release arm. Place new O-rings on the speedometer cable then apply engine oil, attach all wiring in the engine area, and refill the transaxle with SAE 10W-40 engine oil.
Related 1987 Honda CRX Parts
 1987 Honda CRX Torque Converter
 1987 Honda CRX Valve Body
 1987 Honda CRX Side Cover Gasket
 1987 Honda CRX Transmission Gasket