×
- Hello
- Login or Register
- Quick Links
- Live Chat
- Track Order
- Parts Availability
- RMA
- Help Center
- Contact Us
- Shop for
- Honda Parts
- Honda Accessories
My Garage
My Account
Cart
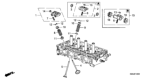
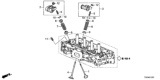
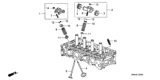
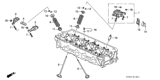
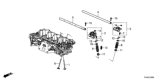
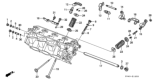
Genuine Honda Accord Exhaust Valve
Exhaust Muffler Valve- Select Vehicle by Model
- Select Vehicle by VIN
Select Vehicle by Model
orMake
Model
Year
Select Vehicle by VIN
For the most accurate results, select vehicle by your VIN (Vehicle Identification Number).
21 Exhaust Valves found


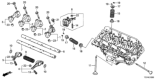


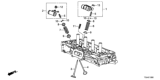


Honda Accord Valve, Exhuast (Tmss)
Part Number: 14721-P0A-000$74.09 MSRP: $104.65You Save: $30.56 (30%)
Honda Accord Valve Set, Exhuast
Part Number: 06147-59B-U00$77.27 MSRP: $109.14You Save: $31.87 (30%)


| Page 1 of 2 |Next >
1-20 of 21 Results
Honda Accord Exhaust Valve
The Exhaust Valve in Honda Accord vehicles is extensively used in internal combustion engine that permit release of burnt exhaust gases from the cylinders. This function is crucial in ensuring the engine achieves a good condition because any problem of the Exhaust Valve can result to low power output, failure to start, low rpm as well as low fuel economy. Honda Accord models over the years maybe have used different styles of Exhaust Valves, as much as we may not know specific differences. The primary mode of operation of the Exhaust Valve is the ability to open and close giving way to the release of the exhaust gases so that the engine is able to run effectively. Exhaust Valve plays a significant role in the smooth running of the Honda Accord model's engine hence efficient running of this part resolves many problems.
In search of affordable OEM Honda Accord Exhaust Valve? Consider browsing through our extensive inventory of genuine Honda Accord Exhaust Valve. Not only do we provide market-leading prices and a manufacturer's warranty, but we also pride ourselves on exceptional customer service and swift delivery.
Honda Accord Exhaust Valve Parts Questions & Experts Answers
- Q: How to Check and Adjust Exhaust Valve and Intake Valve Clearance on V6 Engine on Honda Accord?A:The valve clearance generally does not need adjustment unless valvetrain components have been replaced, a valve job has been performed, or if the valves are noisy. The simplest check for proper valve adjustment is to listen carefully to the engine running with the hood open; if the valvetrain is noisy, adjustment is necessary. The valve clearance must be checked and adjusted with the engine cold. To begin, remove the Valve Covers and rotate the crankshaft clockwise to position the number 1 piston at TDC. In this position, check and, if necessary, adjust the valves for cylinder number 1, which has four valves. Starting with the intake valve, insert a feeler gauge of the correct thickness between the valve stem and the rocker arm. Withdraw it to feel a slight drag; if there's no drag or a heavy drag, loosen the adjuster nut and back off the adjuster screw. Carefully tighten the adjuster screw until a slight drag is felt on the feeler gauge upon withdrawal. Hold the adjuster screw with a screwdriver to prevent it from turning, then tighten the locknut and recheck the clearance to ensure it hasn't changed. Repeat this process for the other intake valve and the two exhaust valves. Next, rotate the crankshaft pulley clockwise until the number 4 on the camshaft sprocket aligns with the pointer on the timing belt cover, then check and adjust the number 4 cylinder valves. Rotate the crankshaft pulley 120 degrees clockwise until the number 2 cylinder is at TDC and check and adjust its valves. Continue rotating the crankshaft pulley clockwise, following the firing order to adjust the remaining valves. Finally, install the valve covers.

Related Honda Accord Parts
 Honda Accord Headlight
 Honda Accord Intake Manifold Gasket
 Honda Accord Oil Pressure Switch
 Honda Accord Relay
 Honda Accord Exhaust Manifold Gasket
 Honda Accord Heater Control Valve
 Honda Accord Exhaust Pipe
 Honda Accord Rocker Arm
 Honda Accord Power Transistor
 Honda Accord Heater Core
 Honda Accord Idler Pulley
 Honda Accord Intake Valve
Browse by Year
2025 Exhaust Valve 2024 Exhaust Valve 2023 Exhaust Valve 2022 Exhaust Valve 2021 Exhaust Valve 2020 Exhaust Valve 2019 Exhaust Valve 2018 Exhaust Valve 2017 Exhaust Valve 2016 Exhaust Valve 2015 Exhaust Valve 2014 Exhaust Valve 2013 Exhaust Valve 2012 Exhaust Valve 2011 Exhaust Valve 2010 Exhaust Valve 2009 Exhaust Valve 2008 Exhaust Valve 2007 Exhaust Valve 2006 Exhaust Valve 2005 Exhaust Valve 2004 Exhaust Valve 2003 Exhaust Valve 2002 Exhaust Valve 2001 Exhaust Valve 2000 Exhaust Valve 1999 Exhaust Valve 1998 Exhaust Valve 1997 Exhaust Valve 1996 Exhaust Valve 1995 Exhaust Valve 1994 Exhaust Valve 1993 Exhaust Valve 1992 Exhaust Valve 1991 Exhaust Valve 1990 Exhaust Valve 1989 Exhaust Valve 1988 Exhaust Valve 1987 Exhaust Valve 1986 Exhaust Valve 1985 Exhaust Valve 1984 Exhaust Valve 1983 Exhaust Valve 1982 Exhaust Valve 1981 Exhaust Valve 1980 Exhaust Valve 1979 Exhaust Valve 1978 Exhaust Valve 1977 Exhaust Valve 1976 Exhaust Valve