×
- Hello
- Login or Register
- Quick Links
- Live Chat
- Track Order
- Parts Availability
- RMA
- Help Center
- Contact Us
- Shop for
- Honda Parts
- Honda Accessories
My Garage
My Account
Cart
Genuine Honda Civic Fuel Tank
Gas Tank- Select Vehicle by Model
- Select Vehicle by VIN
Select Vehicle by Model
orMake
Model
Year
Select Vehicle by VIN
For the most accurate results, select vehicle by your VIN (Vehicle Identification Number).
77 Fuel Tanks found


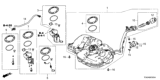


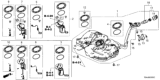
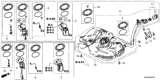
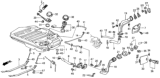
Honda Civic Fuel Tank Complete Set
Part Number: 17044-TBA-L11$965.36 MSRP: $1393.01You Save: $427.65 (31%)
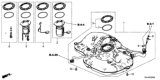


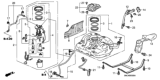
Honda Civic Fuel Tank Complete Set
Part Number: 17044-TBA-A05$748.87 MSRP: $1080.62You Save: $331.75 (31%)

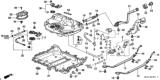
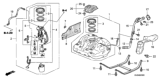
Honda Civic Fuel Tank Complete Set
Part Number: 17044-TBA-L10$965.36 MSRP: $1393.01You Save: $427.65 (31%)
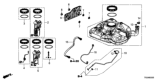
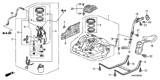
Honda Civic Tank Assembly, Cng
Part Number: 17500-S5W-A01$3304.25 MSRP: $4768.03You Save: $1463.78 (31%)


Honda Civic Tank Assembly, Cng
Part Number: 17500-PDN-A02$3304.25 MSRP: $4768.03You Save: $1463.78 (31%)
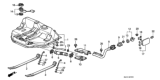
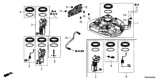
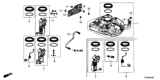
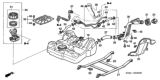
Honda Civic SET,FUEL TANK COM
Part Number: 17044-TBA-L07$954.39 MSRP: $1377.18You Save: $422.79 (31%)
| Page 1 of 4 |Next >
1-20 of 77 Results
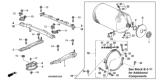
Honda Civic Fuel Tank
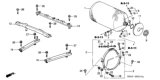
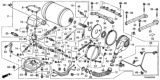
The Fuel Tank of Honda Civic vehicles is an essential part catering the need of the vehicle to keep liquid fuel and its vapor safely stored and to provide it whenever needed. Located at the back of the car, Fuel Tank has a screw off top for refueling with a covered opening. As for the implementation of Fuel Tanks, there are many shapes and forms depending on the manufacture and model of the car; there is a filler pipe, vent, as well as an outline for the fuel that will be connected to the engine. When looking for a replacement Fuel Tank there are dependencies like fitment and quality that must be met thus opting for a direct fit fuel tank that will suit the model of the car that is being worked on. Just like the Fuel Tanks made from metals, the plastic versions are also cheap to produce yet equally durable as the OE versions.
In search of affordable OEM Honda Civic Fuel Tank? Consider browsing through our extensive inventory of genuine Honda Civic Fuel Tank. Not only do we provide market-leading prices and a manufacturer's warranty, but we also pride ourselves on exceptional customer service and swift delivery.
Honda Civic Fuel Tank Parts Questions & Experts Answers
- Q: How to facilitate the procedure of removing and installing a fuel tank for the Honda Civic?A:The process of draining Civic fuel tanks becomes much simpler when the tank has an empty fuel level because the tank lacks a drain plug yet requires fuel siphoning from auto parts stores which should be initiated without using your mouth. Start by discharging fuel system pressure before removing the negative cable connection from the battery terminal. The first step must be to access the Fuel Pump/fuel gauge sending unit to remove connections from both the fuel lines and the electrical connector. It is important to support the vehicle safely by placing it on jackstands while it rests at a raised height. It is not necessary to siphon fuel from an empty fuel tank but you should drain remaining fuel by removing the fuel pump/fuel gauge sending unit and extracting it through the opening. The driver's rear wheel must be detached and wheel well liner extracted. Proceed to eliminate the fuel filler neck hose and fuel tank vapor hose quick connect fittings while inspecting all parts for damage. The procedure requires you to remove lower rear fasteners from the mounting cover and pull the cover backward if it is equipped. Detach the front tank quick-connect fittings from the fuel line followed by removing the fuel tank shield. First support the fuel tank with a transmission jack or a floor jack with plywood safety material before removing the rear underfloor bar and separating the fuel tank retaining straps. To remove the fuel tank open its baffle plates when applicable and perform a safe fuel tank descent. It is appropriate to remove the fuel pump/fuel gauge sending unit module now if it needs replacement. The process of fitting materials follows the exact steps in reverse order of uninstalling.

Related Honda Civic Parts
 Honda Civic Gas Cap
 Honda Civic Fuel Filter
 Honda Civic Fuel Door Release Cable
 Honda Civic Fuel Pump
 Honda Civic Fuel Pressure Regulator
 Honda Civic Fuel Filler Neck
 Honda Civic Fuel Door
 Honda Civic Fuel Pressure Sensor
 Honda Civic Fuel Tank Strap
Browse by Year
2026 Fuel Tank 2025 Fuel Tank 2024 Fuel Tank 2023 Fuel Tank 2022 Fuel Tank 2021 Fuel Tank 2020 Fuel Tank 2019 Fuel Tank 2018 Fuel Tank 2017 Fuel Tank 2016 Fuel Tank 2015 Fuel Tank 2014 Fuel Tank 2013 Fuel Tank 2012 Fuel Tank 2011 Fuel Tank 2010 Fuel Tank 2009 Fuel Tank 2008 Fuel Tank 2007 Fuel Tank 2006 Fuel Tank 2005 Fuel Tank 2004 Fuel Tank 2003 Fuel Tank 2002 Fuel Tank 2001 Fuel Tank 2000 Fuel Tank 1999 Fuel Tank 1998 Fuel Tank 1997 Fuel Tank 1996 Fuel Tank 1995 Fuel Tank 1994 Fuel Tank 1993 Fuel Tank 1992 Fuel Tank 1991 Fuel Tank 1990 Fuel Tank 1989 Fuel Tank 1988 Fuel Tank 1987 Fuel Tank 1986 Fuel Tank 1985 Fuel Tank 1984 Fuel Tank 1983 Fuel Tank 1982 Fuel Tank 1981 Fuel Tank 1980 Fuel Tank 1979 Fuel Tank 1978 Fuel Tank 1977 Fuel Tank 1976 Fuel Tank 1975 Fuel Tank 1974 Fuel Tank 1973 Fuel Tank