×
- Hello
- Login or Register
- Quick Links
- Live Chat
- Track Order
- Parts Availability
- RMA
- Help Center
- Contact Us
- Shop for
- Honda Parts
- Honda Accessories
My Garage
My Account
Cart
Genuine Honda Civic Fuel Pump
Gas Pump- Select Vehicle by Model
- Select Vehicle by VIN
Select Vehicle by Model
orMake
Model
Year
Select Vehicle by VIN
For the most accurate results, select vehicle by your VIN (Vehicle Identification Number).
72 Fuel Pumps found


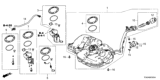
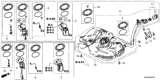
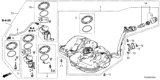
Honda Civic Fuel Pump Module Set
Part Number: 17045-TBA-A03$374.63 MSRP: $533.67You Save: $159.04 (30%)


Honda Civic Pump Assembly, Fuel H
Part Number: 16790-59B-003$391.33 MSRP: $564.68You Save: $173.35 (31%)

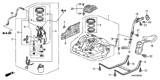
Honda Civic Set, Fuel Pump Module
Part Number: 17045-TBA-A00$374.63 MSRP: $533.67You Save: $159.04 (30%)

Honda Civic Module Assembly, Fuel Pump (Yachiyo)
Part Number: 17045-S5A-A00$598.29 MSRP: $863.33You Save: $265.04 (31%)

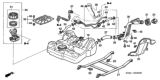
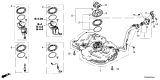
Honda Civic Fuel Pump Module Assembly
Part Number: 17045-SNA-A31$478.87 MSRP: $691.02You Save: $212.15 (31%)


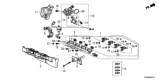
Honda Civic Pump Assembly, Fuel High Pressure
Part Number: 16790-RPY-G01$486.02 MSRP: $701.33You Save: $215.31 (31%)

Honda Civic Fuel Pump Module Assembly
Part Number: 17045-SVB-A31$407.44 MSRP: $587.93You Save: $180.49 (31%)

Honda Civic Fuel Pump Module Assembly
Part Number: 17045-TR0-L32$392.55 MSRP: $566.45You Save: $173.90 (31%)


Honda Civic Fuel Pump Module Set
Part Number: 17045-TR0-A11$419.44 MSRP: $605.25You Save: $185.81 (31%)
Honda Civic Fuel Pump Module Assembly
Part Number: 17045-TR0-A50$402.39 MSRP: $580.65You Save: $178.26 (31%)


Honda Civic Fuel Pump Module Set
Part Number: 17045-TGH-315$347.67 MSRP: $495.25You Save: $147.58 (30%)
Honda Civic Fuel Pump Module Assembly
Part Number: 17045-SNA-A01$478.87 MSRP: $691.02You Save: $212.15 (31%)
Honda Civic Fuel Pump Module Assembly
Part Number: 17045-TR0-A00$402.39 MSRP: $580.65You Save: $178.26 (31%)


Honda Civic Fuel Pump Module Set
Part Number: 17045-TGH-305$347.67 MSRP: $495.25You Save: $147.58 (30%)
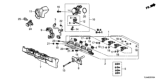
Honda Civic MOD SET, FUEL PUMP
Part Number: 17045-T20-A00$288.80 MSRP: $411.40You Save: $122.60 (30%)Honda Civic Fuel Pump Module Set
Part Number: 17045-TBA-A02$374.63 MSRP: $533.67You Save: $159.04 (30%)Honda Civic Fuel Pump Module Set
Part Number: 17045-TBA-A01$374.63 MSRP: $533.67You Save: $159.04 (30%)

Honda Civic Pump Assembly, Fuel High Pressure
Part Number: 16790-5PC-H02$509.48 MSRP: $735.18You Save: $225.70 (31%)
| Page 1 of 4 |Next >
1-20 of 72 Results
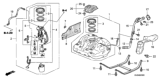
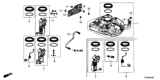
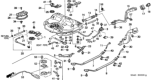
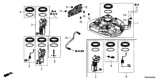
Honda Civic Fuel Pump
Civic's Fuel Pump is attributed for the task of supplying fuel to the engine compartment that enhances combustion. It supplies fuel to the fuel injectors but first pumps and filters it through several stages. Different fuel pumps have been used in Honda Civics through the years, especially shifting from the mechanical type in carbureted models to the electric type in fuel injected engines. Diaphragm and plunging mechanical pumps were conventional in the earlier models delivering up to 15 PSI or pounds per square inch only. But today's Civics typically employ electric pumps mounted in the fuel tank, with the capacity to deliver significantly higher pressure (40-60 psi or more). Some of these features are better cooling, safety measures which are regulated by the electronic control units or ECUs for fuel regulation. Also, recent innovations such as pulse width modulation, fulfill pump durability and power levels to maximize performance and emissions in new Honda Civic products.
In search of affordable OEM Honda Civic Fuel Pump? Consider browsing through our extensive inventory of genuine Honda Civic Fuel Pump. Not only do we provide market-leading prices and a manufacturer's warranty, but we also pride ourselves on exceptional customer service and swift delivery.
Honda Civic Fuel Pump Parts Questions & Experts Answers
- Q: How to replace the in-tank fuel pump and Fuel Level Sensor in the Honda Civic?A:Twist off the gas cap to release any pressure trapped in the tank, then let go of the tank pressure before starting work. Unplug the negative battery cable. When working on Civic models, take out the trunk carpet, then lift off the rear seat cushion and backrest. When you have this part, pull out the crossmember over the fuel pump access area. Loosen and remove the fuel access cover's screws. Then take off the fuel access cover. First, disconnect the fuel supply and EVAP quick-connect fittings, and save them somewhere. Then unplug the electrical connector for fuel pump/Fuel Level Sensor. To get the fuel pump/fuel gauge sending unit out, remove its locknut and carefully pull the unit from the tank, turning it slightly to avoid bending the float arm and float. When you find any problems with your seal, replace it right away. Take the plastic clamp off the fuel gauge sending unit's connection to the module, push the two tabs, and pull the unit out of the fuel pump module housing, being careful to not damage the float arm inside. Put the seal into the hole before sloting the fuel pump/fuel gauge module into the tank, to prevent any twisting or bending. Put the top mark of the fuel module between the marks on both sides of the hole while setting it in its position. Like removing it, reinstallation also involves screwing the module locknut until tight. To put the fuel pump cover in correctly, touch the negative side of the battery with a cable, turn on the engine, and look for any gas leaks where the pump attaches to its tube. Put the access cover in place, replace the carpet, and either fix the seat or slide in the seat cushion.

Related Honda Civic Parts
 Honda Civic Fuel Injector O-Ring
 Honda Civic Throttle Cable
 Honda Civic Fuel Injector
 Honda Civic Turbocharger
 Honda Civic Throttle Body
 Honda Civic Throttle Body Gasket
 Honda Civic Fuel Level Sensor
 Honda Civic Accelerator Cable
 Honda Civic Fuel Tank
 Honda Civic Fuel Rail
 Honda Civic Fuel Temperature Sensor
Browse by Year
2026 Fuel Pump 2025 Fuel Pump 2024 Fuel Pump 2023 Fuel Pump 2022 Fuel Pump 2021 Fuel Pump 2020 Fuel Pump 2019 Fuel Pump 2018 Fuel Pump 2017 Fuel Pump 2016 Fuel Pump 2015 Fuel Pump 2014 Fuel Pump 2013 Fuel Pump 2012 Fuel Pump 2011 Fuel Pump 2010 Fuel Pump 2009 Fuel Pump 2008 Fuel Pump 2007 Fuel Pump 2006 Fuel Pump 2005 Fuel Pump 2004 Fuel Pump 2003 Fuel Pump 2002 Fuel Pump 2001 Fuel Pump 2000 Fuel Pump 1999 Fuel Pump 1998 Fuel Pump 1997 Fuel Pump 1996 Fuel Pump 1995 Fuel Pump 1994 Fuel Pump 1993 Fuel Pump 1992 Fuel Pump 1991 Fuel Pump 1990 Fuel Pump 1989 Fuel Pump 1988 Fuel Pump 1987 Fuel Pump 1986 Fuel Pump 1985 Fuel Pump 1984 Fuel Pump 1983 Fuel Pump 1982 Fuel Pump 1981 Fuel Pump 1980 Fuel Pump 1979 Fuel Pump 1978 Fuel Pump 1977 Fuel Pump 1976 Fuel Pump 1975 Fuel Pump 1974 Fuel Pump 1973 Fuel Pump