×
- Hello
- Login or Register
- Quick Links
- Live Chat
- Track Order
- Parts Availability
- RMA
- Help Center
- Contact Us
- Shop for
- Honda Parts
- Honda Accessories
My Garage
My Account
Cart
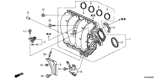
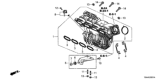
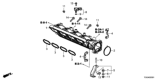
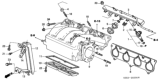
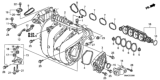
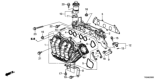
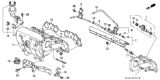
Genuine Honda Civic Intake Manifold
Engine Intake Manifold- Select Vehicle by Model
- Select Vehicle by VIN
Select Vehicle by Model
orMake
Model
Year
Select Vehicle by VIN
For the most accurate results, select vehicle by your VIN (Vehicle Identification Number).
69 Intake Manifolds found


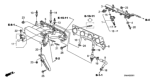


Honda Civic Manifold Complete, Int
Part Number: 17100-5BA-A01$146.78 MSRP: $209.08You Save: $62.30 (30%)


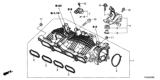
Honda Civic Manifold Complete, Int
Part Number: 17100-5AA-004$111.16 MSRP: $157.00You Save: $45.84 (30%)


Honda Civic Chamber Assembly, Intake Manifold
Part Number: 17010-RW0-A00$486.72 MSRP: $702.34You Save: $215.62 (31%)


Honda Civic Manifold, Intake (Lower)
Part Number: 17100-PE1-681$311.93 MSRP: $444.35You Save: $132.42 (30%)Honda Civic Manifold, Intake (Lower)
Part Number: 17100-PE1-680$311.93 MSRP: $444.35You Save: $132.42 (30%)


| Page 1 of 4 |Next >
1-20 of 69 Results
Honda Civic Intake Manifold
The Intake Manifold of Honda Civics' fits in between the carburetor or fuel injectors and the engine's cylinder to make sure that a precise air-fuel mixture is provided to the cylinders in order to get the prime consummation of fuel out of the engines and also great efficiency out of the car. It is a set of tubes that transfer air from the air filter to the carburetor and specially the throttle body to allow equal distribution of the mixture. It also incorporates various sensors to measure temperature, airflow and pressure with an aim of improving performance of the engine. In different years, Honda Civic have changed many types and materials of the intake manifold, from common aluminum and cast iron to the nowadays' popular composite plastics. It is worthwhile to distinguish variable length intake manifolds (VLIM) which allow the engine to change the localization of the intake tract in the course of power, torque and efficiency maxima. The Venturi effect and Helmholtz resonance technologies are used on this technology to optimize the airflow according to load and enhance combustion while minimizing emissions. In a nutshell, the design and the material used in the fabrication of the Honda Civic intake manifold play an important role towards the performance of its engine.
In search of affordable OEM Honda Civic Intake Manifold? Consider browsing through our extensive inventory of genuine Honda Civic Intake Manifold. Not only do we provide market-leading prices and a manufacturer's warranty, but we also pride ourselves on exceptional customer service and swift delivery.
Honda Civic Intake Manifold Parts Questions & Experts Answers
- Q: How to remove the intake manifold on 2.4L engine on Honda Civic?A:Take the battery cable wire from the terminal that's ground, or negative. Take out all engine cover bolts and slip the cover off its supports. Then disconnect the breath hose from both the Valve Cover and intake manifold. Take these two parts out: the intake tube and the air filter holder. Carefully move the throttle body away from its intake manifold joint, while staying connected to the coolant hoses. Mark each intake hose with tape before you detach it from the intake manifold, so you can fasten everything back in the right spot during reassembly. Take off these parts: IAC valve, TPS, knock sensor, and their related electrical wires. Unplug the two vacuum lines for the purge solenoid one by one. Lift the front of the car and use jackstands to support it safely. Then take off the under-vehicle splash shield. Detach the bracket under the intake manifold before taking out the whole intake manifold assembly. Pull the intake manifold far away to release its mounting bolts/nuts. When pulled back, disconnect the PCV hose by detaching it from the metal retaining pin and manifold. Unhook the intake manifold from its position in the engine space. First, scrub off all remaining gasket material and get rid of any oil or dirt. Install a new gasket. Begin to put the manifold in its place while tightening the mounting screws in stages, starting from the middle bolts, and slowly work toward the ends of the installation. To reverse installation, repeat the steps we just did for removal. Reconnect the battery. Start the car and observe if oil, coolant, and vacuum leaks appear.

Related Honda Civic Parts

Browse by Year
2026 Intake Manifold 2025 Intake Manifold 2024 Intake Manifold 2023 Intake Manifold 2022 Intake Manifold 2021 Intake Manifold 2020 Intake Manifold 2019 Intake Manifold 2018 Intake Manifold 2017 Intake Manifold 2016 Intake Manifold 2015 Intake Manifold 2014 Intake Manifold 2013 Intake Manifold 2012 Intake Manifold 2011 Intake Manifold 2010 Intake Manifold 2009 Intake Manifold 2008 Intake Manifold 2007 Intake Manifold 2006 Intake Manifold 2005 Intake Manifold 2004 Intake Manifold 2003 Intake Manifold 2002 Intake Manifold 2001 Intake Manifold 2000 Intake Manifold 1999 Intake Manifold 1998 Intake Manifold 1997 Intake Manifold 1996 Intake Manifold 1995 Intake Manifold 1994 Intake Manifold 1993 Intake Manifold 1992 Intake Manifold 1991 Intake Manifold 1990 Intake Manifold 1989 Intake Manifold 1988 Intake Manifold 1987 Intake Manifold 1986 Intake Manifold 1985 Intake Manifold 1984 Intake Manifold 1983 Intake Manifold 1982 Intake Manifold 1981 Intake Manifold 1980 Intake Manifold 1979 Intake Manifold 1978 Intake Manifold 1977 Intake Manifold 1976 Intake Manifold 1975 Intake Manifold 1974 Intake Manifold 1973 Intake Manifold