×
- Hello
- Login or Register
- Quick Links
- Live Chat
- Track Order
- Parts Availability
- RMA
- Help Center
- Contact Us
- Shop for
- Honda Parts
- Honda Accessories
My Garage
My Account
Cart
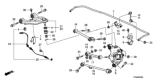
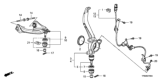
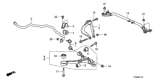
Genuine Honda Crosstour Control Arm
Suspension Arm- Select Vehicle by Model
- Select Vehicle by VIN
Select Vehicle by Model
orMake
Model
Year
Select Vehicle by VIN
For the most accurate results, select vehicle by your VIN (Vehicle Identification Number).
12 Control Arms found


Honda Crosstour Arm B, Rear (Lower)
Part Number: 52350-TA0-A00$106.35 MSRP: $150.21You Save: $43.86 (30%)

Honda Crosstour Arm, Left Rear Control
Part Number: 52345-TA0-A00$272.15 MSRP: $397.89You Save: $125.74 (32%)

Honda Crosstour Arm, Right Rear Control
Part Number: 52340-TA0-A00$272.15 MSRP: $397.89You Save: $125.74 (32%)

Honda Crosstour Arm A, Right Rear (Lower)
Part Number: 52370-TA0-A00$109.15 MSRP: $154.18You Save: $45.03 (30%)


Honda Crosstour Arm, Right Front (Upper)
Part Number: 51510-TP6-A01$172.43 MSRP: $245.63You Save: $73.20 (30%)


Honda Crosstour Left Rear Arm (Upper)
Part Number: 52520-TA0-A02$277.54 MSRP: $395.35You Save: $117.81 (30%)


Honda Crosstour Right Rear Arm (Upper)
Part Number: 52510-TA0-A02$277.54 MSRP: $395.35You Save: $117.81 (30%)


Honda Crosstour Arm, Left Front (Upper)
Part Number: 51520-TP6-A01$172.43 MSRP: $245.63You Save: $73.20 (30%)

Honda Crosstour Left Front Arm (Lower)
Part Number: 51360-TP6-C00$488.84 MSRP: $705.39You Save: $216.55 (31%)


Honda Crosstour Right Front Arm (Lower)
Part Number: 51350-TP6-C00$488.84 MSRP: $705.39You Save: $216.55 (31%)Honda Crosstour Arm, Right Rear Control
Part Number: 52340-TP6-A00$96.04 MSRP: $135.64You Save: $39.60 (30%)
Honda Crosstour Arm, Left Rear Control
Part Number: 52345-TP6-A00$96.04 MSRP: $135.64You Save: $39.60 (30%)
Honda Crosstour Control Arm
The Control Arm in Honda Crosstour cars is an intermediary to the frame and wheels and also supports the Shock absorbers and springs. These arms turn in relation to road conditions such that they enable the wheels to perform a bouncing action. Control arms of different types have bushings at the area where they are joined to the frame and Ball joints on the area where they are linked to the axle or knuckle. The later Crosstour models may have sturdier control arms that are made of cast iron or aluminum for strength and low weight. These components are critical in ensuring correct wheel alignment, vehicle control, and correct tire wearing when cornering, or when lowering the car and adopting a sporty driving strategy.
In search of affordable OEM Honda Crosstour Control Arm? Consider browsing through our extensive inventory of genuine Honda Crosstour Control Arm. Not only do we provide market-leading prices and a manufacturer's warranty, but we also pride ourselves on exceptional customer service and swift delivery.
Honda Crosstour Control Arm Parts Questions & Experts Answers
- Q: How to remove and install a lower control arm for the Honda Crosstour?A:Loosen the front wheel lug nuts, raise the vehicle, place it securely on jackstands and remove the wheel. Remove the through-bolt and detach the damper fork from the lower control arm. Detach the stabilizer bar link from the lower-control arm. Remove the cotter pin from the castle nut on the lower balljoint stud. Loosen the nut, but don't remove it yet (this will prevent the components from separating violently). Using a two-jaw puller, separate the lower control arm from the balljoint in the Steering Knuckle. Remove the nut. Remove the pivot and front bolts from the inner end of the lower control arm and then remove the arm. Installation is the reverse of removal, noting the following points: Raise the outer end of the control arm with a floor jack to simulate normal ride height before tightening the pivot bolt and inner front bolt. Be sure to install a new cotter pin. Tighten the wheel lug nuts.
")


