×
- Hello
- Login or Register
- Quick Links
- Live Chat
- Track Order
- Parts Availability
- RMA
- Help Center
- Contact Us
- Shop for
- Honda Parts
- Honda Accessories
My Garage
My Account
Cart
Genuine Honda Crosstour Coil Springs
Strut Spring- Select Vehicle by Model
- Select Vehicle by VIN
Select Vehicle by Model
orMake
Model
Year
Select Vehicle by VIN
For the most accurate results, select vehicle by your VIN (Vehicle Identification Number).
11 Coil Springs found


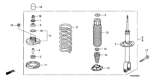


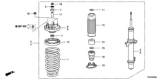
Honda Crosstour Coil Springs
Coil Springs in Honda Crosstour vehicles is used mainly in the support of the weight of the vehicles and shock absorptions of the bumps on the road. Wear of coil springs is characterized by symptoms that includes sagging or bottoming out of the vehicle, or abnormal wear of tires. Coil springs for the vehicle are available in the market to replace the worn out ones so as to maintain the ride height and quality, and for additional load the variable rate or cargo coils can be used. These springs are available in different heights and spring rates whereby you can get a lift and lowering kit, performance as well as adjustable coilovers for the fine-tuning of the car's ride height. Linear rate, progressive and dual rate springs are the common kinds of the coil springs which provide varying rates of stiffness and compression to enhance the car stability and reduce the likelihood of bottoming.
In search of affordable OEM Honda Crosstour Coil Springs? Consider browsing through our extensive inventory of genuine Honda Crosstour Coil Springs. Not only do we provide market-leading prices and a manufacturer's warranty, but we also pride ourselves on exceptional customer service and swift delivery.
Honda Crosstour Coil Springs Parts Questions & Experts Answers
- Q: How to remove and install the rear coil springs and shock absorber assembly on a Honda Crosstour?A:Loosen the rear wheel lug nuts, raise the vehicle, place it securely on jackstands and remove the rear wheels. Remove the rear package shelf trim cover. Remove the seat back side trim panel. Note: This step applies to sedans only. Remove the shock absorber upper mounting nuts. Remove the nut from the upper end of the stabilizer link. Remove the shock absorber lower mounting bolt. Pull the rear knuckle down and remove the shock absorber/coil spring assembly. To inspect or replace the shock absorber or coil spring, proceed accordingly. Installation is the reverse of removal, noting the following points: Raise the rear knuckle with a floor jack to simulate normal ride height before tightening the shock absorber lower mounting bolt. Tighten the upper mounting nuts. Tighten the wheel lug nuts.


