×
- Hello
- Login or Register
- Quick Links
- Live Chat
- Track Order
- Parts Availability
- RMA
- Help Center
- Contact Us
- Shop for
- Honda Parts
- Honda Accessories
My Garage
My Account
Cart
Genuine Honda Crosstour Cylinder Head
Head- Select Vehicle by Model
- Select Vehicle by VIN
Select Vehicle by Model
orMake
Model
Year
Select Vehicle by VIN
For the most accurate results, select vehicle by your VIN (Vehicle Identification Number).
10 Cylinder Heads found


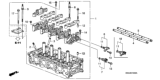
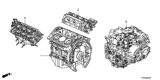
Honda Crosstour Cylinder Head Assembly
Part Number: 12100-R40-A02$1123.68 MSRP: $1496.73You Save: $373.05 (25%)

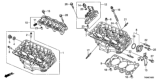
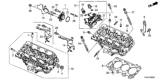
Honda Crosstour Cylinder Head Assembly, Front
Part Number: 12100-R70-305$1372.08 MSRP: $1808.04You Save: $435.96 (25%)


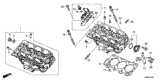
Honda Crosstour Cylinder Head Assembly, Rear (Dot)
Part Number: 12300-R70-810$1370.85 MSRP: $1806.40You Save: $435.55 (25%)
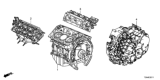
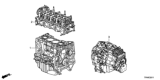
Honda Crosstour Front Cylinder Head General Assembly
Part Number: 10004-5G0-A01$2148.16 MSRP: $2841.77You Save: $693.61 (25%)
Honda Crosstour Engine Sub-Assembly, Rear Head
Part Number: 10005-R70-A05$3432.16 MSRP: $4552.06You Save: $1119.90 (25%)Honda Crosstour Engine Sub-Assembly, Rear Head
Part Number: 10005-5G0-A01$2923.28 MSRP: $3874.23You Save: $950.95 (25%)
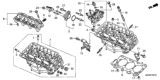
Honda Crosstour Head Assembly, Cylinder Rear
Part Number: 12300-5G0-810$938.71 MSRP: $1230.78You Save: $292.07 (24%)
Honda Crosstour Head Assembly, Cylinder Front
Part Number: 12100-5G0-305$938.71 MSRP: $1230.78You Save: $292.07 (24%)
Honda Crosstour Engine Sub-Assembly, Rear Head
Part Number: 10004-R70-A04$2999.25 MSRP: $3975.43You Save: $976.18 (25%)
Honda Crosstour Cylinder Head
The Honda Crosstour vehicle utilizes its Cylinder Head as an essential engine element which helps air and fuel access the engine space and guides exhaust gases to leave. The upper part of the combustion chamber includes necessary valves and spark plugs located in this component. The manufacturing approach for Cylinder Heads is standard with aluminum as the chosen material that combines weight reduction benefits with exceptional heat management properties for superior system operation and efficiency improvement. The main faults with the Crosstour Cylinder Head consist of valve-guide degradation alongside valve defects that cause performance degradation and leakage problems in the engine. Honda implements torque-to-yield (TTY) head bolts throughout its engines to achieve optimal sealing effectiveness by providing superior gasket and clamping capability. The performance potential of any vehicle depends heavily on the Honda Crosstour Cylinder Head which ensures maximum airflow while reducing pressure drops to boost horsepower and operational capabilities.
In search of affordable OEM Honda Crosstour Cylinder Head? Consider browsing through our extensive inventory of genuine Honda Crosstour Cylinder Head. Not only do we provide market-leading prices and a manufacturer's warranty, but we also pride ourselves on exceptional customer service and swift delivery.
Honda Crosstour Cylinder Head Parts Questions & Experts Answers
- Q: How to remove and install Cylinder Head on V6 engine on Honda Crosstour?A:Before removing the units, one has to release the fuel pressure and disconnect the cable of the car negative terminal. Sucked out both block drains of the cooling system. Remove the nuts at the back of the Evap Charcoal Canister and unplug the harness connectors from the fuel injectors and fuel lines, Evap canister purge lines and then unbolt the fuel rails. Subsequently, it is necessary to take out the alternator and ignition coils from the Valve Covers. Disconnect the power steering hoses without separating the pump from them, then, together with warm-up catalysts, separate the upper intake manifold. Take off Camshaft Timing Belt covers, timing belt, and the camshaft sprockets from the camshafts. All the electrical connectors at the lower intake manifold have to be labeled and then disconnected and the water passage assembly that is connected to the cylinder head has to be unbolted and then the assembly has to be gently tapped to be removed. Take out the rocker arms/shafts assembly, it should be noted that for 2008 and later model year the head can be removed without this assembly if the marks on the camshaft sprocket are lined up properly. Turn the cylinder head bolts in the reverse order of the lightening sequence in a 1/4 turn until they are hand loosened and replace the bolts as the old ones should not be reapplied. Remove the cylinder head off the engine block gently using a screwdriver while apply force on an external casting projection on head if it is stuck do not pry from the middle between head and block where the gasket lays. Do the same process for the other head. During assembling the surfaces of the cylinder heads and block should be completely clean; use gasket scraper and clean it with lacquer thinner or acetone. You insert clean shop rag into the cylinders to eliminate entry of debris into it and for shaking of material that has fallen into the cylinders, use vacuum cleaner. Inspect the block and head mating surfaces for damage, you may use file for slight nicks while for serious damage, may be required to do machining. What is more, the threads in the head bolt holes should be chased with a tap of the correct size and the holes blow out with compressed air. Remove the oil-control jets and wash the block and the jet open area thoroughly then replace the oil-control jets with new O-rings, place the new gaskets over the oil-control jets and locate dowels in the block fixedly. Gently place the head on the block with no interference to the gasket, coat the threads and the underside of the heads of the new bolts with clean engine oil. Screw in the bolts and special washers tightening the nuts only enough for the fingers to torque and thereafter follow the torqueing sequence. If necessary repeat the procedure for another cylinder head. The other steps of an installation are the opposite of the removal steps mentioned above. Connect the battery, fill the cooling system, change the oil and filter, start the engine to look for leaks, and let it idle for five minutes to bleed air from the lost motion assemblies, inspect for leaks and strange functioning. Minimal tappet noise happens in the initial couple of minutes of engine start up, if the noise persists it may be because of any of the lost motion assemblies.
")


