×
- Hello
- Login or Register
- Quick Links
- Live Chat
- Track Order
- Parts Availability
- RMA
- Help Center
- Contact Us
- Shop for
- Honda Parts
- Honda Accessories
My Garage
My Account
Cart
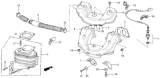
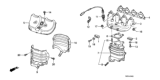
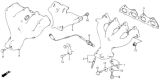
Genuine Honda CRX Exhaust Manifold
Engine Exhaust Manifold- Select Vehicle by Model
- Select Vehicle by VIN
Select Vehicle by Model
orMake
Model
Year
Select Vehicle by VIN
For the most accurate results, select vehicle by your VIN (Vehicle Identification Number).
6 Exhaust Manifolds found

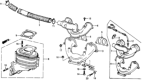
Honda CRX Exhaust Manifold
Part Number: 18100-PE0-010$196.17 MSRP: $279.45Limited AvailabilityYou Save: $83.28 (30%)


Honda CRX Exhaust Manifold
Designed together with the catalytic converter, the Exhaust Manifold of Honda CRX vehicles helps to channel hot exhaust gases from the engine towards the exhaust system for proper performance of the vehicle's engine. Located at the top of the exhaust system the manifold gathers exhaust from several cylinders and directs it through the catalytic converter and muffler. This design is especially important preventing intake reversion whereby the intake of gases into the engine will influence poor efficiency owing to the gases bouncing back into the intake. However, used in Honda CRX models through the years are the cast iron exhaust manifolds standard to the vehicle models, as well as more stainless steel varieties, performance headers that increase the car's performance by decreasing restriction. Headers enhances velocity through exhaust gas thus enhancing the efficiency of the engine on an overall basis. It is worthy to point out that the main distinctions of these styles are material and geometry and headers provide more advantages than manifolds. There is much literature concerning the need to ensure that the exhaust manifold is well maintained since exhaust manifold failure results in decreased performance and health hazards from exhaust gaseous within the car.
In search of affordable OEM Honda CRX Exhaust Manifold? Consider browsing through our extensive inventory of genuine Honda CRX Exhaust Manifold. Not only do we provide market-leading prices and a manufacturer's warranty, but we also pride ourselves on exceptional customer service and swift delivery.
Honda CRX Exhaust Manifold Parts Questions & Experts Answers
- Q: How to remove and install the exhaust manifold on Honda CRX?A:Start the process by turning off the vehicle and taking out the negative cable of the battery before you start the repair process in order to remove the exhaust manifold and putting it back. Lift and firmly stabilize the frontend of the car, next, take off the nuts of the header pipe or the catalytic converter and exhaust manifold so that the pipe can be detached from the manifold. Subsequently, liberate the oxygen sensor if at all installed and then the EGR and air suction tubes from the manifold, if any. Take off the exhaust manifold shroud and the exhaust manifold bracket and its bolts. Working in a crisscross pattern from the center, take off the exhaust manifold-to-Cylinder Head nuts as well as the manifold accompanied with the gaskets; dispose of the gaskets. In installation, use putty knife to clean gasket mounting surfaces and use only new self-locking bolts. Install the manifold with the new gaskets in place, starting with the middle nut of the exhaust manifold to cylinder head bolts and tighten the nuts, diagonally to 23 ft lbs. 35 Tighten the header pipe flange nuts to 32 Nm and the same nuts as used for connecting the converter to the manifold or as manifold bolts to 32 Nm. Remove and torque the exhaust manifold to oxygen sensor 33 ft. lbs. (45 Nm), the manifold bracket bolts to 16 ft. lbs. The camshaft sprocket bolts to 22 Nm, the crankshaft position sensor to 5 Nm, the intake manifold bolts to 105 ft. lbs., the manifold shroud bolts to 16 ft. lbs. (22 Nm). Last secure the converter shroud bolts to 9 ft. lbs. Crank the starter and check the exhaust for leaks by snapping a rubber APK gasket/choke plate between the intake and exhaust flange and setting the propeller at 12 Nm.


