×
- Hello
- Login or Register
- Quick Links
- Live Chat
- Track Order
- Parts Availability
- RMA
- Help Center
- Contact Us
- Shop for
- Honda Parts
- Honda Accessories
My Garage
My Account
Cart
Genuine Honda Del Sol Brake Light Switch
Brake Lamp Switch- Select Vehicle by Model
- Select Vehicle by VIN
Select Vehicle by Model
orMake
Model
Year
Select Vehicle by VIN
For the most accurate results, select vehicle by your VIN (Vehicle Identification Number).
2 Brake Light Switches found


Honda Del Sol Switch Assembly, Stop (Tec)
Part Number: 35350-SE0-A03$36.84 MSRP: $52.03You Save: $15.19 (30%)

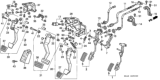
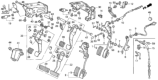
Honda Del Sol Brake Light Switch
The Honda Del Sol Brake Light Switch is the small but important switch that activates the rear stop lights the moment the driver presses the pedal, and the Brake Light Switch is the instant signal to the following traffic that the driver is slowing down or coming to a halt. Inside each Honda Del Sol, this Brake Light Switch is located near the top of the brake pedal arm, with a spring-loaded plunger that completes an electrical circuit as soon as the pedal is moved to send a pulse of electrical power directly to the bulbs. Across the production years, Honda Del Sol models applied only one plunger-style Brake Light Switch, and production changes were minimal, being connector changes to serve periodic updates to wiring rather than any change in working principle. Durable, fast reacting, and easy to replace, the Brake Light Switch is designed to make every Honda Del Sol visible and safe with every application of the brake.
In search of affordable OEM Honda Del Sol Brake Light Switch? Consider browsing through our extensive inventory of genuine Honda Del Sol Brake Light Switch. Not only do we provide market-leading prices and a manufacturer's warranty, but we also pride ourselves on exceptional customer service and swift delivery.
Honda Del Sol Brake Light Switch Parts Questions & Experts Answers
- Q: How to check and replace the brake light switch on Honda Del Sol?A:To test the brake light switch, the brake pedal should be pressed, if the brake light does not light up the brake light fuse and the brake light bulbs in both tail light assemblies and the high-mount brake light should also be checked. If both fuse and bulbs are fine, this suggests the problem is with the brake light switch, and this is located at the upper part of the brake pedal; the switch electrical connector should be disconnected and the meter probes placed across terminals B and C and there should be couple when the brake pedal is pressed and no couple when released-if the switch does not operate in this manner, it should be replaced. To remove the switch, first, it is necessary to open the electrical connection, then to remove the locknut located in the pedal part and unscrew the switch from the bracket; to install-vice versa. For adjustment, turn the brake light switch locknut clockwise counterclockwise until switch no longer touches the brake pedal, then make adjustment on the pushrod so that the height of the brake pedal from the floor is correct your screw the locknut tight. Insert the plunger of the brake light switch until it rests against the spring and backlash, turn the switch clockwise until the backlash is at the 1/2 turn position, then tighten the locknut as required. Last but not the least, depress the pedal and check the free play or lack of it and see whether the brake lights are functional and whether the freeplay is to the specified dimension or not.
")
Related Honda Del Sol Parts
 Honda Del Sol Oil Pressure Switch
 Honda Del Sol Door Jamb Switch
 Honda Del Sol Back Up Light Switch
 Honda Del Sol Dimmer Switch
 Honda Del Sol Headlight Switch
 Honda Del Sol Mirror Switch
 Honda Del Sol Neutral Safety Switch
 Honda Del Sol Power Window Switch
 Honda Del Sol Turn Signal Switch
 Honda Del Sol Wiper Switch