×
- Hello
- Login or Register
- Quick Links
- Live Chat
- Track Order
- Parts Availability
- RMA
- Help Center
- Contact Us
- Shop for
- Honda Parts
- Honda Accessories
My Garage
My Account
Cart
Genuine Honda Del Sol Ignition Coil
Ignition Coil Resistor- Select Vehicle by Model
- Select Vehicle by VIN
Select Vehicle by Model
orMake
Model
Year
Select Vehicle by VIN
For the most accurate results, select vehicle by your VIN (Vehicle Identification Number).
1 Ignition Coil found


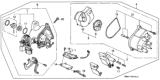
Honda Del Sol Coil Assembly, Ignition
Part Number: 30510-PT2-006$186.52 MSRP: $272.68You Save: $86.16 (32%)
Honda Del Sol Ignition Coil
Honda Del Sol Ignition Coil is responsible for the jolt that converts battery voltage energy to the intense spark every cylinder needs, conversion of 12 volts to up to 40,000 volts of energy to enable the spark plug to burn air and fuel. Inside the small housing are primary and secondary windings of copper around an iron core which creates a magnetic field then collapses to send high voltage through the secondary tower or directly to the plug. Early Del Sol models featured the use of a single Ignition Coil in conjunction with a distributor as a means of sending the energy through the cap and rotor to each cylinder. The mid-run Del Sol introduced the distributor-less pack container with two Ignition Coil units for waste spark setup where each Ignition Coil fires a pair of cylinders on every crank revolution. Regardless of style, every Honda part depends on epoxy insulation to combat heat and vibration, and a tired Honda Ignition Coil manifests itself in misfires, rough idle, reduced mileage or no-start, prompting Honda drivers to test resistance and replace the failed Ignition Coil in order to keep Del Sol engines breathing.
In search of affordable OEM Honda Del Sol Ignition Coil? Consider browsing through our extensive inventory of genuine Honda Del Sol Ignition Coil. Not only do we provide market-leading prices and a manufacturer's warranty, but we also pride ourselves on exceptional customer service and swift delivery.
Honda Del Sol Ignition Coil Parts Questions & Experts Answers
- Q: What steps should be taken to check and replace the ignition coil on Honda Del Sol?A:Make sure that the ignition switch is switched off before going on with the checks. Remove the connection of the high tension lead from the secondary terminal of the coil. Take off the distributor cap, rotor and its cover. Screw remove the black/yellow wire in terminal A (+) and the white/blue wire in the terminal B (-) in the distributor. To measure the primary resistance, connect probes of the ohmmeter across the primary terminals A and B of the coil. Remember always to first disconnect the coil from the circuit. Next, measure the secondary resistance with probes touching the secondary winding terminal and the positive primary terminal A: The mentioned above special resistance values are valid at the coil temperature of about 70 degrees F; in the case when the coil does not coincide with the readings on the specified values, it should be replaced. To remove the coil, the consumer needs to disconnect the cable from the negative terminal of the battery, if the vehicle has a distributor, then one has to remove the distributor cap together with the leak cover, if available, and unscrew the wires connected to the primary terminals. If the coil is to be replaced, then the screws have to be unscrewed and the coil has to be slid out, lifting it from the distributor and installation must reverse the process.


