×
- Hello
- Login or Register
- Quick Links
- Live Chat
- Track Order
- Parts Availability
- RMA
- Help Center
- Contact Us
- Shop for
- Honda Parts
- Honda Accessories
My Garage
My Account
Cart
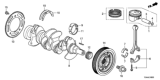
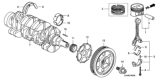
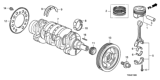
Genuine Honda Fit Connecting Rod
- Select Vehicle by Model
- Select Vehicle by VIN
Select Vehicle by Model
orMake
Model
Year
Select Vehicle by VIN
For the most accurate results, select vehicle by your VIN (Vehicle Identification Number).
4 Connecting Rods found


Honda Fit Connecting Rod
The Honda Fit Connecting Rod converts the linear up and down motion of each piston into the smooth turning motion of the crankshaft that gives the subcompact engine such lively response. Inside each Fit engine, the Connecting Rod faces rapid fire load changes without compromising balance. Early years of the Honda models featured robust powdered metal Connecting Rod pieces that balanced affordability and street reliability while later iterations advanced to forged steel Connecting Rod units cast in the weight saving H-Beam form for added strength at higher rpm. Both styles have the same basic layout of a small end that rides on a floating wrist pin at the piston and a split big end clamped round the crank throw, but the forged one resists stretch and fatigue better during high load. Regardless of year, each Connecting Rod works with lightweight aluminum pistons to ensure quick revs and efficient fuel burn. Ongoing Honda quality goals mean the Fit lineup continues with its rod length for an ideal rod ratio that encourages mid range torque. When combined with the tight piston rings and polished crank journals found in every Honda four cylinder, the system provides the reliable power and long service life that Fit owners appreciate across city commutes and highway trips.
In search of affordable OEM Honda Fit Connecting Rod? Consider browsing through our extensive inventory of genuine Honda Fit Connecting Rod. Not only do we provide market-leading prices and a manufacturer's warranty, but we also pride ourselves on exceptional customer service and swift delivery.
Honda Fit Connecting Rod Parts Questions & Experts Answers
- Q: How to properly inspect and overhaul pistons and connecting rods on Honda Fit?A:There is usually a series of ridges at the top end of ring travel, about a ¼ inch down from the top of each cylinder; if these are formed, carefully scrape them off with a ridge reamer so as not to break the piston before delving into the process of removing them. When we have gotten the ridges out turn the engine in a manner that the Crankshaft is upwards and measure the crankshaft endplay next, then take off the main bearing cap bridge. Specify connecting rods end play and measure with a feeler gauge so it is close to or just below the limit; if this is not possible, new connecting rods may be required. The connecting rods and their caps should also be labeled to prevent swapping and then the connecting rod cap bolts should be loosened incrementally. Lift the first connecting rod cap without allowing the insert to drop, then push out the connecting rod / piston from the top of the engine with care to see that all the ridge material has been eradicated. Do the same for the rest of the cylinders, ensure that the caps and inserts are not allowed to come into contact with each other as this will lead to their damage. As it will be seen the pistons and the connecting rods are now ready for an inspection and overhaul. That is with new piston rings, it is advisable to check on the end gaps in order to confirm that the side clearance of the piston ring is as required. Designate the piston/connecting rod assemblies and the new ring sets according to the particular plan for their fitting. Slide the top ring into the first cylinder and align it with the walls and make a check on the end gap by using feeler gauges and adjusting it accordingly. After the oil control ring, it's time to fix the two compression rings-the middle compression ring, the upper one-and the difference between them should be remembered to avoid their confusion. Before fixing the piston/connecting rod assemblies the cylinder walls and edges should be free of dirt and the crankshaft should be fitted. Take out the worn bearings from the connecting rod and cap and fit in the new bearings in a non-lubricated state but a proper fit must be maintained. Ensure that the gaps of the piston ring are in the right place, apply the engine oil in the piston and the rings as well as using the ring compressor in order to correctly position the piston over the cylinder. Clean and dry the connecting rod bearing and oil space; check the oil clearance with Plastigage. The clearance can be got from comparing the width of crushed Plastigage with the scale, and if the bearing inserts have to be replaced. Following removal of the Plastigage material clean them and apply new grease on the bearing faces, replace the connecting rod and cap and lastly tighten the bolts. Do the same for the remaining assemblies and fit the main bearing cap bridge; maintenance of cleanliness and accurate alignment of the parts at all the times.


