×
- Hello
- Login or Register
- Quick Links
- Live Chat
- Track Order
- Parts Availability
- RMA
- Help Center
- Contact Us
- Shop for
- Honda Parts
- Honda Accessories
My Garage
My Account
Cart
Genuine Honda Fit Crankshaft
Crank Shaft- Select Vehicle by Model
- Select Vehicle by VIN
Select Vehicle by Model
orMake
Model
Year
Select Vehicle by VIN
For the most accurate results, select vehicle by your VIN (Vehicle Identification Number).
6 Crankshafts found

Honda Fit Crankshaft Complete
Part Number: 13310-5R1-040$1273.58 MSRP: $1696.42You Save: $422.84 (25%)


Honda Fit Crankshaft Complete
Part Number: 13310-RK8-J00$1251.67 MSRP: $1667.23You Save: $415.56 (25%)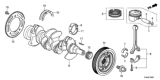
Honda Fit Crankshaft Complete
Part Number: 13310-5R1-010$1306.43 MSRP: $1740.17You Save: $433.74 (25%)Honda Fit Crankshaft Complete
Part Number: 13310-5R1-030$1309.02 MSRP: $1743.62You Save: $434.60 (25%)
Honda Fit Crankshaft
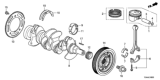
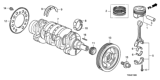
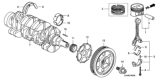
The Honda Fit Crankshaft converts the up and down thrusts of the pistons into the smooth spinning force that ultimately turns the transmission, axle shafts, and wheels. Anchored in the engine block, this stout steel or cast iron shaft carries offset crank throws where the connecting rods fasten, which permits easy movement conversion with every pulse of ignition. Early production versions use cast iron that is good for moderate output, while those assigned to higher horsepower go with forged steel, a tougher style that resists twisting, so differences across the years focus on material strength rather than design. Owners of Honda Fit models have the advantage of a component designed to last, as precise machining and constant lubrication allow it to survive an engine's lifetime. Dirt or decreased oil flow can scar journals, widen clearances, and cause metal to metal contact, causing harsh vibration, a warning that the Crankshaft may need to be replaced. That hard work involves engine removal, numbering of main bearing caps, delicate lift out of the damaged Crankshaft, fresh bearings, a light coat of moly grease on each journal, torque checked main bearing caps, and rotation tests to see the new Crankshaft spins freely. Because the part is heavy, helpers steady it upright so that the Crankshaft is true. With the proper care, every Honda Fit can count on its rotating core to spin mile after mile, and its carefully built Crankshaft as the unsung hero of daily driving.
In search of affordable OEM Honda Fit Crankshaft? Consider browsing through our extensive inventory of genuine Honda Fit Crankshaft. Not only do we provide market-leading prices and a manufacturer's warranty, but we also pride ourselves on exceptional customer service and swift delivery.
Honda Fit Crankshaft Parts Questions & Experts Answers
- Q: How to properly measure and install a crankshaft on Honda Fit?A:When removing crankshaft, check the end play with a crankshaft dial indicator placed in a position to touch the end of the crankshaft. Place the dial indicator at the rear of the crankshaft and rotate the component using a pry bar to zero it, followed by rotating the crankshaft to the front to read the endplay. If the endplay goes beyond these limits, the crankshaft thrust faces should be checked for wear after the pieces have been removed; if no signs of wear are observed, new main bearings should suffice. When a dial indicator is not available, use feeler gauges and push the crankshaft as far forward as possible and then slip the feeler gauges in between the crank-shaft and the thrust-bearing to measure the clearance. Slowly undo the cap bridge bolts until they hand accessible then remove the bolts and the main bearing cap bridge without dropping the bearing inserts. Come back with new bolts while keeping the old ones for the main bearing oil clearance measurement. Slowly raise the crankshaft out of the engine, and if you are working on the after 2009 model, you need to take out the Crankshaft Position Sensor pulse plate too. After inserting the bearing inserts, refit the bridge assembly back to the engine block and tighten the bolts with your fingers. To install the crankshaft, it is necessary to ensure that both the engine block and the crankshaft are clean and checked. The engine block should be set horizontally with the bottom up or turned slightly toward the horizontal, and then remove the main bearing cap bridge assembly. If there are worn but original bearing inserts left, take them out and make sure that the bearing surfaces are clear. It is recommended to clean the back-side of the new upper main bearing inserts and install them to the main bearing saddles with the oil hole alignment correct. Wipe and lay the lower main bearing inserts back to the main bearings and on the main bearing bridge, put the thrust washers at the right position. Scrub the faces of the bearing inserts and crankshaft main bearing journals, and look for dirt in the oil holes. After that, place the crankshaft into its lying position in the cylinder block and measure the main bearing oil clearance with the help of Plastigage and it should be slightly less than the journal width. Position Plastigage on each crankshaft main bearing journal, then install the main bearing cap bridge in the usual manner leaving the Plastigage undisturbed. Dip threads of bolts with clean engine oil before installation, then install the main bearing bridge bolts evenly without turning the crankshaft. Bolt reversal in an anti clock wise manner and then finally lift off the main bearing bridge, to check the width of Plastigage on the basis of scale in order to get the oil clearance. When the clearance is too large, investigate dirt or oil interference and replace the bearing inserts if needed. Try to remove any Plastigage that may have adhered to the journals and bearing faces without damaging those surfaces. For final installation, lift the crankshaft out, install the CKP pulse plate and bolts for 2009 and later models, then clean the bearing insert faces and apply a thin layer of grease or assembly lube. Replace the crankshaft back into its proper location and reinstall the Connecting Rod and caps for reassembly and clean the bearing insert faces before putting some liquid gasket on the lower main bearing bridge. Replace the bridge assembly or new bolts and securely tighten in accredited sequence. Recheck the crankshaft endplay and rotate the crankshaft with a running torque of 50 in-lbs or less to allow free movement. Lastly, fit the new rear main oil seal into its proper place or location as necessary or required.


