×
- Hello
- Login or Register
- Quick Links
- Live Chat
- Track Order
- Parts Availability
- RMA
- Help Center
- Contact Us
- Shop for
- Honda Parts
- Honda Accessories
My Garage
My Account
Cart
Genuine Honda Odyssey CV Joint
CV Joint Axle- Select Vehicle by Model
- Select Vehicle by VIN
Select Vehicle by Model
orMake
Model
Year
Select Vehicle by VIN
For the most accurate results, select vehicle by your VIN (Vehicle Identification Number).
25 CV Joints found


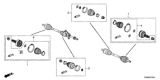
Honda Odyssey Outboard Joint Set
Part Number: 44014-TK8-A11$242.34 MSRP: $345.22You Save: $102.88 (30%)
Honda Odyssey Outboard Joint Set
Part Number: 44014-TK8-A21$232.98 MSRP: $331.88You Save: $98.90 (30%)

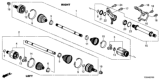
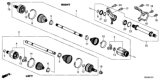
Honda Odyssey Inboard Joint Set
Part Number: 44310-TZ5-305$333.57 MSRP: $475.17You Save: $141.60 (30%)


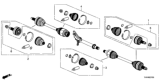
Honda Odyssey Outboard Joint Set
Part Number: 44014-TK8-A31$233.20 MSRP: $332.20You Save: $99.00 (30%)
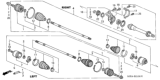
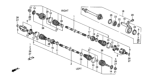
Honda Odyssey Outboard Joint Set
Part Number: 44014-THR-305$250.85 MSRP: $357.33You Save: $106.48 (30%)
Honda Odyssey Outboard Joint Set
Part Number: 44014-S0X-A53$306.93 MSRP: $437.22You Save: $130.29 (30%)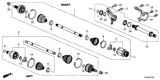


Honda Odyssey Outboard Joint Set
Part Number: 44014-SHJ-A03$164.72 MSRP: $359.87You Save: $195.15 (55%)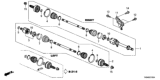


| Page 1 of 2 |Next >
1-20 of 25 Results
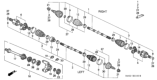
Honda Odyssey CV Joint
The CV Joint in Honda Odyssey vehicles is located mid car and is responsible for transmitting the power from the transmission through the wheels while also allowing the suspension to move and steer. These joints ensure that each of these joints rotates at a constant speed to ensure efficient power transmission, especially when in the front-wheel-drive applications. Honda Odyssey models incorporate different sorts of CV Joints, Rzeppa joints are used for outer joints and tripod joints for inboard joints. Rzeppa joints have spherical action allowing for great deal of travel and tripod joints which provide axial movement for changes in suspension. The primary difference lies in their application: outboard joints bear more complex angle while in board joint allows length change during suspension movement. For this reason, CV Joints are protected by rubber boots that hold lubricant and prevent exposure of the joint to environmental factors. These boots must always be checked for any signs of damage because this covers easy destruction of the joints by dirt and moisture. It is therefore important that the MV Joint is well maintained to enable the Honda Odyssey to perform as desired.
In search of affordable OEM Honda Odyssey CV Joint? Consider browsing through our extensive inventory of genuine Honda Odyssey CV Joint. Not only do we provide market-leading prices and a manufacturer's warranty, but we also pride ourselves on exceptional customer service and swift delivery.
Honda Odyssey CV Joint Parts Questions & Experts Answers
- Q: What Should You Consider Before Replacing CV Boot and CV Joint on a Honda Odyssey?A:If you have to replace the CV joints or boots, don't rush to start the job; instead, thanks to the availability of complete, rebuilt CV Boots on an exchange basis, you will spare yourself a lot of work. The first step involves the detachment of the CV Boot from the car and placing it in a vise with wooden jaws so that it you are not harm the axleshaft. Check CV joints for signs of excessive end float and proper operation; if a boot is damaged, remove the joint, clean the components and look for signs of wear. Saw off the boot clips and disconnect the boots to reveal the tri-pod assembly, indicating the position of the joint housing with respect to the tri-pod. Remove the tri-pod assembly snap-ring and align the tri-pod to the axleshaft for assembly. The tri-pod assembly can be driven from the axleshaft with a hammer and brass drift; final cleaning of all of the components is done and all of them should be examined for wear. If any part is worn, replace the entire joint or may be go for full CV Boot assembly. As for reassembly, put the splines back in place and cover them with tape; place the tri-pod and apply some grease. Get the position of the boot right, set the length of the CV Boot and ensure that pressure inside the boot is balanced. Check that the boot is correctly positioned and fix the clamps and these may differ in kind. The CV Boot is then in the ready state for it to be fitted. As for the outer CV joint, it requires the CV Boot to be removed and the boot band to be cut off; the axleshaft has to be cleaned and a distance between a marked point and the inner race has to be measured. In order to install or replace the outer CV joint the slide hammer is used to pull the outer joint out, check the joint for damage and get it greased, and finally the boot and clamps are put back in place and arranged properly.

Related Honda Odyssey Parts

Browse by Year
2026 CV Joint 2025 CV Joint 2024 CV Joint 2023 CV Joint 2022 CV Joint 2021 CV Joint 2020 CV Joint 2019 CV Joint 2018 CV Joint 2017 CV Joint 2016 CV Joint 2015 CV Joint 2014 CV Joint 2013 CV Joint 2012 CV Joint 2011 CV Joint 2010 CV Joint 2009 CV Joint 2008 CV Joint 2007 CV Joint 2006 CV Joint 2005 CV Joint 2004 CV Joint 2003 CV Joint 2002 CV Joint 2001 CV Joint 2000 CV Joint 1999 CV Joint 1998 CV Joint 1997 CV Joint 1996 CV Joint 1995 CV Joint