×
- Hello
- Login or Register
- Quick Links
- Live Chat
- Track Order
- Parts Availability
- RMA
- Help Center
- Contact Us
- Shop for
- Honda Parts
- Honda Accessories
My Garage
My Account
Cart
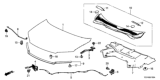
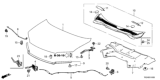
Genuine Honda Passport Hood Latch
Engine Hood Latch- Select Vehicle by Model
- Select Vehicle by VIN
Select Vehicle by Model
orMake
Model
Year
Select Vehicle by VIN
For the most accurate results, select vehicle by your VIN (Vehicle Identification Number).
6 Hood Latches found


Honda Passport Hood Lock Assembly
Part Number: 74120-TG7-A11$53.14 MSRP: $75.06You Save: $21.92 (30%)


Honda Passport LOCK ASSY-, HOOD
Part Number: 74120-3BM-A01$267.08 MSRP: $380.45You Save: $113.37 (30%)


Honda Passport Hood Latch
The Hood Latch in Honda Passport cars have a very important role of preventing the hood from opening during use of the vehicle. This mechanism is important because it helps protect the major parts of the car such as the engine, radiator and the battery among others. Perhaps in successive models of Honda Passport, there has been different designs of Hood Latch despite that the specific changes are not elaborated. The prime focus still remains in this case in understanding the efficacy of the Hood Latch as far as keeping the hood closed in order to protect the integrity of the car's internal environment. Speaking of the Hood Latch of the Honda Passport, it remains as one of the critical components of the vehicle that dictates its efficiency and security.
In search of affordable OEM Honda Passport Hood Latch? Consider browsing through our extensive inventory of genuine Honda Passport Hood Latch. Not only do we provide market-leading prices and a manufacturer's warranty, but we also pride ourselves on exceptional customer service and swift delivery.
Honda Passport Hood Latch Parts Questions & Experts Answers
- Q: How to install the hood latch and replace the hood cable on a Honda Passport?A:Before working on the models 1998 or later Amigo, first draw a line on the latch as a guide, then disconnect the bolts that keep the latch in place on the radiator support. Rephrase the following sentence. Keep the sentences direct, flowing, and easy to understand. Also normalize verbalization when possible. Undo the hood release cable connection by sliding out its fixture from the back side of the latch assembly. Reverse the steps used when removing the latch to install the hood mechanism: make sure the latch works well while the bumpers are comfortably squished together. Then, put stiff wire at the cable's end and follow it back to the firewall, dismantling all holding clips along the way. Step into the passenger area and pull the hood release lever, unfastening any mounting screws around it. Detach the cable from the lever's rear compartment, where the connection occurs. You can change the lock cylinder by taking out a cover panel and unscrewing the mounting screws. Give the cable and grommet a lift through the passenger area until you can see the wire, making sure the new cable also has a grommet ready when you connect it. Reach into the engine bay, pull the cable through to the passenger side, and press on the grommet in the passenger's space to fit it right. End your installation process by following the backward steps you used to take everything apart.


