×
- Hello
- Login or Register
- Quick Links
- Live Chat
- Track Order
- Parts Availability
- RMA
- Help Center
- Contact Us
- Shop for
- Honda Parts
- Honda Accessories
My Garage
My Account
Cart
Genuine Honda Prelude Antenna
Radio Antenna- Select Vehicle by Model
- Select Vehicle by VIN
Select Vehicle by Model
orMake
Model
Year
Select Vehicle by VIN
For the most accurate results, select vehicle by your VIN (Vehicle Identification Number).
11 Antennas found


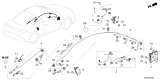
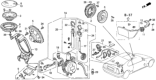
Honda Prelude Antenna Assembly, Lf
Part Number: 38387-TZ5-A01$54.30 MSRP: $77.35You Save: $23.05 (30%)
Honda Prelude Antenna Assembly, Motor
Part Number: 39150-SF1-A02$361.53 MSRP: $515.00You Save: $153.47 (30%)

Honda Prelude Antenna Assembly, Automatic Radio
Part Number: 39150-692-671$7.46 MSRP: $10.55You Save: $3.09 (30%)Honda Prelude Antenna Assembly, Motor
Part Number: 39150-SF1-A01$361.53 MSRP: $515.00You Save: $153.47 (30%)


Honda Prelude Antenna
The Honda Prelude Antenna allows drivers to draw in sharp radio signals, making every commute an audio-friendly ride. Acting as the connection between the radio waves and the stereo, the Antenna converts them to electric current for the head unit. Across generations, the sporty Prelude applied a slender mast Antenna of conductive metal sized near a half wavelength to pull from all directions, an omnidirectional design. This mast can transmit and receive but is focused on reception in daily driving, sacrificing pinpoint aim for coverage that keeps music steady. Earlier Honda models had a fixed pole; newer trims gained a power retracting unit, but the difference is not so much signal theory as motorized movement. Regardless of style, each Prelude Antenna is based on the same science first demonstrated by Hertz to convert alternating current from incoming broadcasts back into sound within the cabin. Fans love the way that the Prelude Antenna combines reliable reception with attractive design, a vital and small connection between road and airwaves. Every Honda model trusts this Antenna to keep the cabin connected, and Honda owners notice the difference.
In search of affordable OEM Honda Prelude Antenna? Consider browsing through our extensive inventory of genuine Honda Prelude Antenna. Not only do we provide market-leading prices and a manufacturer's warranty, but we also pride ourselves on exceptional customer service and swift delivery.
Honda Prelude Antenna Parts Questions & Experts Answers
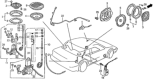
- Q: How to remove and install a pillar or trunk mounted antenna on Honda Prelude?A:If you have a car with an aerial fixed on the pillar or the truck, the procedures begin by the removal of the negative cable of the battery. There are two screws located in the base of the antenna that screws into the windshield pillar of the car, take them out and then you pull up on the base of the antenna to release the windshield pillar. Then, it will be necessary to gently disconnect the antenna cable from the pillar together with the connector at the lower part of the base plate of the antenna and remove the latter. Just as it was done during removal, installation follows the reverse sequence with respect to this part of the system. For the trunk mounted reflectors, first try consulting the local parts store because it might be that the part may only be obtained from a Honda dealer. The trim panel is removed in order for your to access the antenna motor; the connector should be disconnected from the motor, and so shall the antenna lead. Lift and disconnect the isolating nut from the top of the fender together with the motor bracket and remove the motor and antenna as assembly. Take out the antenna nut spacer, connect the wiring harness to the assembly and with an assistant tuning on the radio get rid of the 3rd B pillar. To install the new antenna turn the teeth of the new antenna mast cable into the housing until they snap into position as instructed by gently sliding them into place from the cable. Apply a light penetrating oil to the threads of the antenna mast housing after cleaning the same, switch of the radio and allow the power antenna to pull the cable into the housing using its motor. Last of all, replace the bushing, spacer and nut to conclude the process which is done by performing the reverse of the foregoing procedure.


