×
- Hello
- Login or Register
- Quick Links
- Live Chat
- Track Order
- Parts Availability
- RMA
- Help Center
- Contact Us
- Shop for
- Honda Parts
- Honda Accessories
My Garage
My Account
Cart
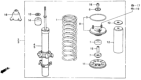
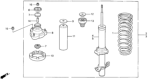
Genuine Honda Prelude Coil Springs
Strut Spring- Select Vehicle by Model
- Select Vehicle by VIN
Select Vehicle by Model
orMake
Model
Year
Select Vehicle by VIN
For the most accurate results, select vehicle by your VIN (Vehicle Identification Number).
28 Coil Springs found


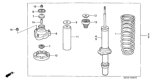

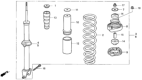
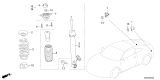
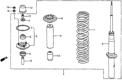
Honda Prelude Spring, Rear (Showa)
Part Number: 52441-SS0-014$88.48 MSRP: $124.97You Save: $36.49 (30%)Honda Prelude Spring, Rear (Mitsubishi)
Part Number: 52441-SS0-013$88.48 MSRP: $124.97You Save: $36.49 (30%)

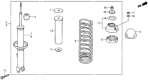
Honda Prelude Spring, Front (Nippon Hatsujo)
Part Number: 51401-692-952$38.88 MSRP: $54.92You Save: $16.04 (30%)

Honda Prelude Spring, Rear (Nippon Hatsujo)
Part Number: 52441-692-952$94.62 MSRP: $133.66You Save: $39.04 (30%)


| Page 1 of 2 |Next >
1-20 of 28 Results
Honda Prelude Coil Springs
For that kind of car like Honda Prelude made between 1978 to 2001, the car was said to use a coil spring as one of the suspension necessities crucial for it to provide comfort in its ride as well as responsiveness to turn on the road. These coil springs, crafted from special spring steel and treated with anti-corrosive coatings, serve two primary functions: acting to bear the weight and distribute the weight of the vehicle over the tires and in supporting and following the contours of the road surface required. Through the years, the Honda Prelude employed different varieties of coils springs especially the compression type which opposes to contraction to support the car. Even with the concept of durability in mind, time and wear and tear may lead to deformation, corrosion or cracking of these coil springs and they need to be replaced on regular basis without compromising safety as well as efficiency. Coil springs are used as a key shock absorber for roads and to improve car dynamics they are vital for the Honda Prelude for daily use as well as when making turns and high speed driving.
In search of affordable OEM Honda Prelude Coil Springs? Consider browsing through our extensive inventory of genuine Honda Prelude Coil Springs. Not only do we provide market-leading prices and a manufacturer's warranty, but we also pride ourselves on exceptional customer service and swift delivery.
Honda Prelude Coil Springs Parts Questions & Experts Answers
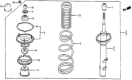
- Q: How to remove and install the rear Coil Springs on Honda Prelude?A:After placing your vehicle on jackstands, first unlatch the trunk trim and take out the two mount bolts for the strut. First, remove two new 15mm nuts that secure the lower strut mount. Then, use a ball joint removal tool to remove the rod links while pulling the lower ball joint free, after which you can remove the 10mm nut and ball joint nut. Drop the suspension with its bolt removed, pulling the strut off the vehicle. Using the manufacturer's guidelines, install a spring compressor on the coil spring while holding stable the strut in a vice. Start by squeezing the spring, taking off the self-locking nut from the strut, breaking apart the strut mounts, and removing the coil spring. Check the strut mounts to see if they are damaged or worn out and replace broken pieces. To put the spring in place, you need new locking nuts for the rear struts first. Put the spring compressor on the coil spring, then set the spring onto the strut assembly flat side up. Begin by adding the strut mount and washer to the strut, and fasten the self-locking nut manually to 22 ft. pounds before releasing the spring compressor. Put the strut back into place, set the bottom bolt on loosely, and tighten the top strut mounting bolts to 28 foot pounds. Link up the upper arm and knuckle, fasten the upper ball joint nut to between 29 and 35 foot pounds. Lift the suspension with a floor jack until the strut supports the vehicle's weight, then clamp down the lower bolt to 47 foot pounds. Complete your work by putting back the rear wheels, lower the car down, and tighten the new numbers first with 80 foot-pound-force. Then put on the trunk piece, and ensure your rear wheels are still correctly aligned.
")
Related Honda Prelude Parts
 Honda Prelude Coil Spring Insulator
 Honda Prelude Shock And Strut Mount
 Honda Prelude Tie Rod End
 Honda Prelude Bump Stop
 Honda Prelude Rear Crossmember
 Honda Prelude Front Cross-Member
 Honda Prelude Fender
 Honda Prelude Strut Bearing
 Honda Prelude Wheelhouse
Browse by Year
2026 Coil Springs 2001 Coil Springs 2000 Coil Springs 1999 Coil Springs 1998 Coil Springs 1997 Coil Springs 1996 Coil Springs 1995 Coil Springs 1994 Coil Springs 1993 Coil Springs 1992 Coil Springs 1991 Coil Springs 1990 Coil Springs 1989 Coil Springs 1988 Coil Springs 1987 Coil Springs 1986 Coil Springs 1985 Coil Springs 1984 Coil Springs 1983 Coil Springs 1982 Coil Springs 1981 Coil Springs 1980 Coil Springs 1979 Coil Springs