×
- Hello
- Login or Register
- Quick Links
- Live Chat
- Track Order
- Parts Availability
- RMA
- Help Center
- Contact Us
- Shop for
- Honda Parts
- Honda Accessories
My Garage
My Account
Cart
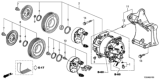
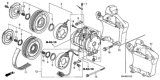
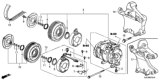
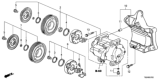
Genuine Honda Ridgeline A/C Compressor
Air Conditioning Compressor- Select Vehicle by Model
- Select Vehicle by VIN
Select Vehicle by Model
orMake
Model
Year
Select Vehicle by VIN
For the most accurate results, select vehicle by your VIN (Vehicle Identification Number).
6 A/C Compressors found


Honda Ridgeline A/C Compressor
The Honda Ridgeline A/C Compressor is responsible for keeping the cabin cool by squeezing refrigerant and forcing it through the system so that cooled air reaches the vents. Built as a belt-driven pump, the A/C Compressor pressurizes the liquid gas then circulates the gas to the condenser and evaporator, which drop interior temperatures quickly during summer drives. Every A/C Compressor contains the same basic mechanics to move the refrigerant in a closed loop. Across all Honda Ridgeline generations, the fundamental layout remains the same; therefore, drivers are subject to the same rapid startup cooling, and the only change really amounts to minor updates in efficiency rather than the switch to a different style of A/C Compressor. When the unit goes bad, the cabin of a Honda Ridgeline gets warm very quickly and the blower produces little more than tepid air, so a healthy A/C Compressor is a must-have for daily comfort in any model of the Honda Ridgeline.
In search of affordable OEM Honda Ridgeline A/C Compressor? Consider browsing through our extensive inventory of genuine Honda Ridgeline A/C Compressor. Not only do we provide market-leading prices and a manufacturer's warranty, but we also pride ourselves on exceptional customer service and swift delivery.
Honda Ridgeline A/C Compressor Parts Questions & Experts Answers
- Q: How to remove and install the A/C Compressor on Honda Ridgeline?A:Honda and 2006 Acura vehicles will receive a new receiver-drier anytime the compressor gets replaced. First, have a licensed AC professional take the old refrigerant from your system and store it safely. When taking the compressor out but keeping it working, turn it on for several minutes as you make your way to dumping the waste gas. Park the car, remove the drivebelt, set the parking brake, and block both rear wheels. Then lift the front of the car safely on jackstands. Remove and disconnect the electrical plug connecting the compressor clutch from its place on the fan shroud in front of the alternator. When lifting the subframe, set a floor jack under it on the right side, then eliminate the subframe mounting bracket at the bottom of the compressor while keeping note that the company says it's better to attach a brand new bolt when setting the subframe back in place. Close the refrigerator lines at the compressor and put cap covers on the open ends to keep dirt and moisture from getting inside. First take out the compressor mounting bolts, then pull it down. You'll see bolts holding the compressor mounting bracket, and you can take it off by first pulling out the bottom bolt of the lower alternator. Before putting it into place, you have to move the clutch from the old compressor to the new one. Follow the special instructions to check and adjust oil when installing a fresh or rebuilt compressor. Changing compression involves putting new O-rings in place on the compressor where the line fittings connect, tightening both subframe bracket and subframe mounting bolts. Reconnect the battery, then send the unit to the same shop that took the charge from it. They will reempty, recharge, and perform leak checks.

Related Honda Ridgeline Parts
 Honda Ridgeline Blend Door Actuator
 Honda Ridgeline Blower Motor Resistor
 Honda Ridgeline Blower Motor
 Honda Ridgeline A/C Clutch
 Honda Ridgeline A/C Hose
 Honda Ridgeline A/C Expansion Valve
 Honda Ridgeline A/C Accumulator
 Honda Ridgeline A/C Condenser
 Honda Ridgeline A/C Switch
Browse by Year
2026 A/C Compressor 2025 A/C Compressor 2024 A/C Compressor 2023 A/C Compressor 2022 A/C Compressor 2021 A/C Compressor 2020 A/C Compressor 2019 A/C Compressor 2018 A/C Compressor 2017 A/C Compressor 2014 A/C Compressor 2013 A/C Compressor 2012 A/C Compressor 2011 A/C Compressor 2010 A/C Compressor 2009 A/C Compressor 2008 A/C Compressor 2007 A/C Compressor 2006 A/C Compressor