×
- Hello
- Login or Register
- Quick Links
- Live Chat
- Track Order
- Parts Availability
- RMA
- Help Center
- Contact Us
- Shop for
- Honda Parts
- Honda Accessories
My Garage
My Account
Cart
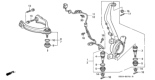
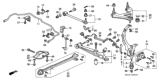
Genuine 1999 Honda Prelude Control Arm
Suspension Arm- Select Vehicle by Model
- Select Vehicle by VIN
Select Vehicle by Model
orMake
Model
Year
Select Vehicle by VIN
For the most accurate results, select vehicle by your VIN (Vehicle Identification Number).
12 Control Arms found


 Product Specifications
- Other Name: Upper Control Arm
- Position: Passenger Side
- Item Weight: 4.00 Pounds
- Item Dimensions: 13.4 x 11.6 x 4.6 inches
- Condition: New
- Fitment Type: Direct Replacement
- SKU: 51450-S30-N21
- Warranty: This genuine part is guaranteed by Honda's factory warranty.


 Product Specifications
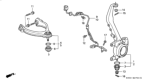
- Other Name: Upper Control Arm
- Position: Passenger Side
- Item Weight: 3.80 Pounds
- Item Dimensions: 11.3 x 10.7 x 5.3 inches
- Condition: New
- Fitment Type: Direct Replacement
- SKU: 51450-S30-003
- Warranty: This genuine part is guaranteed by Honda's factory warranty.

 Product Specifications
- Other Name: Upper Control Arm
- Position: Driver Side
- Item Weight: 3.90 Pounds
- Item Dimensions: 11.0 x 11.3 x 5.3 inches
- Condition: New
- Fitment Type: Direct Replacement
- SKU: 51460-S30-003
- Warranty: This genuine part is guaranteed by Honda's factory warranty.


 Product Specifications
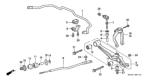
- Other Name: Lower Control Arm
- Position: Driver Side
- Replaces: 51365-SS0-000
- Item Weight: 9.10 Pounds
- Item Dimensions: 18.6 x 5.6 x 4.5 inches
- Condition: New
- Fitment Type: Direct Replacement
- SKU: 51365-S30-000
- Warranty: This genuine part is guaranteed by Honda's factory warranty.


 Product Specifications
- Other Name: Lower Control Arm
- Position: Passenger Side
- Replaces: 51355-SS0-000
- Item Weight: 7.60 Pounds
- Item Dimensions: 17.9 x 3.6 x 3.1 inches
- Condition: New
- Fitment Type: Direct Replacement
- SKU: 51355-S30-000
- Warranty: This genuine part is guaranteed by Honda's factory warranty.


 Product Specifications
- Other Name: Lower Control Arm
- Position: Driver Side
- Item Weight: 8.90 Pounds
- Item Dimensions: 27.7 x 11.5 x 6.7 inches
- Condition: New
- Fitment Type: Direct Replacement
- SKU: 51365-S30-N20
- Warranty: This genuine part is guaranteed by Honda's factory warranty.

 Product Specifications
- Other Name: Lower Control Arm
- Position: Passenger Side
- Item Weight: 5.70 Pounds
- Item Dimensions: 17.9 x 5.5 x 4.6 inches
- Condition: New
- Fitment Type: Direct Replacement
- SKU: 51355-S30-N20
- Warranty: This genuine part is guaranteed by Honda's factory warranty.


 Product Specifications
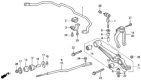
- Other Name: Lower Control Arm; Rear Lower Control Arm
- Position: Driver Side
- Item Weight: 8.60 Pounds
- Item Dimensions: 19.8 x 5.5 x 4.5 inches
- Condition: New
- Fitment Type: Direct Replacement
- SKU: 52360-S30-900
- Warranty: This genuine part is guaranteed by Honda's factory warranty.

 Product Specifications
- Other Name: Lower Control Arm; Rear Lower Control Arm
- Position: Passenger Side
- Item Weight: 9.50 Pounds
- Item Dimensions: 19.6 x 5.5 x 4.5 inches
- Condition: New
- Fitment Type: Direct Replacement
- SKU: 52350-S30-900
- Warranty: This genuine part is guaranteed by Honda's factory warranty.
 Product Specifications
- Other Name: Upper Control Arm
- Position: Driver Side
- Item Weight: 4.30 Pounds
- Item Dimensions: 13.4 x 11.3 x 4.7 inches
- Condition: New
- Fitment Type: Direct Replacement
- SKU: 51460-S30-N21
- Warranty: This genuine part is guaranteed by Honda's factory warranty.
 Product Specifications
- Other Name: Upper Control Arm
- Position: Driver Side
- Item Weight: 4.80 Pounds
- Item Dimensions: 13.6 x 13.5 x 5.9 inches
- Condition: New
- Fitment Type: Direct Replacement
- SKU: 52400-S30-003
- Warranty: This genuine part is guaranteed by Honda's factory warranty.
 Product Specifications
- Other Name: Upper Control Arm
- Position: Passenger Side
- Item Weight: 8.50 Pounds
- Item Dimensions: 13.6 x 13.0 x 5.8 inches
- Condition: New
- Fitment Type: Direct Replacement
- SKU: 52390-S30-003
- Warranty: This genuine part is guaranteed by Honda's factory warranty.
1999 Honda Prelude Control Arm
Our website is the optimal online store for when you need any genuine 1999 Honda Prelude Control Arm. We offer a wide range of 1999 Honda Prelude Control Arm at unbeatable prices. We will help provide you with a worry-free shopping experience at highly competitive prices. In addition, all OEM parts are backed by the manufacturer's warranty.
1999 Honda Prelude Control Arm Parts Questions & Experts Answers
- Q: How to remove and install the rear lower Control Arm on 1999 Honda Prelude?A: Before you take off the lower arm, raise and secure the car, take out the rear tire and wheel, and follow these steps. Before taking off the lower arm, first undo the flanged through bolt and flange nut holding the inner bushing. Keep the following in mind during installation: grease the bushing, tighten the nuts to the numbers listed above, and apply even pressure. With lower arm B, raise the vehicle safely and take off both back wheels. Place a floor jack under the spring perch of the lower control arm and raise it just a little. After you grab the lower control arm, twist those two bolts holding the strut and knuckle flanges, let the lower control arm go, then take off the parts from the strut, coil spring, and spring seats in order. Mark the washer position before removing the inner bushing and lower arm in order to put them back correctly. First put silicone grease in the inner bushing, then place the lower arm and screw through bolt onto it while leaving the bolt loose. Before installing the lower control arm, replace damaged upper and lower spring seats, put them in place, and use a floor jack under the arm to compress the spring. Lower the vehicle, put the bolt through the flange, hand tighten it, then place a jack under the knuckle to support. For the bushing, tighten the inner flange nut to 40 foot pounds (54 newton meters), the three flange bolts to 47 foot pounds (64 newton meters), and everything connecting the strut to its flange to 47 foot pounds (64 newton meters). Before using the car again, turn the steering wheel from side to side ten times to even up the tires. Reinstall the rear wheels onto the hubs and make sure the wheel nuts are tightened to 80 ft lbs. Also check the wheel alignment, correct if needed.
Related 1999 Honda Prelude Parts
 1999 Honda Prelude Shift Cable
 1999 Honda Prelude Control Arm Bushing
 1999 Honda Prelude Ball Joint
 1999 Honda Prelude Coil Springs
 1999 Honda Prelude Steering Knuckle
 1999 Honda Prelude Radius Arm Bushing
 1999 Honda Prelude Radius Arm
 1999 Honda Prelude Lift Support
 1999 Honda Prelude Torsion Bar
 1999 Honda Prelude Trailing Arm