×
- Hello
- Login or Register
- Quick Links
- Live Chat
- Track Order
- Parts Availability
- RMA
- Help Center
- Contact Us
- Shop for
- Honda Parts
- Honda Accessories
My Garage
My Account
Cart
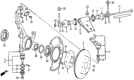
Genuine Honda Prelude Control Arm
Suspension Arm- Select Vehicle by Model
- Select Vehicle by VIN
Select Vehicle by Model
orMake
Model
Year
Select Vehicle by VIN
For the most accurate results, select vehicle by your VIN (Vehicle Identification Number).
78 Control Arms found


Honda Prelude Lower Arm A Complete
Part Number: 52370-TGH-A00$306.79 MSRP: $437.02You Save: $130.23 (30%)


Honda Prelude Left Rear Arm (Upper)
Part Number: 52520-TGH-A01$277.28 MSRP: $394.98You Save: $117.70 (30%)


Honda Prelude Right Rear Arm (Upper)
Part Number: 52510-TGH-A01$277.13 MSRP: $394.77You Save: $117.64 (30%)


Honda Prelude Left Rear Arm (Lower)
Part Number: 52360-692-010$84.79 MSRP: $119.77You Save: $34.98 (30%)
Honda Prelude Right Rear Arm (Lower)
Part Number: 52350-692-000$84.79 MSRP: $119.77You Save: $34.98 (30%)
Honda Prelude Arm B, Left Rear (Lower)
Part Number: 52365-SF1-A02$116.75 MSRP: $164.90You Save: $48.15 (30%)Honda Prelude Arm B, Left Rear (Lower)
Part Number: 52365-SF1-A01$116.75 MSRP: $164.90You Save: $48.15 (30%)
Honda Prelude Arm B, Right Rear (Lower)
Part Number: 52355-SF1-A02$116.75 MSRP: $164.90You Save: $48.15 (30%)Honda Prelude Arm B, Right Rear (Lower)
Part Number: 52355-SF1-A01$116.75 MSRP: $164.90You Save: $48.15 (30%)
Honda Prelude Left Front Arm (Lower)
Part Number: 51365-SS0-000$154.51 MSRP: $220.10You Save: $65.59 (30%)Honda Prelude Left Rear Arm (Lower)
Part Number: 52360-692-640$84.79 MSRP: $119.77You Save: $34.98 (30%)Honda Prelude Left Rear Arm (Lower)
Part Number: 52360-692-020$84.79 MSRP: $119.77You Save: $34.98 (30%)Honda Prelude Right Rear Arm (Lower)
Part Number: 52350-692-020$84.79 MSRP: $119.77You Save: $34.98 (30%)

Honda Prelude TRAILING ARM COMP, L
Part Number: 52365-36W-J01$96.25 MSRP: $135.95You Save: $39.70 (30%)


| Page 1 of 4 |Next >
1-20 of 78 Results
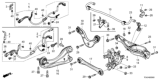
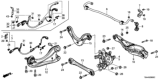
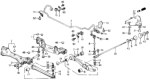
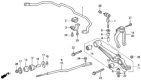
Honda Prelude Control Arm
The Control Arm of Honda Prelude cars connects the frame of the car with the wheels to enable the movement within the suspension system. This part enables the wheels to rotate in order to balance the effects of road surface undulations in order to help the wheels maintain their correct position on the car to enhance its handling capability. Control Arms used by Honda Prelude models consist of stamped steel Control Arms of the earlier models as well as advanced cast iron or aluminum Control Arms which are stronger yet lighter in weight. Stymied steel Control Arms are more rigid but very much susceptible to rust, which eliminates its strength. Whereas previous generations were expected to handle less rigorous performance, new generation shocks exhibit sturdy frame structures and components including DOM tubular steel and aluminum. These performance oriented Control Arms are specifically designed for increased turning allowance and modifications for the outstanding Hondas Prelude for various driving.
In search of affordable OEM Honda Prelude Control Arm? Consider browsing through our extensive inventory of genuine Honda Prelude Control Arm. Not only do we provide market-leading prices and a manufacturer's warranty, but we also pride ourselves on exceptional customer service and swift delivery.
Honda Prelude Control Arm Parts Questions & Experts Answers
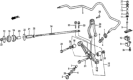
- Q: How to remove and install the rear upper Control Arm on Honda Prelude?A:To work on the Prelude models' rear wheels, carefully lift the car, prop it up, and take off the rear wheels. Then place a jack under the control arm and knuckle so they stay in position. Take out the upper Ball Joint from the knuckle by using a ball joint separator tool, push away the trunk panel, and unscrew the two strut-stabilitizer nuts. Pull off the nuts holding the upper arm bolts in place and remove the arm from the vehicle. Keep the arm together when taking it out - you must replace everything if the ball joint fails, the bushings wear out, or the arm gets damaged. When reinstalling, first install the upper arm and strut together using new self-locking nuts on the upper arm. Place the upper control arm assembly into the strut tower, fit the upper ball joint, and finish by installing the rear wheels while lowering the entire car. Lower the vehicle onto all four wheels, finding the right amount of tension on the upper control arm nuts. Then fix the cast nut to 32 ft. pounds torque, relax enough to put in a fresh cotter pin. After tightening wheel nuts to the required 80 ft. lbs. force, replace the trunk trim and adjust the vehicle to correct wheel alignment at the rear. You need to replace the entire control arm when the bushings in the upper part of the control arm become worn or damaged.
")
Related Honda Prelude Parts
 Honda Prelude Shift Cable
 Honda Prelude Control Arm Bushing
 Honda Prelude Ball Joint
 Honda Prelude Coil Springs
 Honda Prelude Steering Knuckle
 Honda Prelude Radius Arm Bushing
 Honda Prelude Radius Arm
 Honda Prelude Lift Support
 Honda Prelude Torsion Bar
 Honda Prelude Trailing Arm
 Honda Prelude Trailing Arm Bushing
Browse by Year
2026 Control Arm 2001 Control Arm 2000 Control Arm 1999 Control Arm 1998 Control Arm 1997 Control Arm 1996 Control Arm 1995 Control Arm 1994 Control Arm 1993 Control Arm 1992 Control Arm 1991 Control Arm 1990 Control Arm 1989 Control Arm 1988 Control Arm 1987 Control Arm 1986 Control Arm 1985 Control Arm 1984 Control Arm 1983 Control Arm 1982 Control Arm 1981 Control Arm 1980 Control Arm 1979 Control Arm