×
- Hello
- Login or Register
- Quick Links
- Live Chat
- Track Order
- Parts Availability
- RMA
- Help Center
- Contact Us
- Shop for
- Honda Parts
- Honda Accessories
My Garage
My Account
Cart
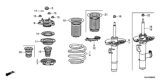
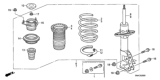
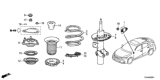
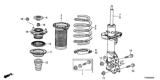
Genuine Honda Civic Shock Absorber
Suspension Shock Absorber- Select Vehicle by Model
- Select Vehicle by VIN
Select Vehicle by Model
orMake
Model
Year
Select Vehicle by VIN
For the most accurate results, select vehicle by your VIN (Vehicle Identification Number).
721 Shock Absorbers found


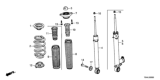
Honda Civic Right Rear Shock Absorber Unit
Part Number: 52611-TBF-A01$520.19 MSRP: $750.63You Save: $230.44 (31%)


Honda Civic Shock Absorber Unit, Left Rear
Part Number: 52621-TBF-A01$531.70 MSRP: $767.25You Save: $235.55 (31%)

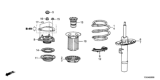
Honda Civic Shock Absorber Unit, Left Front
Part Number: 51621-TGG-A02$184.59 MSRP: $262.95You Save: $78.36 (30%)
Honda Civic Shock Absorber Unit, Right Front
Part Number: 51611-TGG-A02$286.77 MSRP: $408.50You Save: $121.73 (30%)

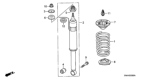
Honda Civic Shock Absorber Assembly, Rear
Part Number: 52610-SNE-A03$166.96 MSRP: $237.83You Save: $70.87 (30%)


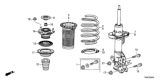
Honda Civic Damper Unit, Front Left
Part Number: 51621-TBA-A03$172.69 MSRP: $246.00You Save: $73.31 (30%)
Honda Civic Damper Unit, Front Right
Part Number: 51611-TBA-A03$172.69 MSRP: $246.00You Save: $73.31 (30%)
Honda Civic Shock Absorber Unit, Left Front
Part Number: 51621-TBF-A01$573.86 MSRP: $828.08You Save: $254.22 (31%)
Honda Civic Shock Absorber Unit, Right Front
Part Number: 51611-TBF-A01$573.86 MSRP: $828.08You Save: $254.22 (31%)


Honda Civic Rear Front Damper Unit
Part Number: 51611-TR0-A23$203.58 MSRP: $290.00You Save: $86.42 (30%)

Honda Civic Damper Unit, Front Left
Part Number: 51621-TBA-A13$179.43 MSRP: $255.60You Save: $76.17 (30%)
Honda Civic Damper Unit, Front Right
Part Number: 51611-TBA-A13$179.43 MSRP: $255.60You Save: $76.17 (30%)
Honda Civic Damper Unit, Front Left
Part Number: 51621-TBC-A03$179.43 MSRP: $255.60You Save: $76.17 (30%)

Honda Civic Left Front Damper Unit
Part Number: 51621-TR0-A23$203.58 MSRP: $290.00You Save: $86.42 (30%)


Honda Civic Shock Absorber Unit, Right Front
Part Number: 51605-SNA-A13$261.16 MSRP: $372.02You Save: $110.86 (30%)


Honda Civic Damper Unit, Front Right
Part Number: 51611-TBC-A03$172.69 MSRP: $246.00You Save: $73.31 (30%)

Honda Civic Damper Unit, Front Left
Part Number: 51621-TGH-A01$567.51 MSRP: $818.92You Save: $251.41 (31%)


Honda Civic Damper Unit, Front Left
Part Number: 51621-TBC-A13$172.69 MSRP: $246.00You Save: $73.31 (30%)

Honda Civic Shock Absorber Unit, Right Front
Part Number: 51611-TR0-A03$203.58 MSRP: $290.00You Save: $86.42 (30%)

Honda Civic Shock Absorber Unit, Left Front
Part Number: 51606-SNA-A13$261.16 MSRP: $372.02You Save: $110.86 (30%)
| Page 1 of 37 |Next >
1-20 of 721 Results
Honda Civic Shock Absorber
The Honda Civic Shock Absorber and strut assembly enables avails to reduce movements beyond a reasonable level in roads that have poor surface. They are based on shock absorbers, struts and springs and help the vehicle to maintain road contact while at the same time minimizing bounce. If the shock absorber is failing, then the car exhibits characteristics like fluctuation, vibration on the steering wheel and late response to brake. Most of the low-end shock absorber and strut assemblies for the Honda Civics go for a reasonable range, and can be bought individually or as a kit. Various types such as twin tube shocks and mono tube shocks come with incomparable features in the management of the hydraulic fluid flow and additional features for extra efficiency in performance conditions. Some of the prominent types of dampers include electrorheological and magnetorheological dampers that make way for semi-active and adaptive suspension systems.
In search of affordable OEM Honda Civic Shock Absorber? Consider browsing through our extensive inventory of genuine Honda Civic Shock Absorber. Not only do we provide market-leading prices and a manufacturer's warranty, but we also pride ourselves on exceptional customer service and swift delivery.
Honda Civic Shock Absorber Parts Questions & Experts Answers
- Q: How to remove and install the Rear Shock Absorber on Honda Civic?A:Start by unscrewing the rear wheel nuts, lift the rear of your car, place jackstands under it, and block the front wheels to make sure the car stays put. Pull out the wheel and lower the trunk panel to make it easy to reach the shock absorber top mounting point in the trunk. Place a jack underneath the Trailing Arm, where it connects to the knuckle, to stabilize the lower arm while you work. Keep the suspension shaft steady by tightening a hex tool on its lower end as you loosen the upper mounting nut holding the shock absorber. First, unscrew the lower mounting bolt, then easily pull out the shock absorber. Look over the shock body for signs of fluid leaks, dings, cracks, and other visible damage. See how much work you need to do to fix or replace it. Bring the new shock absorber into the fender area and slip the damper through the body opening - keep the damper rod visible - and fasten the bushing, washer, and nut to stop the assembly from sinking back below, using fresh mounting bushings for better stability. Place the shock absorber on the trailing arm, lift the trailing arm to normal ride height with the jack, secure the shock both on top and bottom by hand-tightening the relevant bolts and nut. Last, attach the tire, thread on all lug nuts, let the car return to the ground, and tighten the lug nuts.
- Q: How to Replace Coil Springs and Shock Absorber on Honda Civic?A:Remove the strut/spring assembly, mount it in the vise, and compress the spring. Hold the damper rod, unscrew the nut, and remove the upper mount. Remove the spring seat/insulator, lift the compressed spring, and remove the dust cover/plate. Slide the bump stop and extend the damper rod. Install the bump stop/dust cover/plate, place the compressed coil spring, and install the upper insulator/spring seat. Install the bearing/support, install the washer/nut, remove the spring compressor, and install the strut/spring assembly.
- Q: How to Remove and Install a Front Shock Absorber on a Honda Civic?A:Loosen the wheel lug nuts, raise the vehicle and support it securely on jackstands, then remove the wheels. Unbolt the brake hose bracket from the strut and detach the speed sensor wiring harness from the strut by removing the clamp bracket bolt. Remove the stabilizer bar link from the strut, mark the position of the strut to the Steering Knuckle, then remove the strut-to-knuckle nuts and bolts. Remove the access cover from the cowl panel, then remove the three upper nuts securing the strut assembly to the body. Separate the strut from the steering knuckle and remove it. Check the strut body for leaking fluid, dents, cracks and other obvious damage which would warrant repair or replacement. Check the coil spring for chips or cracks in the spring coating and inspect the spring seat for cuts, hardness and general deterioration. Guide the strut assembly up into the fenderwell and insert the upper mounting studs through the holes in the body, then install the nuts. Slide the steering knuckle into the strut flange and insert the two bolts, install the nuts, align the previously made matchmarks and tighten them to the torque. Install the wheel and lug nuts, then lower the vehicle and tighten the lug nuts. Tighten the upper mounting nuts and install the cowl panel cover. Have the front end alignment checked and, if necessary, adjusted.


Related Honda Civic Parts
 Honda Civic Tie Rod End
 Honda Civic Steering Knuckle
 Honda Civic Coil Springs
 Honda Civic Wheelhouse
 Honda Civic Fender
Browse by Year
2026 Shock Absorber 2025 Shock Absorber 2024 Shock Absorber 2023 Shock Absorber 2022 Shock Absorber 2021 Shock Absorber 2020 Shock Absorber 2019 Shock Absorber 2018 Shock Absorber 2017 Shock Absorber 2016 Shock Absorber 2015 Shock Absorber 2014 Shock Absorber 2013 Shock Absorber 2012 Shock Absorber 2011 Shock Absorber 2010 Shock Absorber 2009 Shock Absorber 2008 Shock Absorber 2007 Shock Absorber 2006 Shock Absorber 2005 Shock Absorber 2004 Shock Absorber 2003 Shock Absorber 2002 Shock Absorber 2001 Shock Absorber 2000 Shock Absorber 1999 Shock Absorber 1998 Shock Absorber 1997 Shock Absorber 1996 Shock Absorber 1995 Shock Absorber 1994 Shock Absorber 1993 Shock Absorber 1992 Shock Absorber 1991 Shock Absorber 1990 Shock Absorber 1989 Shock Absorber 1988 Shock Absorber 1987 Shock Absorber 1986 Shock Absorber 1985 Shock Absorber 1984 Shock Absorber 1983 Shock Absorber 1982 Shock Absorber 1981 Shock Absorber 1980 Shock Absorber 1979 Shock Absorber 1978 Shock Absorber 1977 Shock Absorber 1976 Shock Absorber 1975 Shock Absorber 1974 Shock Absorber 1973 Shock Absorber