×
- Hello
- Login or Register
- Quick Links
- Live Chat
- Track Order
- Parts Availability
- RMA
- Help Center
- Contact Us
- Shop for
- Honda Parts
- Honda Accessories
My Garage
My Account
Cart
Genuine Honda CR-V Brake Master Cylinder
- Select Vehicle by Model
- Select Vehicle by VIN
Select Vehicle by Model
orMake
Model
Year
Select Vehicle by VIN
For the most accurate results, select vehicle by your VIN (Vehicle Identification Number).
15 Brake Master Cylinders found


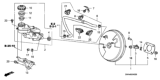
Honda CR-V Master Cylinder Assembly
Part Number: 46100-SWA-A01$496.42 MSRP: $716.33You Save: $219.91 (31%)

Honda CR-V Master Cylinder Set (Coo)
Part Number: 01462-TLA-A00$348.46 MSRP: $496.38You Save: $147.92 (30%)


Honda CR-V Master Cylinder Assembly
Part Number: 46100-S6M-A52$673.72 MSRP: $972.18You Save: $298.46 (31%)


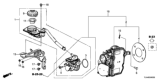
Honda CR-V Master Cylinder Assembly
Part Number: 46100-S9A-A62$673.48 MSRP: $971.83You Save: $298.35 (31%)Honda CR-V Master Cylinder Set
Part Number: 46101-T0B-315$476.45 MSRP: $687.52You Save: $211.07 (31%)

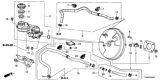
Honda CR-V Master Cylinder Assembly
Part Number: 46100-S10-023$297.40 MSRP: $423.65You Save: $126.25 (30%)
Honda CR-V Master Cylinder Assembly (Abs)
Part Number: 46100-S04-N53$246.75 MSRP: $351.50You Save: $104.75 (30%)


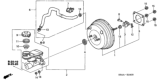
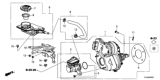
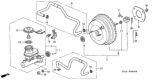
Honda CR-V Brake Master Cylinder
It is a Master Cylinder that in the Honda CR-V automobiles specifically fixated on the mechanical brake system is a component that translates the foot pressure with which a driver presses the brake pedal into hydraulic forces that influences the slave cylinders. Hydraulic brake system works by putting pressure on hydraulic fluid that in turn brings into play calipers or drum brake to generate the amount of friction required to stop the car freely. In the past unmentioned years, the Honda CR-V was fitted with a dual circuit master cylinder means that the if one circuit fails, the other one is capable of supplying braking force. Honda has used both, cast iron and aluminium for the Brake Master Cylinder and varying in reservoir type; integral or external in terms of service and performance. Housing of seals and springs is located in the master cylinder and reliable functioning is guaranteed, but various problems such as leakage of fluids or failure inside can lead to poor braking system. It is required to inspect the Brake Master Cylinder as often as possible for the sake of the Honda CR-V safety and proper functioning.
In search of affordable OEM Honda CR-V Brake Master Cylinder? Consider browsing through our extensive inventory of genuine Honda CR-V Brake Master Cylinder. Not only do we provide market-leading prices and a manufacturer's warranty, but we also pride ourselves on exceptional customer service and swift delivery.
Honda CR-V Brake Master Cylinder Parts Questions & Experts Answers
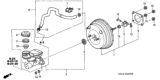
- Q: Where is the Brake Master Cylinder Located and How is it Installed on a Honda CR-V?A:The brake master cylinder is located in the engine compartment, mounted to the power Brake Booster. Begin by removing the air filter housing. Disconnect the electrical connector from the fluid level warning switch. Using a syringe or equivalent, remove the brake fluid from the brake master cylinder reservoir and dispose of it properly, ensuring that brake fluid does not come into contact with painted surfaces as it can cause damage. If spilled, wash immediately with water. Disconnect the electrical connector from the fluid level sensor on the remote reservoir, then remove the remote fluid reservoir mounting bolt. Place rags underneath the fluid fittings and prepare caps or bags to cover the ends of the lines once they're disconnected. Loosen the fittings at the ends of the Brake Lines entering the brake master cylinder. Using a flare-nut wrench is preferred. Pull the brake lines slightly away from the brake master cylinder and plug the ends. Remove the mounting nuts from the brake master cylinder to detach it from the power booster and then pull it out of the engine compartment. If installing a new brake master cylinder, transfer the reservoir to it. Before installing the new brake master cylinder, bench bleed it by mounting it in a vise. Attach bleeder tubes to the outlet ports and fill the reservoir with brake fluid. Push the pistons into the brake master cylinder until no more air bubbles are present, then remove the bleed tubes and install plugs in the ports. Install a new O-ring on the brake master cylinder and place it over the studs on the power brake booster. Thread the brake line fittings into the brake master cylinder and tighten them. Fill the brake master cylinder reservoir with fluid and bleed it. Attach the remote fluid reservoir, tightening the bolt securely. Reconnect the electrical connector to the fluid level sensor. Reverse the removal process for the remainder of the installation, bleed the entire brake hydraulic system, and test the brake system operation before regular driving.

Related Honda CR-V Parts

Browse by Year
2025 Brake Master Cylinder 2024 Brake Master Cylinder 2023 Brake Master Cylinder 2022 Brake Master Cylinder 2021 Brake Master Cylinder 2020 Brake Master Cylinder 2019 Brake Master Cylinder 2018 Brake Master Cylinder 2017 Brake Master Cylinder 2016 Brake Master Cylinder 2015 Brake Master Cylinder 2014 Brake Master Cylinder 2013 Brake Master Cylinder 2012 Brake Master Cylinder 2011 Brake Master Cylinder 2010 Brake Master Cylinder 2009 Brake Master Cylinder 2008 Brake Master Cylinder 2007 Brake Master Cylinder 2006 Brake Master Cylinder 2005 Brake Master Cylinder 2004 Brake Master Cylinder 2003 Brake Master Cylinder 2002 Brake Master Cylinder 2001 Brake Master Cylinder 2000 Brake Master Cylinder 1999 Brake Master Cylinder 1998 Brake Master Cylinder 1997 Brake Master Cylinder