×
- Hello
- Login or Register
- Quick Links
- Live Chat
- Track Order
- Parts Availability
- RMA
- Help Center
- Contact Us
- Shop for
- Honda Parts
- Honda Accessories
My Garage
My Account
Cart
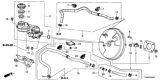
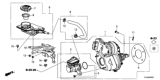
Genuine Honda CR-V Brake Booster
Brake Power Booster- Select Vehicle by Model
- Select Vehicle by VIN
Select Vehicle by Model
orMake
Model
Year
Select Vehicle by VIN
For the most accurate results, select vehicle by your VIN (Vehicle Identification Number).
19 Brake Boosters found


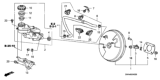
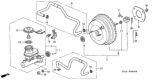
Honda CR-V Power Set, Master (10.5")
Part Number: 01469-SWA-A00$781.21 MSRP: $1127.28You Save: $346.07 (31%)


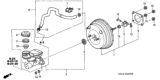
Honda CR-V Set, Master Power
Part Number: 01469-T0G-A01$704.88 MSRP: $1017.14You Save: $312.26 (31%)


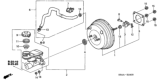
Honda CR-V Power Set, Master (10.5")
Part Number: 01469-T0A-A01$704.88 MSRP: $1017.14You Save: $312.26 (31%)


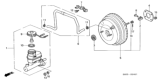


Honda CR-V Brake Booster
The Brake Booster as a system refers to the part found in the Honda CR-V car model, which has the capability of lessening the amount of force used in applying brakes. The brake booster as well as the vacuum chamber makes use of the hydraulic pressure of the master cylinder and increases the force which the driver applies when pressing the brake pedal. There are two main types of boosters used in CR-V vehicles: vacuum operated boosters and hydraulic boosters. In vacuum boosters, pressurisation is obtained by difference of vacuum pressure in the engine and ambient pressure, while hydraulic boosters use hydraulic pressure to help in the application of brakes. typically vacuum power boosters are quite reliable; nonetheless, they can sometimes go wrong and thus need replacement. As for the actual power brake booster, owners of the Honda CR-V have a range of either model or size specific or universal power brake boosters that are available in different diameters and of course different types of finish.
In search of affordable OEM Honda CR-V Brake Booster? Consider browsing through our extensive inventory of genuine Honda CR-V Brake Booster. Not only do we provide market-leading prices and a manufacturer's warranty, but we also pride ourselves on exceptional customer service and swift delivery.
Honda CR-V Brake Booster Parts Questions & Experts Answers
- Q: How to remove and install a Power Brake Booster Unit on Honda CR-V?A:Press the brake pedal several times when the engine's off, then check to see if the distance between the pedal and its stopping position stays the same. Push the accelerator when the engine's on - if it moves down even a little, your brakes are working correctly. Step onto the brake pedal a few times, beginning with the engine turned off. If the pedal sinks farther down when you press it the first time, but comes back up after the second or third try, this means your booster is sealed well. Keep the brake pedal engaged while powering down the engine; if the pedal stays in place when you hold the pedal for 30 seconds while running, the booster is holding its air properly. Experts warn against opening car brakes because their construction and how they work to stop vehicles make them too hard to fix; replacing old, broken brakes with fresh ones works best. Unbolt the Brake Master Cylinder, detach the engine-to-boost hose, and protect the hose while you work to avoid harm. Unclip the Brake Lines from their holder on the cowl, and for CR-V owners, remove and set aside the wiring harness's clamp bolts. Take out the clevis pin that connects the pushrod to the brake pedal, then lay the retaining clip and clevis pin aside. Disconnect the pushrod clevis from its position on the pedal. Push the booster back through the firewall and take out the four nuts. Slide the booster straight off until the studs disengage from the firewall, then remove the entire booster, brackets, and gaskets from the engine bay. You can install the booster by just following the same steps in reverse order. After setting the booster correctly, don't forget to put in a fresh cotter pin for the clevis pin. Set up the master cylinder in place, then flush and fix the other parts of your brake system. Test and, when needed, adjust the height of the brake pedal and the free space it has before stopping.

Related Honda CR-V Parts
 Honda CR-V Brake Disc
 Honda CR-V Brake Light Switch
 Honda CR-V Brake Caliper
 Honda CR-V Brake Backing Plate
 Honda CR-V Brake Proportioning Valve
 Honda CR-V Brake Master Cylinder
 Honda CR-V Brake Line
 Honda CR-V Brake Drum
Browse by Year
2025 Brake Booster 2024 Brake Booster 2023 Brake Booster 2022 Brake Booster 2021 Brake Booster 2020 Brake Booster 2016 Brake Booster 2015 Brake Booster 2014 Brake Booster 2013 Brake Booster 2012 Brake Booster 2011 Brake Booster 2010 Brake Booster 2009 Brake Booster 2008 Brake Booster 2007 Brake Booster 2006 Brake Booster 2005 Brake Booster 2004 Brake Booster 2003 Brake Booster 2002 Brake Booster 2001 Brake Booster 2000 Brake Booster 1999 Brake Booster 1998 Brake Booster 1997 Brake Booster