×
- Hello
- Login or Register
- Quick Links
- Live Chat
- Track Order
- Parts Availability
- RMA
- Help Center
- Contact Us
- Shop for
- Honda Parts
- Honda Accessories
My Garage
My Account
Cart
Genuine Honda CR-V Cooling Fan Assembly
Engine Cooling Fan- Select Vehicle by Model
- Select Vehicle by VIN
Select Vehicle by Model
orMake
Model
Year
Select Vehicle by VIN
For the most accurate results, select vehicle by your VIN (Vehicle Identification Number).
11 Cooling Fan Assemblys found


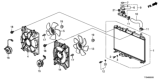


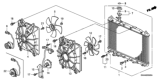


Honda CR-V Fan, Cooling (Natural) (Denso)
Part Number: 38611-PNA-003$77.99 MSRP: $110.14You Save: $32.15 (30%)

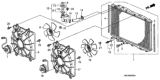
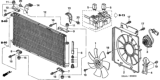
Honda CR-V Fan, Cooling (Mitsuba)
Part Number: 38611-PT2-J02$75.12 MSRP: $106.10You Save: $30.98 (30%)

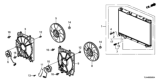
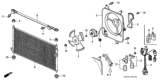
Honda CR-V Fan, Cooling (Mitsuba)
Part Number: 38611-PAA-A01$33.19 MSRP: $46.89You Save: $13.70 (30%)

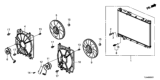
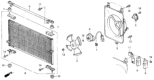
Honda CR-V Fan, Cooling (Mitsuba)
Part Number: 19020-P5M-004$83.66 MSRP: $118.17You Save: $34.51 (30%)
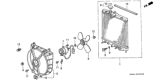
Honda CR-V Cooling Fan Assembly
The Cooling Fan Assembly in Honda CR-V vehicles is important in controlling the temperature of the car's engine by driving circulation of air through the radiator. The fan assembly commonly is made of a fan blade and a mount shroud, and loaded by a motor beside the radiator where hot coolant passes through to be cooled down in order to re-circulate in the engine. Honda CR-V models employ both Mechanical as well as Electric cooling fans. Mechanical fans rotates by being connected to the water pump shaft enganged by temperature while the electric fans use a commend 12V motor, engaged by coolant temperature and air conditioning calls. This covers enables proper air flow over the radiator hence increases cooling rate. In general, it seems that the Cooling Fan Assembly is quite important in ensuring that the Honda CR-V cars run smoothly.
In search of affordable OEM Honda CR-V Cooling Fan Assembly? Consider browsing through our extensive inventory of genuine Honda CR-V Cooling Fan Assembly. Not only do we provide market-leading prices and a manufacturer's warranty, but we also pride ourselves on exceptional customer service and swift delivery.
Honda CR-V Cooling Fan Assembly Parts Questions & Experts Answers
- Q: What are the procedures for removing and installing the Cooling Fan Assembly on a Honda CR-V?A:Every CRV air conditioning model uses two full fan circuits, one cooling the condenser and one blowing air into the radiator. Begin by taking your cable out of the battery's negative connection. Taking off the air filter housing and intake air duct is necessary on all 2.4L vehicles. After you remove the black caps, carefully work your way around the grille to take out the clips that keep it attached to the bumper cover. Pull out the pushpins from the grille opening. After that, take off the duct assembly along with its mounting pins which connect it to the front bumper cover. Crack the clamp that holds the wiring harness and set it aside. Pull off the connector wire from the radiator fan. Let go of the harness retainer after that. Do the same with the cooling fan attached to the condenser using the same steps. Detach the electrical cable to the horn, take off both the horn and its bracket, and pull out the hood locking mechanism. Unbolt and remove the two radiator mount upper bracket bolts. Detach their brackets. Disconnect the pair of wiring connectors found at the top of the cooling fan shroud. Start by taking off the top engine cooling fan bolts from the radiator. Be careful as you lift the condenser fan first, then move the radiator fan up a little bit and to the right, allowing you to take it out from the engine bay. Unscrew the motor shaft nut first; after that, pull the fan blade away from the motor shaft. To take off the fan motor from its housing, first remove the mounting screws. Installation is the reverse of removal. Finally, add cold fluid back to the car's cooling system and hook up the battery.

Related Honda CR-V Parts
 Honda CR-V Drain Plug Washer
 Honda CR-V Drain Plug
 Honda CR-V Cooling Hose
 Honda CR-V Coolant Temperature Sensor
 Honda CR-V Fan Motor
 Honda CR-V Evaporator
 Honda CR-V Fan Blade
 Honda CR-V Fan Shroud
 Honda CR-V Coolant Reservoir
 Honda CR-V Door Lock
 Honda CR-V Fuel Pump Relay
Browse by Year
2026 Cooling Fan Assembly 2025 Cooling Fan Assembly 2024 Cooling Fan Assembly 2023 Cooling Fan Assembly 2022 Cooling Fan Assembly 2021 Cooling Fan Assembly 2020 Cooling Fan Assembly 2019 Cooling Fan Assembly 2018 Cooling Fan Assembly 2017 Cooling Fan Assembly 2016 Cooling Fan Assembly 2015 Cooling Fan Assembly 2014 Cooling Fan Assembly 2013 Cooling Fan Assembly 2012 Cooling Fan Assembly 2011 Cooling Fan Assembly 2010 Cooling Fan Assembly 2009 Cooling Fan Assembly 2008 Cooling Fan Assembly 2007 Cooling Fan Assembly 2006 Cooling Fan Assembly 2005 Cooling Fan Assembly 2004 Cooling Fan Assembly 2003 Cooling Fan Assembly 2002 Cooling Fan Assembly 2001 Cooling Fan Assembly 2000 Cooling Fan Assembly 1999 Cooling Fan Assembly 1998 Cooling Fan Assembly 1997 Cooling Fan Assembly