×
- Hello
- Login or Register
- Quick Links
- Live Chat
- Track Order
- Parts Availability
- RMA
- Help Center
- Contact Us
- Shop for
- Honda Parts
- Honda Accessories
My Garage
My Account
Cart
Genuine Honda CR-V Crankshaft
Crank Shaft- Select Vehicle by Model
- Select Vehicle by VIN
Select Vehicle by Model
orMake
Model
Year
Select Vehicle by VIN
For the most accurate results, select vehicle by your VIN (Vehicle Identification Number).
7 Crankshafts found


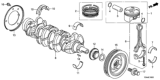


Honda CR-V Crankshaft Complete
Part Number: 13310-59B-J00$357.58 MSRP: $470.19You Save: $112.61 (24%)


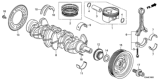
Honda CR-V Crankshaft Complete
Part Number: 13310-5AA-A00$357.58 MSRP: $470.19You Save: $112.61 (24%)

Honda CR-V Crankshaft
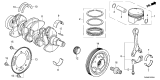
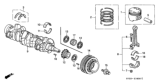
Honda CR-V Crankshaft converts the up and down movement of the pistons to smooth running power to eventually rotate the wheels. This Crankshaft is located in the engine block and its offset throws let the connecting rods change reciprocating movement to rotation which feeds the transmission and axles. Crankshaft journals require constant oil. Over the years the CR-V has relied on two Crankshaft builds: durable cast iron for standard engines and tougher forged steel for horsepower; the latter resists stress under heavy loads. Despite movement, Crankshafts are all built to last the life of the vehicle if the owner maintains oil to flow clean and avoid dirt that can score journals and increase clearances, which can trigger the knocking vibrations. Should such damage happen, the replacement of the unit requires removing the engine, pulling bearing caps, fitting new bearings, greasing journals, torquing caps in sequence and checking for free rotation before the CR-V engine goes back in place. Honda engineering makes this core shaft stout, but Honda still cautions against neglect that trouble will be the guest of the negligent, so frequent oil changes keep the CR-V Crankshaft spinning reliably inside every Honda.
In search of affordable OEM Honda CR-V Crankshaft? Consider browsing through our extensive inventory of genuine Honda CR-V Crankshaft. Not only do we provide market-leading prices and a manufacturer's warranty, but we also pride ourselves on exceptional customer service and swift delivery.
Honda CR-V Crankshaft Parts Questions & Experts Answers
- Q: How can the crankshaft be removed and installed on Honda CR-V?A:The crankshaft can only be removed, if the engine has been removed from the vehicle, assuming that parts such as the flywheel, crankshaft pulley, timing chain, oil pan and others have been unbolted. Use a dial indicator to check crankshaft end play; the zero should read with crankshaft pried to rear, then measure when pried to front of the thrust; common end play includes a range between 0.004 and 0.014 inch. In the situation where a dial indicator cannot be used, feeler gauges are used to measure clearance. Turn the main bearing bridge perimeter bolts out slowly if present, take off the bridge if present and carefully lift out the crankshaft simultaneously taking off the crankshaft position sensor pulse plate. For installation, the engine block and crankshaft must be clean and inspected, Afterwards turn the block upside down and pull out the lower crankcase. Lubricate and scrape out old bearing metal and renew the upper main bearing inserts and check that the oil holes are correctly located. Ensure that the oil clearance of the main bearing is correct by the method of Plastigage, fit the lower crankcase or caps and without dismantling the Plastigage use a torque wrench to tighten the bolts in the right sequences. In the case of assessing the clearance, if it varies with the standard figures, incorrect bearing sizes or interference by dirt may be thought of. Wipe any Plastigage remaining on the crankshaft before reassemble and there's applying the layer of oil on the bearing surface and make sure the mating surfaces have no oil. Spread liquid gasket on the lower main bearing bridge and fasten it as soon as possible; the bolts of the liquid gasket should be tightened to a fixed torque. Crankshaft end play must be checked and felt to rotate as smoothly with little friction as possible. Last of all fit the new rear main oil seal and do not turn the engine for some time before filling it with oil or cranking it to start the car.

Related Honda CR-V Parts
 Honda CR-V Rod Bearing
 Honda CR-V Oil Pan
 Honda CR-V Oil Pump
 Honda CR-V Crankshaft Pulley
 Honda CR-V Oil Pan Gasket
 Honda CR-V Camshaft
 Honda CR-V Cam Gear
 Honda CR-V Crankshaft Gear
 Honda CR-V Crankshaft Thrust Washer Set
Browse by Year
2026 Crankshaft 2025 Crankshaft 2024 Crankshaft 2023 Crankshaft 2022 Crankshaft 2021 Crankshaft 2020 Crankshaft 2019 Crankshaft 2018 Crankshaft 2017 Crankshaft 2016 Crankshaft 2015 Crankshaft 2014 Crankshaft 2013 Crankshaft 2012 Crankshaft 2011 Crankshaft 2010 Crankshaft 2009 Crankshaft 2008 Crankshaft 2007 Crankshaft 2006 Crankshaft 2005 Crankshaft 2004 Crankshaft 2003 Crankshaft 2002 Crankshaft 2001 Crankshaft 2000 Crankshaft 1999 Crankshaft 1998 Crankshaft 1997 Crankshaft