×
- Hello
- Login or Register
- Quick Links
- Live Chat
- Track Order
- Parts Availability
- RMA
- Help Center
- Contact Us
- Shop for
- Honda Parts
- Honda Accessories
My Garage
My Account
Cart
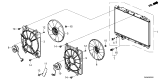
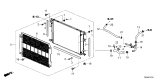
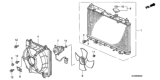
Genuine Honda CR-V Radiator
Cooling Radiator- Select Vehicle by Model
- Select Vehicle by VIN
Select Vehicle by Model
orMake
Model
Year
Select Vehicle by VIN
For the most accurate results, select vehicle by your VIN (Vehicle Identification Number).
15 Radiators found


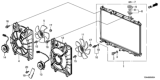


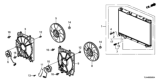


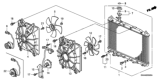


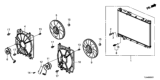


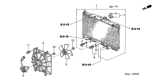


Honda CR-V W-RADIATOR, DRIVETRAIN
Part Number: 1J000-6GS-A01$287.19 MSRP: $409.10You Save: $121.91 (30%)
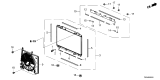


Honda CR-V Radiator
The function of a radiator is very crucial in that it provides coolant that has become extremely hot with the main purpose of cooling the engines in Honda CR-V brand vehicles. This coolant gets heated up by the heat from the engine and goes through the radiator where heater air flow cools the coolant which inturn goes back to the engine and begins the cycle again. After a while some wear and tear problems like leakage, rusting and blockage of the paths befalls it hence requires an early replacement in order to avoid severe cases of engine overheating. There are various kinds of radiators have been used in Honda CR-V with the current models having aluminum core in order to reduce the weight and cost of the vehicle. Like any other radiators, these radiators provided with several fins to increase its efficiency in heat exchanging by convective means. There is always an availability of after-market replacement radiators with favorable characteristics of quality and price that will ensure functionality of Honda CR-V as intended.
In search of affordable OEM Honda CR-V Radiator? Consider browsing through our extensive inventory of genuine Honda CR-V Radiator. Not only do we provide market-leading prices and a manufacturer's warranty, but we also pride ourselves on exceptional customer service and swift delivery.
Honda CR-V Radiator Parts Questions & Experts Answers
- Q: How to remove and reinstall a radiator on Honda CR-V?A:Before removing the radiator, it is essential to ensure that the ignition is off, and the key is out of the vehicle, then, you must switch off your car and unscrew the cable of the battery's negative terminal. Lift the front of the vehicle and secure it with jackstands and then remove the under vehicle splash shield. Removing coolants with poor quality is important but saving the coolant if it is good merits consideration as follows; Both the engine cooling fans that have to be removed and, in the case of ATX models, the transaxle fluid cooler lines coming out from the bottom of the radiator. Tomorrow, unscrew the #2 inlet and outlet to the radiator, strip the electrical connector of the #2 ECT sensor. Gently remove the radiator remembering to be careful as not to pour the coolant on the ground or scratch the paint. Check the condition and possible present leaks on the radiator and if necessary have it fixed by a mechanic. Rinse out the radiator using a garden hose nozzle from the back side and do not forget to reinstall it back after cleaning. The radiator mounts should be inspected for signs of wear and tear, and should be replaced if needed. When installing the opposite procedure is followed by guiding the radiator towards the mount and applying pressure unto the mounts to ensure that the hear pins in. Here are the requirements to observe after installation; it must be refilled with the appropriate proportion of anti-freeze and water reconnected to the battery to engage the starter motor, switched on the engine and checked for any leakage. Let the engine warm up for the coolant to expand, this can be known by checking the upper hose coming from the radiator to be hot and then check the coolant level and add more if necessary. Last but not the least, look and ascertain that transaxle fluid is right and replenished should it be necessary.

Related Honda CR-V Parts
 Honda CR-V Water Pump
 Honda CR-V Radiator Hose
 Honda CR-V Cooling Hose
 Honda CR-V Fan Motor
 Honda CR-V Radiator Support
 Honda CR-V Fan Blade
 Honda CR-V Intercooler
 Honda CR-V Fan Shroud
 Honda CR-V Coolant Reservoir
Browse by Year
2026 Radiator 2025 Radiator 2024 Radiator 2023 Radiator 2022 Radiator 2021 Radiator 2020 Radiator 2019 Radiator 2018 Radiator 2017 Radiator 2016 Radiator 2015 Radiator 2014 Radiator 2013 Radiator 2012 Radiator 2011 Radiator 2010 Radiator 2009 Radiator 2008 Radiator 2007 Radiator 2006 Radiator 2005 Radiator 2004 Radiator 2003 Radiator 2002 Radiator 2001 Radiator 2000 Radiator 1999 Radiator 1998 Radiator 1997 Radiator