×
- Hello
- Login or Register
- Quick Links
- Live Chat
- Track Order
- Parts Availability
- RMA
- Help Center
- Contact Us
- Shop for
- Honda Parts
- Honda Accessories
My Garage
My Account
Cart
Genuine Honda CRX Ball Joint
Control Arm Joint- Select Vehicle by Model
- Select Vehicle by VIN
Select Vehicle by Model
orMake
Model
Year
Select Vehicle by VIN
For the most accurate results, select vehicle by your VIN (Vehicle Identification Number).
3 Ball Joints found


Honda CRX Ball Joint
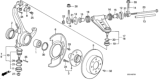
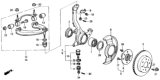
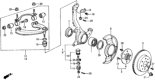
The Ball Joint is one of the most important components of suspension and steering system of Honda CRX vehicles, used to link the control arm with the steering knuckle. This component can rotate freely in two planes thanks to which the vehicle reacts to road surface features and the input from the steering wheel. Usually used in steel body, the Honda CRX Ball Joint consists of a bearing stud and socket, which is covered by rubber boot for the sake of preventing touch of dirt and allowing lubrication. The Ball Joints used in Honda CRX models may also be of loaded or unloaded kind. The loaded Ball Joints take the weight of the car whereas the unloaded or follower Ball Joints are only responsible for the orientation of car though they do not carry loads. Like any other joint, Ball Joints wear over time because of use, and lack of lubrication they show signs such as noise, and abnormal tire wear. Upgrades of this type are available, ball joint inserts, and complete control arms are tunable for higher level handling, and upgrades.
In search of affordable OEM Honda CRX Ball Joint? Consider browsing through our extensive inventory of genuine Honda CRX Ball Joint. Not only do we provide market-leading prices and a manufacturer's warranty, but we also pride ourselves on exceptional customer service and swift delivery.
Honda CRX Ball Joint Parts Questions & Experts Answers
- Q: How to diagnose and replace the upper control arm or ball joint on Honda CRX?A:To begin, raise and safely support the vehicle, then remove the front wheel and tire assembly. Next, grasp the Steering Knuckle and move it back and forth. If any play is detected, replace the upper control arm on all models except Prelude; for Prelude, replace the upper ball joint. The upper ball joint is an integral component of the upper control arm, and if it is defective, the entire upper control arm must be replaced.
 (Musashi)")

