×
- Hello
- Login or Register
- Quick Links
- Live Chat
- Track Order
- Parts Availability
- RMA
- Help Center
- Contact Us
- Shop for
- Honda Parts
- Honda Accessories
My Garage
My Account
Cart
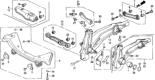
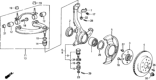
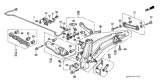
Genuine Honda CRX Control Arm
Suspension Arm- Select Vehicle by Model
- Select Vehicle by VIN
Select Vehicle by Model
orMake
Model
Year
Select Vehicle by VIN
For the most accurate results, select vehicle by your VIN (Vehicle Identification Number).
31 Control Arms found


Honda CRX Left Rear Arm (Lower)
Part Number: 52360-SH3-A12$100.47 MSRP: $141.90You Save: $41.43 (30%)
Honda CRX Right Front Arm Assembly (Upper)
Part Number: 51450-SH3-A01$124.84 MSRP: $177.84Limited AvailabilityYou Save: $53.00 (30%)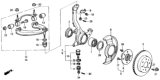
Honda CRX Right Front Arm Assembly (Upper)
Part Number: 51450-SH3-020$124.84 MSRP: $177.84You Save: $53.00 (30%)
Honda CRX Left Rear Arm (Lower)
Part Number: 52360-SH3-G11$94.57 MSRP: $133.57You Save: $39.00 (30%)
Honda CRX Right Rear Arm (Upper)
Part Number: 52390-SH3-000$76.76 MSRP: $108.42You Save: $31.66 (30%)


| Page 1 of 2 |Next >
1-20 of 31 Results
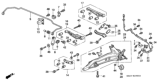
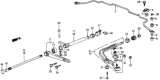
Honda CRX Control Arm
Generally, the Control Arm of Honda CRX vehicles acts as a connection between the frame of the car and the wheels with a responsibility of movement of the suspension system. This unit swivels as a result of road situation in order to ensure that the wheels are capable of reaching a vertical plane in the right manner. Honda CRX comes with different types of Control Arms such as, Stamped steel, cast iron Control Arm, or even aluminum Control Arms which are stronger but lighter in weight than the stamped steel Control Arms. Although stamped steel Control Arms have certain merits including being very rigid, they have demerits such as being susceptible to rust and thus may have their structural strength rendered useless. On the other hand, newer designs are far more powerful and built to sustain extra power train requirements, housing DOM tubular steel and billet aluminum to name a few. This final pair of Control Arms is for performance application, the Steering and Suspension Control Arms, street performance and racing, provides the Honda CRX excellent road feel while maintaining superior stability at various driving speeds.
In search of affordable OEM Honda CRX Control Arm? Consider browsing through our extensive inventory of genuine Honda CRX Control Arm. Not only do we provide market-leading prices and a manufacturer's warranty, but we also pride ourselves on exceptional customer service and swift delivery.
Honda CRX Control Arm Parts Questions & Experts Answers
- Q: How to remove and install the lower control arm on Honda CRX?A:This procedure requires a special puller for removing the lower control arm on these vehicles. Begin by raising and supporting the vehicle, then remove the torsion bar height adjuster nut, torque tube hold, bushing, and circlip. Next, take off the torsion bar cap, tap the torsion bar forward, and remove the snapring before tapping the torsion bar out of the torque tube. Remove the torque tube and the bolt attaching the lower control arm to the Radius Arm. Use a jack to raise the engine for access to the lower arm. If working on the left side control arm, move the alternator out of the way; for automatic transaxle equipped cars, remove the battery and splash shield, then raise the transaxle and remove the transaxle mount while installing a supporting bracket. Attach the removal tool to the lower arm and use it to pull the control arm off. For installation, place the bushing and control arm onto the installation tool, aligning the marks on the bushing and frame. Use the tool to install the lower arm into position, turning it until the frame and end of the bushing are flush, then lower the engine and remove any supports. Install the torsion bar assembly and adjust as needed. For 1988-91 models, raise the vehicle and support it safely, then remove the front wheels. Support the lower control arm assembly, disconnect the lower arm Ball Joint carefully to avoid damaging the seal, and remove the stabilizer bar retaining brackets, starting with the center ones. Remove the lower arm pivot bolt, disconnect the radius rod, and take out the lower arm. Install the lower control arm in position, connect all brackets, and attach the stabilizer bar to the control arm, tightening the nut to 16 ft. lbs. (22 Nm). Connect the radius bar to the control arm and tighten the bolts to 80 ft. lbs. (110 Nm), then tighten the lower control arm to chassis bolt to 43 ft. lbs. (60 Nm) and connect the damper fork to the control arm, tightening the bolt to 47 ft. lbs. (65 Nm).
")


