×
- Hello
- Login or Register
- Quick Links
- Live Chat
- Track Order
- Parts Availability
- RMA
- Help Center
- Contact Us
- Shop for
- Honda Parts
- Honda Accessories
My Garage
My Account
Cart
Genuine Honda CRX Control Arm Bushing
Suspension Arm Bushing- Select Vehicle by Model
- Select Vehicle by VIN
Select Vehicle by Model
orMake
Model
Year
Select Vehicle by VIN
For the most accurate results, select vehicle by your VIN (Vehicle Identification Number).
21 Control Arm Bushings found


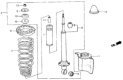
Honda CRX Bush, Rear Shock Absorber (Lower)
Part Number: 52622-SH3-013$29.60 MSRP: $42.17You Save: $12.57 (30%)

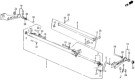
Honda CRX Bush, Rear Arm (Upper) (Yusa)
Part Number: 52395-SR0-A01$23.00 MSRP: $33.23You Save: $10.23 (31%)

Honda CRX Bush, Rear Shock Absorber (Lower)
Part Number: 52622-SH3-010$30.04 MSRP: $42.43You Save: $12.39 (30%)


| Page 1 of 2 |Next >
1-20 of 21 Results
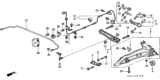
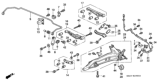
Honda CRX Control Arm Bushing
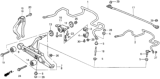
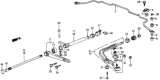
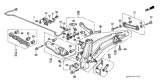
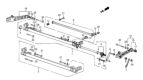
Generally, the Control Arm Bushing is essential parts of the suspension system in Honda CRX that has the function of damping vibration and and minimizing the contact friction between the control arm of the car's frame. This metal sleeve insulated by the surrounding material slideway embraces the control arms so it can pivot and thus, the wheels are capable of adapting or moving according to the street and the mechanism being steer but will not move horizontally. The material used in the manufacturing of Control Arm Bushing has differed for several Honda CRX models, ranging from rubber, steel, aluminum and polyurethane. Where standard rubber bushings are economic and widely used, polyurethane and synthetic elastomers are more tough and outperforming but little more economic. In choosing a types of Control Arm Bushing which would replace the defective one in a Honda CRX, the material to be used and whether it is for stock or for improvement are the most important since it takes into consideration the handling and durability of the car.
In search of affordable OEM Honda CRX Control Arm Bushing? Consider browsing through our extensive inventory of genuine Honda CRX Control Arm Bushing. Not only do we provide market-leading prices and a manufacturer's warranty, but we also pride ourselves on exceptional customer service and swift delivery.
Honda CRX Control Arm Bushing Parts Questions & Experts Answers
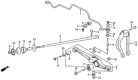
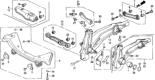
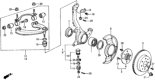
- Q: How to remove and install the upper control arm and Control Arm Bushing on Honda CRX?A:To remove and install the upper control arm assembly, first raise and support the vehicle safely, then remove the front wheels and properly support the lower control arm assemblies. Next, take off the self-locking nuts, upper control arm bolts, and upper control anchor bolts, and separate the upper Ball Joint using a suitable ball joint separator tool. Place the upper control arm assembly into a holding fixture and drive out the upper arm bushing. For installation, drive the new upper arm bushing into the upper arm anchor, ensuring that on Civic and CRX models, 0.3543 inches (9 mm) protrudes from each side of the anchor bolt, while on Accord models, the leading edges should be flush with the anchor bolt. Install the upper control arm assembly and the upper arm bolts, then tighten the self-locking nuts, ensuring the upper arm anchor bolt aligns with the mark on the upper arm. Tighten the upper arm nuts to 47 ft. lbs. (65 Nm), the self-locking nuts on the control arm bolts to 22 ft. lbs. (30 Nm), and the upper ball joint pin nut to 12 ft. lbs. (44 Nm). Finally, reinstall the remaining components in the reverse order of removal.
 (Inner)")


