×
- Hello
- Login or Register
- Quick Links
- Live Chat
- Track Order
- Parts Availability
- RMA
- Help Center
- Contact Us
- Shop for
- Honda Parts
- Honda Accessories
My Garage
My Account
Cart
Genuine Honda Odyssey Crankshaft
Crank Shaft- Select Vehicle by Model
- Select Vehicle by VIN
Select Vehicle by Model
orMake
Model
Year
Select Vehicle by VIN
For the most accurate results, select vehicle by your VIN (Vehicle Identification Number).
9 Crankshafts found


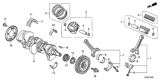


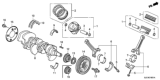


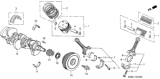


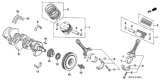


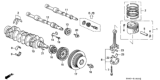
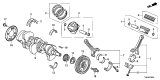

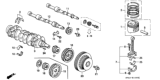
Honda Odyssey Crankshaft
The Honda Odyssey Crankshaft is responsible for converting the straight line thrust of the pistons into smooth spinning power that eventually turns the minivan's wheels. Ground with precision journals and fitted into the engine block, this Crankshaft rides on bearings while connecting rods clamp to offset throws that change back and forth motion into rotation. Early and lower output Odyssey engines usually applied durable cast iron, but later higher horsepower Odyssey models switched to forged steel, which is a stronger style better withstanding twisting forces at elevated rpm, so material choice is a big difference between the two Crankshaft designs applied through the years. Regardless of metal, adhering to the general Honda maintenance schedule is critical because grit or low lubricant can score the journals, open clearances, create metal clash and trigger the familiar knocking sound that warns drivers their Crankshaft is in danger. When cared for, the part is expected to last the life of the vehicle, but once damage is apparent, replacement requires a complete removal of the engine, sequentially numbered main bearing caps, fresh bearings, moly grease on every surface and careful torque checks to ensure free rotation before the block is back on the bay. Ignoring vibration or knock can lead to a broken Crankshaft, which will prevent power from getting delivered, leaving even the reliable Honda owner stranded, so regular oil changes are the easy way to look after any Odyssey owner who wants a trouble-free Honda driving experience.
In search of affordable OEM Honda Odyssey Crankshaft? Consider browsing through our extensive inventory of genuine Honda Odyssey Crankshaft. Not only do we provide market-leading prices and a manufacturer's warranty, but we also pride ourselves on exceptional customer service and swift delivery.
Honda Odyssey Crankshaft Parts Questions & Experts Answers
- Q: How can the crankshaft be removed and installed on Honda Odyssey?A:The crankshaft is only removed after the removal of the engine, which in turn requires removal of the driveplate, crankshaft pulley, timing bell, oil pan, oil pump body, oil filter, and piston/Connecting Rod assemblies where applicable. But before removal, it is advisable to use a dial indi-cator to compare the end play of the crankshaft. Push the crankshaft to the rear and read the indicator and then push it to the front to take the reading which should range from 0.0030.010 inch from the zero gauge (0.0760.254 mm). Feelers can be used in checking clearance in case a dial indicator cannot be used in carrying out the exercise. Turn the main bearing cap bolts on a clockwise and anticlockwise pattern slowly and gently knock the caps, using a soft-faced hammer; then carefully lift the crankshaft out without damaging bearing inserts. For installation, guarantee that the engine block and crankshaft are clean, and their condition analyzed. Turn the block over, undo the main bearing caps and clean the bearing faces. Machine new upper main bearing inserts, make sure there are oil holes and place lower inserts in the caps. Plastigage used to check the oil clearance and make sure that it is within its standard measurements. If not, check for cleanliness and decide which size of bearing you want for your machine. After Plastigage mop up, apply little grease on the bearing areas, re-position the crankshaft and put the caps labeled 'FRONT' in front. Tighten the bolts in the right order and measure and verify the crank end play and then rotate the crankshaft to and fro. Last but not the least, fit the new rear main oil seal.

Related Honda Odyssey Parts
 Honda Odyssey Rod Bearing
 Honda Odyssey Oil Pan
 Honda Odyssey Oil Pan Gasket
 Honda Odyssey Crankshaft Pulley
 Honda Odyssey Camshaft
 Honda Odyssey Oil Pump
 Honda Odyssey Cam Gear
 Honda Odyssey Crankshaft Thrust Washer Set
Browse by Year
2026 Crankshaft 2025 Crankshaft 2024 Crankshaft 2023 Crankshaft 2022 Crankshaft 2021 Crankshaft 2020 Crankshaft 2019 Crankshaft 2018 Crankshaft 2017 Crankshaft 2016 Crankshaft 2015 Crankshaft 2014 Crankshaft 2013 Crankshaft 2012 Crankshaft 2011 Crankshaft 2010 Crankshaft 2009 Crankshaft 2008 Crankshaft 2007 Crankshaft 2006 Crankshaft 2005 Crankshaft 2004 Crankshaft 2003 Crankshaft 2002 Crankshaft 2001 Crankshaft 2000 Crankshaft 1999 Crankshaft 1998 Crankshaft 1997 Crankshaft 1996 Crankshaft 1995 Crankshaft