×
- Hello
- Login or Register
- Quick Links
- Live Chat
- Track Order
- Parts Availability
- RMA
- Help Center
- Contact Us
- Shop for
- Honda Parts
- Honda Accessories
My Garage
My Account
Cart
Genuine Honda Passport Pistons
Engine Pistons- Select Vehicle by Model
- Select Vehicle by VIN
Select Vehicle by Model
orMake
Model
Year
Select Vehicle by VIN
For the most accurate results, select vehicle by your VIN (Vehicle Identification Number).
21 Pistons found


Honda Passport Piston Set (Standard)
Part Number: 13050-R9P-A00$138.60 MSRP: $197.43You Save: $58.83 (30%)
Honda Passport Piston Set,FR (0.)
Part Number: 13030-R9P-A00$87.76 MSRP: $123.95You Save: $36.19 (30%)


Honda Passport PSTN SET, FR- (STD)
Part Number: 13010-6FB-A00$49.95 MSRP: $70.55You Save: $20.60 (30%)Honda Passport PSTN SET, RR- (STD)
Part Number: 13050-6FB-A00$49.97 MSRP: $70.58You Save: $20.61 (30%)

| Page 1 of 2 |Next >
1-20 of 21 Results
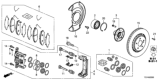
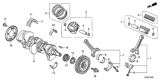
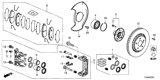
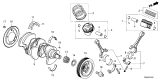
Honda Passport Pistons
The Piston in Honda Passport vehicles is one of the internal combustion engine system that is useful in transmutation of combustion power into the energy needed for the movement of the vehicle. Through transmitting of forces exerted by the expanding gases to the crankshaft, the Honda Passport Piston is very influential in enhancing the engine's efficiency under high pressures and temperatures. In the course of its manufacturing, there have been various kinds of pistons used in Honda Passport models such as the following, trunk pistons that support side forces and usual oil rings. Also, racing pistons come with lightweight and high strength regard to high RPM requirement, if any. These pistons are well designed, and depending on the make, can be made from aluminum alloys to enhance their durability throughout their use in the Honda Passport.
In search of affordable OEM Honda Passport Pistons? Consider browsing through our extensive inventory of genuine Honda Passport Pistons. Not only do we provide market-leading prices and a manufacturer's warranty, but we also pride ourselves on exceptional customer service and swift delivery.
Honda Passport Pistons Parts Questions & Experts Answers
- Q: What steps should be taken before installing the connecting rod and pistons on a Honda Passport?A:Before fitting the piston and connecting rod, provide that the cylinder bore is free from deposits, and the top land of each cylinder is lightly statutory, crank-shaft is properly inserted. Take off the cap of the number one connecting rod, be sure to remember the scratches made and then clean the bearing surface of the connecting rod with a clean cloth. The new upper bearing insert should be cleaned and should be inserted in the connecting rod so that the tab of the insert goes into the recess and the oil holes meet without using the lubricant. Do the same for the lower bearing insert working in the rod cap. Align in a circle the gaps of the piston ring around the piston; each rod cap bolt have rubber hose sections that can be slid over, to compress the rings of the piston while leaving a part of the piston skirt to allow easy insertion into the cylinder. Coat the piston and rings with clean engine oil, then fit a piston ring compressor and making sure that gauge mark is facing front of the engine more easily compressed the piston into the engine bore. When doing this ensure that they fit well on the block then slowly push the piston into the cylinder while placing the conntacting part of the connecting rod on the Crankshaft journal without a heavy force that may harm the piston or the rings. After installation, use Plastigage to check the connecting Rod Bearing oil clearance, see that the bearing faces are clean and grease before replacing the rod cap and tightening the nuts in three stages. Do it for the other assemblies with the bearing inserts and connecting rods clean, with attention to the right piston/rod combinations and with greasing the cylinder walls and the bearing faces. After all assemblies are in place perform a binding check on the crankshaft via rotation and measure the connecting rod end-play to specifications. In 3.2 L V6 engines, following the tightening of the main and connecting rod caps, fit the oil gallery assembly and fasten the bolts in the sequence. The balancer unit is located between the oil strainer and the crankshaft: it includes two counter rotating shafts linked to the crankshaft; backlash should be adjusted and is best checked by a dealer service department. Backlash can be altered by changing the spacer shim between the balancer unit and the engine block and after adjustment the balance unit has to be installed in the correct manner using the correct shim and then aligning it in the right manner before proceeding to tighten the retaining bolts.

Related Honda Passport Parts
 Honda Passport Rod Bearing
 Honda Passport Oil Pan
 Honda Passport Oil Pan Gasket
 Honda Passport Oil Pump
 Honda Passport Crankshaft Pulley
 Honda Passport Crankshaft
 Honda Passport Connecting Rod
 Honda Passport Timing Chain Guide
 Honda Passport Piston Rings
 Honda Passport Crankshaft Gear
 Honda Passport Crankshaft Thrust Washer Set
 Honda Passport Harmonic Balancer